Michael McFadyen's Scuba Diving - Aikoku Maru
The story of the Aikoku Maru is one of the saddest and most frightening of World War II. The final moments of this majestic ship were captured on photograph and truly present an impressive case for the utter stupidity of war.
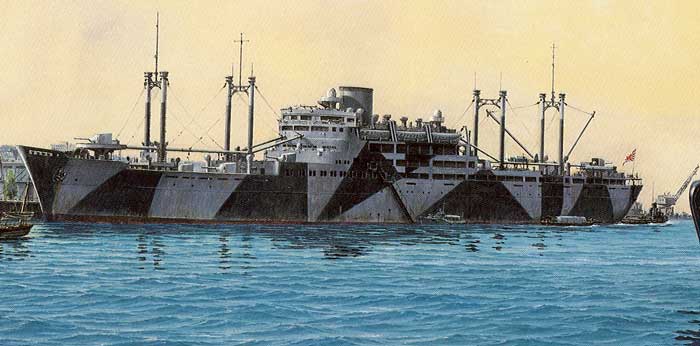
The Aikoku Maru was a very beautiful ship. She looked a lot like a smaller version of the famous P&O vessel, SS Oriana. The Aikoku Maru was laid down on 29 December 1938 and launched on 23 or 25 April 1940 for the Osaka Syosen KK (Osaka Merchant Marine). Note the length of time to build. Designed as a passenger-cargo vessel, she was planned to be used on the Japan to Africa run with two sister ships, the Gokoku Maru and the Hokoku Maru but in fact never entered this service (see later). There was to be accommodation for 48 First Class passengers, 48 "Special" Third Class, 304 "Regular" Third Class.
She was built by Tama Shipbuilding, Tama, Japan. The Aikoku was 10,438 tons gross, 150 metres (492.1 feet) long, 20 metres (66.3 feet) wide and powered by two Mitsubishi B&W diesels (total horsepower of 15,833hp) giving a maximum speed of 20.9 knots. Lloyds Register reports that the engines were 12 cylinders each built by the Tama Shipbuilding Company. She was not completed till 31 August 1941, a very long time indeed considering most vessels around this time only took a few months to be fitted out. She was supposed to be used exclusively in domestic waters, including Japanese occupied areas.
The Aikoku Maru
However, she had already been acquired by the Japanese Navy and converted for use as an armed merchant raider. Perhaps this was the reason it took so long to build and fit out the ship.
On 5 September 1941 she was registered (commissioned) in the Imperial Japanese Navy and attached to the Kure Naval District. Rear Admiral-Retired Okamura Masao (38) is the Commanding Officer. Okamura simultaneously assumes joint command of Kiyosumi Maru.
On the same day, installation of four 41st Year Type single mount 152-mm guns, two 76-mm/40 cal AA guns, Type 93 13.2-mm MGs and two 533-mm torpedo tubes started at Mitsui Engineering & Shipbuilding. On 15 October 1941 the fitting of one 1100-mm and one 900-mm search light and special heavy-duty booms for handling floatplanes was completed. The Aikoku Maru carried one Type 94 Kawanishi E7K2 "Alf" floatplane and another one as a spare. The seaplanes were located on the hatches of holds 4 and 5.
Another source says that the Aikoku Maru had guns placed on the bow and stern as well as four guns put adjacent to or near holds 2 and 3. Another two are believed to have been placed aft of the superstructure. There may have also been two twin torpedo launchers on the main deck behind the superstructure. Machine guns were installed on top of the bridge and behind the funnel and anti-aircraft guns were placed on the rear corners of the superstructure. These appear to be more numerous than what I have detailed in the previous paragraph.
A colour painting of the Hokoku Maru, identical to the Aikoku Maru
Also on 15 October 1941, the 24th Squadron (Raider) was officially established under Rear Admiral Takeda Moriji and attached directly to the Combined Fleet. Aikoku Maru, Hokoku Maru and Kiyosumi Maru were assigned to CruDiv 24.
On 31 October 1941 the Aikoku Maru departed Tamano and arrived at Kure. On 13 November 1941 she departed Kure and arrived at Iwakuni. On 15 November 1941 at 5.35 pm the Aikoku Maru and Hokoku Maru departed Iwakuni. On 24 November 1941 they arrrived at the standby position at Jaluit Atoll, Marshall Islands during Operation "Z" (this was the code name for the attack on Pearl Harbor). They refuelled and replenished from the naval supply base on Emidj Island.
On 26 November 1941 they departed Jaluit. At the outbreak of the Pacific War (when Pearl Harbor was attacked) on 8 December 1941, they were north-east of the Tuamotu Islands (French Polynesia). They then headed south-east. On 12 or 13 December 1941 (not sure if this was the Japanese or the local date) the two ships overtook and attacked the 6,210-ton American merchant ship SS Vincent. The Vincent was a fair distance north of Pitcairn Island in the South Pacific Ocean and steaming in convoy from Sydney to New York via the Panama Canal.
At 7.07 pm, the Hokoku Maru started shelling the freighter and fired a total of eight shells. About 7.35 pm, as a fire broke out aboard the Vincent, her crew abandoned ship in three life boats. Later, the Japanese fired a single torpedo that sent her to the bottom at S22º 41' E118º 19'. All nine officers and 27 crewmen survived and were picked up by Hokoku Maru.
On 31 December 1941 the Aikoku Maru launched one of her E7K2 float planes on a reconnaissance mission. In the afternoon the floatplane found and circled the unarmed 3,275-ton American freighter Malama. This vessel was on her way from San Francisco via Honolulu to Manila. After circling the ship several times, the plane flew off to the east. Soon after, the same plane returned and again circled the ship twice before it flew off to the west. The E7K2 failed to return to the Aikoku Maru. Despite a long search by both ships and the second E7K2, no trace was ever found of the missing aircraft.
On 2 January 1942 the two ships were south of the Cook and Society Islands. At 9.10 am, the remaining E7K2 from the Aikoku Maru found the Malama It circled and the started strafing the ship. Using international code, the plane ordered the ship to stop. At 2.15 pm, the plane returned armed with bombs. At 2.30 pm, the crew scuttled the ship and they and the passengers leave in two lifeboats. They scuttled the ship rather than let the Japanese capture her (she was bombed by the plane anyway) and the cargo of trucks, trailers and plane spares went to the bottom. After all the crew had escaped, the plane dropped four bombs that set the ship on fire. The Malama sank at S26º 39' W151º 24'. At 3.30 pm, the Aikoku Maru and Hokoku Maru arrived and picked up all hands.
In January 1942 the Aikoku Maru and Hokoku Maru nearly encountered Vice Admiral William F. Halsey's Task Forces 17 and 18 that were enroute to raid the Gilbert Islands and Eastern Marshall Islands. On 20 January 1942 they left their assigned area and terminated the sortie. On 30 January 1942 they were off the Gilbert Islands and the false markings on the ships and aircraft were removed.
On 4 February 1942 they arrived at Truk and left the next day for Hashirajima. While enroute they were told to proceed to Oita Bay to disembark their prisoners.
During the night of 11 February 1942 they intercepted and inspected a suspicious vessel that turned out to be the 5,114-ton Soviet transport Kym. On 13 February 1942 they arrived at Oita Bay where the 76 POWs rescued from SS Vincent and Malama were off-loaded. They departed the same day and arrived at Hashirajima in the the evening.
On 14 February 1942 they arrived at Kure. The Aikoku Maru began a refit and armament modernisation at the Kure Naval Yard. The Aikoku Maru's four 152-mm were removed and replaced by eight 3rd Year Type 140-mm/50 cal guns. The 140 mm guns were newer but still quite old. New Rufe sea planes were acquired.
During March 1942 Aikoku Maru and Hokoku Maru were converted to carry a supply of submarine torpedoes in one of their holds. On 10 March 1942 the Aikoku Maru and Hokoku Maru departed Kure for Hashirajima. They were now attached to Vice Admiral Komatsu Teruhisa's Sixth Fleet (Submarines). They were to carry torpedoes and stores for submarines, including 1,300 tons of diesel fuel, and supposed to go with the new SubRon 8 to the East Coast of Africa and Mozambique. However, it appears they stayed in Japan as on 12 April 1942 they departed Kure and on the evening of 15 April 1942 they arrived at the Hashirajima fleet anchorage. The commander of Aikoku Maru is Captain Okamura.
At 11 am on 16 April 1942 the Aikoku Maru departed Hashirajima with training cruiser IJN Katori for the Indian Ocean via Singapore and Penang, Malaya. Their mission was to support SubRon 8s, SubDiv 1s submarines I-10, I-16, I-18, I-20, and I-30 in the Western Indian Ocean. On the way the Aikoku Maru refuelled a number of the submarines. On 30 April 1942 the Aikoku Maru arrived at Penang. On 5 May 1942 she departed Penang with Hokoku Maru.
On 9 May 1942 they were 480 miles south-south-east of Diego Suarez, Madagascar. Here they captured the 7,987-ton Dutch tanker Genota at S17º 40' E76º 20E'. Over the next week the Aikoku Maru refuelled a number of submarines.
On 5 June 1942 near Durban in South Africa the Aikoku Maru shelled and sank the 6,757-ton British merchant Elysia, carrying some Allied troops, at S27º 19' E37º 1'.
On 17 June 1942 they again rendezvoused with the submarines of SubRon 8's Ko Detachment.
On 12 July 1942 the 7,113-ton New Zealand ship SS Hauraka was sailing from Fremantle in Western Australia to Columbo in Ceylon (now Sri Lanka). The SS Hauraka was captured. After her capture, a Japanese crew was put aboard and the deck crew were locked below. The engine crew were engaged under guard to run the ship's machinery. In the course of the voyage back to Japan the engine crew managed to throw most of the spare machinery parts over the side. As a result, the Japanese never obtained much use from the ship. It was later renamed Hoki Maru and now is one of the wrecks of Chuuk Lagoon, only just over a kilometre from the Aikoku Maru.
On 10 August 1942 the Aikoku Maru arrived at Seletar Naval Base, Singapore. A reserve aircraft was taken aboard. Aikoku Maru's submarine torpedo supply was increased to 70 for replenishment of SubDiv 1's subs. Two Type 96 dual 25-mm (2x2) AA were fitted.
On 25 August 1942 she arrived at Penang. About now Commander Oishi Tamotsu assumed command. In late August 1942 the Aikoku Maru was temporarily attached to the Southeast Area Fleet to ferry troops from Singapore to Rabaul.
During September 1942 she was in Singapore and the dazzle camouflage paint previously painted at Kure was replaced by a new experimental design devised by Lieutenant Commander Fukui. The new dazzle camouflage was painted in three colours: black, dark grey and light grey. The Hokoku Maru was similarly camouflaged in light and dark grey (as depicted above in the painting).
On 20 September 1942 Aikoku Maru was assigned to the Southwest Area Fleet (Eighth Fleet). She was tasked to transport elements of Lieutenant General Sano Tadayoshi's 38th Infantry "Hiroshima" Division to Rabaul, New Guinea for the reinforcement of Guadalcanal, Solomon Islands. On 24 September 1942 she arrived at Brown Island, Eniwetok, loaded some provisions, and then departed for Rabaul. On 6 October 1942 she left Rabaul for Singapore via Penang.
On 10 October 1942 the Aikoku Maru was reattached to the Commerce Raiding Unit and on 24 October 1942 she left Penang.
On 1 November 1942 Commander Oishi was promoted to Captain and the ship departed Singapore with the Hokoku Maru for a raiding mission in the Indian Ocean. On 7 November 1942 they passed through the Sunda Strait and enter ed the Indian Ocean.
On 11 November 1942 south-west of the Cocos Islands the Hokoku Maru approached the 6,341-ton Royal Dutch Shell tanker Ondina and her escort, the Australian-built Royal Indian Navy minesweeper HMIS Bengal. This was at S19º 45' E92º 40'. The Bengal's Commanding Officer, Lieutenant Commander William J. Wilson, RNR, moved towards the Hokoku Maru in an attempt to protect the tanker.
At 3.45 pm (Japan time), the Hokoku Maru opened fire. Both ships were damaged. The Aikoku Maru was six miles north-west of the scene and getting closer. A shot from Ondina's 4-inch gun hit Hokoku Maru's starboard torpedo tube. The torpedo inside detonated and a fire broke out which raged out of control and reached the aft magazine. Numerous explosions blew out the sides of the hull. At 5.52 pm (Japan), the Hokoku Maru sank by the stern.
The Aikoku Maru arrived on the scene and hit Bengal. Lieutenant Commander Wilson, confident that Ondina could outrun the Aikoku Maru, disengaged his attack. The Aikoku Maru scored six hits on Ondina and virtually disabled her. The Aikoku Maru then fired two torpedoes at the tanker but both missed. With her ammunition used up, Ondina's crew abandoned the ship.
The Aikoku Maru rescued 278 of the Hokoku Maru's crew and then fired a last torpedo at the Ondina before departing for Penang. After the Aikoku Maru left the scene, the crew of the Ondina reboarded her and temporary repairs were effected. She limped back to Fremantle, Australia.
The idea of using merchant raiders soon lost support and the Aikoku Maru was moved to a role of transport.
On 16 December 1942 the Aikoku Maru is at Rabaul. She was assigned to Vice Admiral Mikawa Gunichi's Eighth Fleet. She departed for Madang, New Guinea in an Attack Force with her sistership Gokoku Maru, light cruiser IJNS Tenryu and destroyers IJNS Isonami, IJNS Inazuma, IJNS Suzukaze and IJNS Arashio.
On 17 December 1942 the aircraft carried by the Aikoku Maru were transferred to the 9th Base Unit and on 18 December 1942 she arrived at Madang and unloaded her cargo. At 7.32 am, the Attack Force was bombed unsuccessfully. At 5.44 pm, Gokoku Maru was hit by a bomb from B-17s of the 43rd Bomb Group, Fifth Air Force. The Aikoku Maru was not damaged.
On 19 December 1942 she arrived back at Rabaul. The next day she departed with Gokoku Maru. On 29 December 1942 they arrived at Kure. On 4 January 1943 she departed Kure and arrived at Pusan, (South) Korea.
At 3.30 pm on 6 January 1943 as part of Operation C (HINOE-GO) - The Reinforcement of New Guinea - Aikoku Maru and Gokoku Maru departed Pusan for Wewak, New Guinea, on a troop transport mission with numerous warships and transports.
The Aikoku Maru was carrying the IJAAF 209th Airfield Construction Unit and 14th Airfield Service Unit, a total of 691 men plus 34 vehicles. This was a very small passenger and cargo load for such a large ship. At 10.30 am on 14 January 1943 they arrived at Rabaul where the Aikoku Maru landed troops and 18 vehicles.
At 5 pm on 15 January 1943 the Aikoku Maru departed Rabaul. The next day when east-north-east of the Admiralty Islands, the Aikoku Maru was attacked by a submarine that fired two torpedoes at her. Both missed. On 17 January 1943 she arrived at Palau. On 19 January 1943 she departed Palau. On
21 January 1943 the Aikoku Maru disembarked troops at Wewak, New Guinea. She departed the same day. On 24 January 1943 she arrived at Tsingtao.
On 29 January 1943 the Aikoku Maru was part of Operation HINOE-GO No. 3 ("C-3"). She departed Tsingtao at 9 am (Japan time), carrying 1,602 soldiers of the IJA's 20th Division, 18 vehicles and 21,171-tons of general cargo. On 7 February 1943 an additional 133 soldiers, 4 vehicles and 133-tons of general cargo were collected from Palau. She left Palau with the Kiyosumi Maru as the second element of HINOE-GO No. 3.
On 19 February 1943 Aikoku Maru departed Palau again after embarking additional soldiers and general cargo (this may be the same action as above). On 19 February 1943 when off Palau, the submarine USS Runner skippered by Lieutenant Commander Frank Fenno attempted to intercept the second group of C-3 but was bombed by an E13A1 "Jake" of the 902nd NAG based at Palau. The Jake dropped a single 250-kg bomb that destroyed the Runner's periscopes and sound gear and forced Fenno to return to Pearl Harbor.
On 23 February 1943 the Aikoku Maru arrived at Wewak where she unloaded her cargo. In late February 1943 she departed Wewak for Takao, Formosa (now Taiwan). On 31 March 1943 she arrived at Takao. She left on 2 April 1943 and on 5 April 1943 she arrived at Kure. Captain-Retired Mizusaki Shojiro (38) assumed command around now.
Over the next couple of months she departed and returned to Kure a number of times, never travelling too far. It is reported that the Aikoku Maru was again modified in June 1943 at the Kure Naval Yard, but this may have been the work previously mentioned.
On 6 July 1943 the Aikoku Maru departed Kisarazu, carrying ground personnel and equipment of the 201st NAG. On 10 July 1943 while on her way to Truk (now Chuuk - although another report says she was on her way to Rabaul from Truk), she was attacked by the submarine USS Halibut at about 9 pm. The Halibut was skippered by Lieutenant Commander Phillip H. Ross and 170 miles north of Truk he fired six torpedoes by periscope and claimed three hits. Only one torpedo actually hit, but this killed 21 people. On 11 July 1943 she arrived at Truk. The Aikoku Maru appears to have left Truk fairly soon after as on 15 July 1943 at about 3 pm, she was attacked by the submarine USS Tinosa (SS-283) skippered by Lieutenant Commander Lawrence R. Daspit. Daspit fired four Mark-14 stern torpedoes at her, but they all missed.
When repairs were made at the Kure Naval Yard in August 1943, the main guns were then removed and two 8cm guns were placed in the stern and bow platforms.
Around this time the Aikoku Maru started being used to transport soldiers (normally "rikusentai" - navy sailors trained as infantry) and supplies from Japan to Rabaul in Papua New Guinea. She may have even been used for this when she was torpedoed. The ship made at least four trips to and from Rabaul.
On 1 October 1943 she was rerated as a special (miscellaneous) transport and assigned to the Kure Naval District. She departed Kure that same day.
On 6 October 1943 the Aikoku Maru was in the Mitsui Engineering and Shipbuilding Tamano shipyard for a refit (I am pretty sure this is not the repairs mentioned above which happened in August). Additional armament was also installed. On 20 October 1943 the Aikoku Maru received a new commander, Captain-Retired Nakamaruo Yoshizo (36).
On 31 December 1943 the installation of two 152-mm guns and four twin Type 96 25mm (4x2) AA machine guns was completed.
On 16 January 1944 she departed Kure for the last time. The next day she arrived at Tokyo Bay. On 21 January 1944 the Aikoku Maru departed Tokyo Bay and arrived at Yokosuka the same day. Here she embarked personnel of the 66th Naval Guard Unit (629 men), 1,200 mines, dynamite, artillery shells, food and construction materials. These were all originally destined for Brown Island, Eniwetok, Marshall Islands.
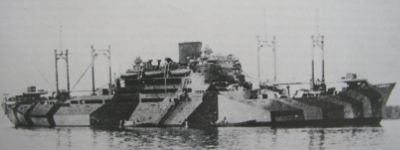
Aikoku Maru after being painted in camoflage colours
On 24 January 1944 she departed Yokosuka and arrived at Tateyama the same day. On 25 January 1944 she departed Tateyama for Truk in convoy with 11,930-ton submarine depot ship Yasukini Maru and the Akagi Maru escorted by destroyers IJNS Michishio and IJNS Shiratsuyu and the minelayer IJNS Nasami.
At about 2 am on 31 January 1944 when 300 miles north-west of Truk, USS Trigger (SS-237), skippered by Lieutenant Commander Robert E. Dornin, attacked the convoy. Dornin fired three torpedoes by radar at the largest ship and the submarine's Executive Officer, Lieutenant Edward L. Beach, fired three other torpedoes from the bridge at the nearest destroyer using the Target Bearing Transmitter (TBT). The TBT's torpedoes ran erratically and missed. The three fired by radar also missed the big ships, but one hit and sank the Nasami.
When still on the surface, the Trigger turned away from a destroyer in the convoy and fired four stern torpedoes at her. They all missed. Masked by her heavy diesel exhaust, the Trigger headed away on a reciprocal course to the destroyer. Unaware that her opponent was on the surface, the destroyer dropped depth charges.
Dornin soon made a high speed "end-around." At about 5 am he fired five torpedoes in a surface radar attack on the largest ship. The Yasukuni Maru was hit by two torpedoes and sank about 30 minutes later at N9º 15' E147º 13'. There were 43 survivours. The Aikoku Maru escaped undamaged.
On 1 February 1944 the remaining vessels in the convoy arrived at Truk. Soon after she departed Truk for Brown Island, Eniwetok, Marshall Islands (also reported as Wake Island) with troop reinforcements, but was forced to abort due to American aircraft activity. I believe that she arrived at Pohnpei instead on 14 February 1944 but could not discharge completely her cargo of soldiers and supplies. The next day she left for Truk, arriving in the lagoon late on 16 February 1944.
All of the Combined Fleet's capital ships based at Truk had departed in anticipation of an American air raid as there were some surveillance flights over Truk a few days earlier. The Aikoku Maru began loading ammunition almost immediately so she would be able to depart for Rabaul as soon as possible. Troops of the 1st Amphibious Brigade aboard her were apparently crammed into their makeshift billets.
The front hold of the Aikoku Maru explodes
On 17 February 1944, the first day of "Operation Hailstone", the Aikoku Maru was anchored off the channel between Eten and Dublon Islands. This was one of the main anchoring points in Chuuk Lagoon and was close to the San Francisco Maru and Nippo Maru as well as many others. A photograph taken very early shows the Aikoku Maru lying untouched facing the east.
At dawn, on the first day of the raids, planes from USS Intrepid (CV-11) attack the Aikoku Maru. The first bomb hit the officers' wardroom galley and started a fire that spread quickly. She took three more hits by bombs.
At about 0815 the Aikoku Maru was attacked by Avenger dive bombers from USS Essex and USS Intrepid. At the same time, an Avenger TBM-1C (serial number BN 25270) from the USS Intrepid, piloted by Lt James Erwin Bridges, with crew Robert Ellis Bruton and James Albert Greem were approaching the ship from wave height. While the TBM-1C was attacking, the ship was hit in the front section of the ship by two bombs dropped from planes from the USS Essex. These bombs had a devastating impact, causing the Aikoku Maru to violently explode. Lt Bridges' (incorrectly referred to as Briggs in some reports) plane had just released its torpedo and was making good its escape, pulling up to clear the ship it had just attacked, when the other planes' bombs exploded. Lt Bridges, his plane and crew were destroyed. It is also possible that the plane was damaged by anti-aircraft fire and crashed into the bridge, falling into the hold causing the explosion. Whatever happened, it is known that Lt Bridges' Avenger did not return to her ship.
Another report says that a Mark 13 aerial torpedo hit her No. 1 hold and set off ordnance that sheared off the entire foreship. However, I do not believe that this report is correct.
To say that the resulting explosion was massive is to understate the situation. Two photographs taken by the attacking American aircraft show a huge "nuclear-bomb" type mushroom cloud rising over the wreck. Within a few seconds the cloud had risen thousands of feet in the air. Within 60 seconds of the fatal attack, the Aikoku Maru sank with the loss of not only all lives on board, but also the lives of some men on adjacent smaller boats and barges. It is not known how many died, but it is estimated that at least 450 men were lost. Another report says that virtually all of the ships' crew including Captain Nakamaruo and 945 sailors, passengers and men of the First Brigade, died in the explosion.
On 30 March 1944 the Aikoku Maru was removed from the Navy List.
The Aikoku Maru was discovered by Jacques Cousteau's expedition in 1969 and then refound by Sam Redford in 1972. In July 1980 the remains of about 400 crew were recovered by a Japanese group, cremated and the ashes returned to Japan.
Today the Aikoku Maru is located to the north of the gap between Eten and Dublon Islands. A GPS Reading of N7º 22' 22.0" E151º 54' 42.6" using WGS84 as a datum will put you on the rear of the superstructure. She lies upright on a sandy bottom which is about 62 metres deep, although as you will see later, it is a bit deeper on some parts of the wreck.
The stern gun of the Aikoku Maru Photo by Kelly McFadyen
Phil Rose on the stern of the Aikoku Maru Photo by Kelly McFadyen
Another photograph of the stern gun
The stern helm of the Aikoku Maru
Dive boats generally anchor on the rear of the main superstructure. The depth here is about 33 metres. As this is a huge wreck and it is very deep, you will need two dives to see all the wreck in a bit of detail, although you could get a quick overview on one dive. The following is a description of the first dive as well as a bit of extra information you could do on a second dive.
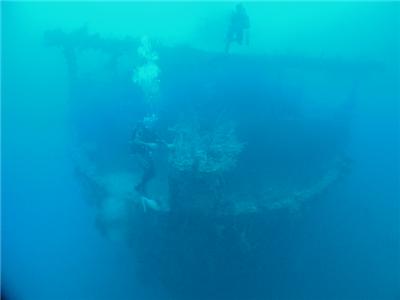
To start the dive you can swim to the stern where there is a huge gun platform with a large gun, still pointing high towards the rear (depth 48 metres). Under the stern you can drop down to 62 metres to see the twin props and single rudder. Only the tips of a single blade on each prop show as well as the top of the rudder. From here, ascend to the stern house where you can easily enter the compartments and have a quick look around. They are very large and safe to explore as the deck of the poop deck was timber and has been totally eaten away.
The rear kingpost of the Aikoku Maru
Kelly McFadyen comes past the rear cabin area
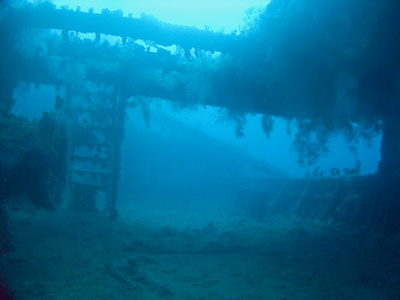
The rear hold (Hold 6) appears to be empty as is the next hold forward (I did not explore Hold 5). The hold straight behind the superstructure (Hold 4) is elevated from the main deck and is not as big as normal holds. It contains hessian bags, possibly full of cement. The depth here is 57 metres.
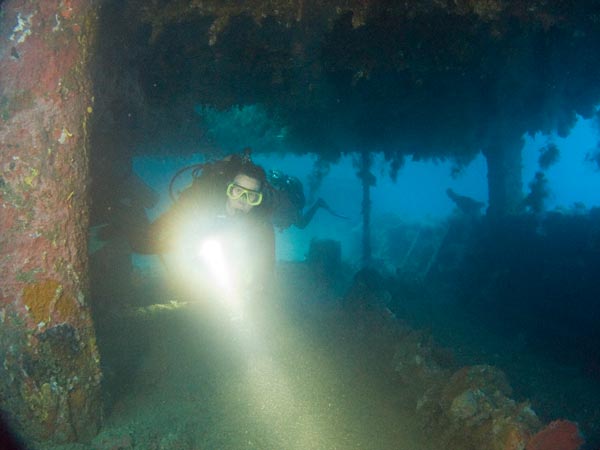
After coming up out of the hold you can enter the superstructure either of two doors on the next level up. These take you inside the living area of the ship. It appears that there were cabin walls all along the port and starboard sides but these have been removed or perhaps eaten away by worms. In any case, there are numerous wash basins all along the now very open areas. In between the two areas, in the centre of the ship, there are a number of passageways that run from one side to the other. These give access to a dozen or more bathrooms. Each bathroom has a normal bath (as distinct from the Japanese baths in most other Chuuk wrecks) and toilets or bidets. Care needs to be taken as there are some wires hanging down in the passageways and open areas. The depth in here is about 42 metres.
Under the poop deck on the starboard side Photo by Kelly McFadyen
Kelly on a section of the rear deck of the Aikoku Maru
By this time you will need to start ascending a bit so exit out a door or window onto the top of the superstructure. Here you will see a number of very interesting things. The first and most obvious (and already seen on the way down) is the huge funnel (top 27 metres), still standing erect. On each of the two rear corners of the top deck there is a single twin barrelled anti-aircraft gun. The port gun is frozen in the firing mode, with one barrel fully extended and the other retracted. The gun is aimed low, possibly firing at the plane (or planes) that sank the Aikoku Maru. The starboard gun is aimed high but was probably not firing at the time she was destroyed.
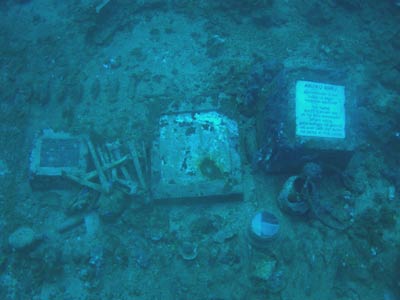
There is a huge platform located between the two guns. It looks like a platform, possibly for a searchlight. In front of this there are three plaques. In 1997 when I last dived it there was only one to the Japanese who died on the ship. There are also a number of skulls and bones located on and/or around the plaque (see the photo at below left). In 2011 the right-hand plaque reads:
AIKOKU MARU
SUNK FEBRUARY 17 1944
DURING US NAVY'S
"OPERATION HAILSTONE"
THIS PLAQUE
PLACED FEBRUARY 1994
ON THE 50TH ANNIVERSARY
OF THIS ACTION
COMMENORATES THE BRAVERY
AND MANY LIVES LOST DURING
THE BATTLE AT TRUK LAGOON
The middle plaque is missing the metal wording and the left hand one was so small I could not read what it said when I reviewed my photograph.
This is normally the end of a single dive although you could quickly swim forward to see where the ship was blown in half.
The starboard side AA gun
The plaques on the rear of the superstructure
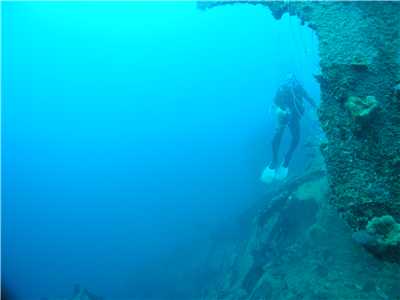
On a second dive I would swim forward to along the port side of the superstructure. All of a sudden, the ship just ends. This is dramatic. It is as if a giant guillotine has plummeted out of the sky and landed straight in front of the funnel. The ship comes to a complete end. In front of here there is nothing at all, just a hole in the sand bottom, caused by the massive explosion, and a couple of pieces of hull plating. No other traces appear to remain at all.
Where the ship has been split the port hull is bent back a little but the main part of the ship is just cleanly cut through. Once you have examined this frightening and amazing scene, drop to the sea floor in front of the middle of the wreck. This leads to the engine room. You will be at about 63 metres. As you approach the engine room, you can see a significant set of stairs that drop down into the engine room. Unless you are planning to just explore the engine room, there is only time to shine a torch down there and then start your ascent to an upper deck. As you go up you will see a door on the port side (the right side as you look at it).
Some of the bones of crew still found on the Aikoku Maru Photo by Kelly McFadyen
Phil Rose at the front end of the Aikoku Maru Photo by Kelly McFadyen
This door leads onto a main deck and you can explore through here. There is evidence of many more cabins having been originally been located here as there are wash basins galore. Swim towards the stern and then cross over to the starboard side and continue towards the rear. You can exit a number of places, but I went out the end most door. This puts you over the smaller hold referred to above (which has cement bags in it).
Depending on the time spent examining the deeper section at the break, this is about all you will have time for on this dive.
Subsequent dives could be done into the areas deeper under the superstructure or below the stern area.
On my two dives here I did about 17 to 19 minutes each dive. This requires decompression of about 2 minutes at 9 metres, 5 minutes at 6 metres and 11 minutes at 3 metres.
An awe inspiring wreck that really frightened me, not about the dive, but about the futility of war. The almost vertical, clean cut across the hull in front of the funnel is amazing to see, emphasising the strength of the explosion. A must do wreck for the more experienced diver.
VIDEO
Video taken by Kelly McFadyen during our 2012 trip to Chuuk.
 v6.00.307 © 2003-2005