Michael McFadyen's Scuba Diving - Bare Island Deep Wall
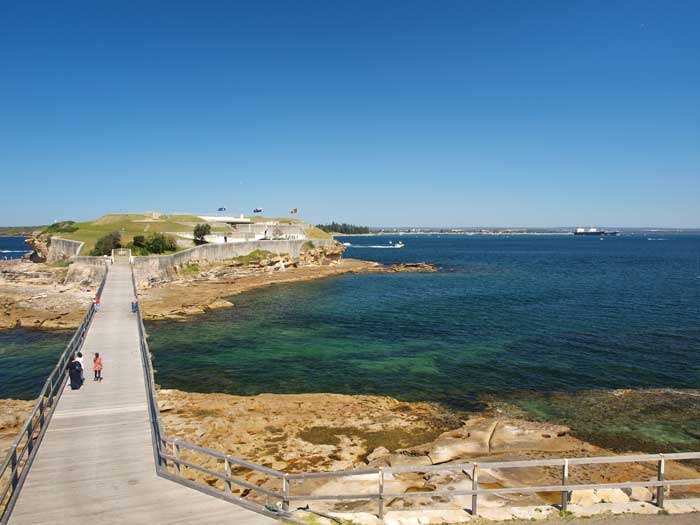 |
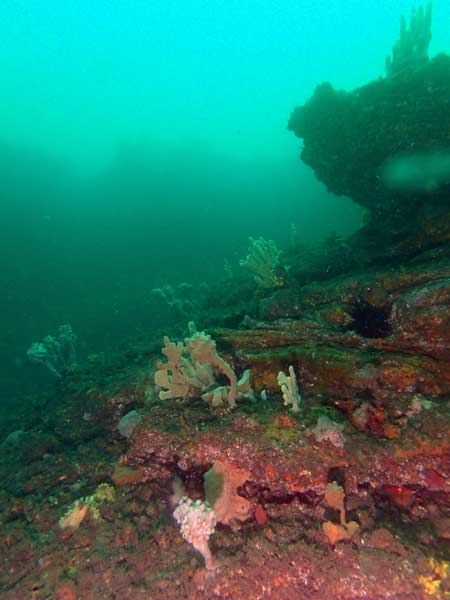
A photograph of Bare Island Right on a perfect day
The best entry point is at the far right of the island, to the left and above the rocks jutting out
The exit point is on the island just to the right of the bridge |
In Sydney, the location I have dived most is Bare Island (over 700 dives). There are many dives that you can do here. In this article I will describe another of these dives.
Located 20 kilometres from the centre of Sydney, Bare Island is part of Botany Bay National Park. From the city, travel along Anzac Parade or Bunnerong Road to La Perouse. Upon arriving at La Perouse, park on the edge of Anzac Parade above the island as close to the island's access road as you can. Walk to the edge of the headland overlooking the island to check the water conditions as well as the entry and exit points. This dive can be done in virtually all seas, even those from the south-east. I have dived here many times when surfers have been surfing off the eastern end of the bridge that joins the island to the mainland. It is only in the hugest of seas that you cannot dive this site. One thing that can affect the site is that after prolonged periods of very heavy rain, the visibility can be reduced to one or two metres.
If you asked me back in the mid-1990s I would have said that even at its best, the visibility only got to four or five metres. However, since about 1999, visibility here has improved dramatically. In 2002 I dived here 10 times. The visibility averaged almost 10 metres on these dives which is certainly much better than the previous 13 years. In May 2003 I dived here and had 15 metres and in December 2003, January 2004 and December 2005 I had at least 20 metres on the deeper reef. The tides do not really have much impact on a dive although sometimes an outgoing tide can cause a current in the deep section of the dive. This is normally when there has been a very large high tide. Visibility is sometimes better on high tide but I have also had good visibility at low tide.
 |  |
A satellite photograph of Bare Island showing the reef
Entry point is far left of the island | A map of Bare Island (Right)
Click to enlarge |
 |  |
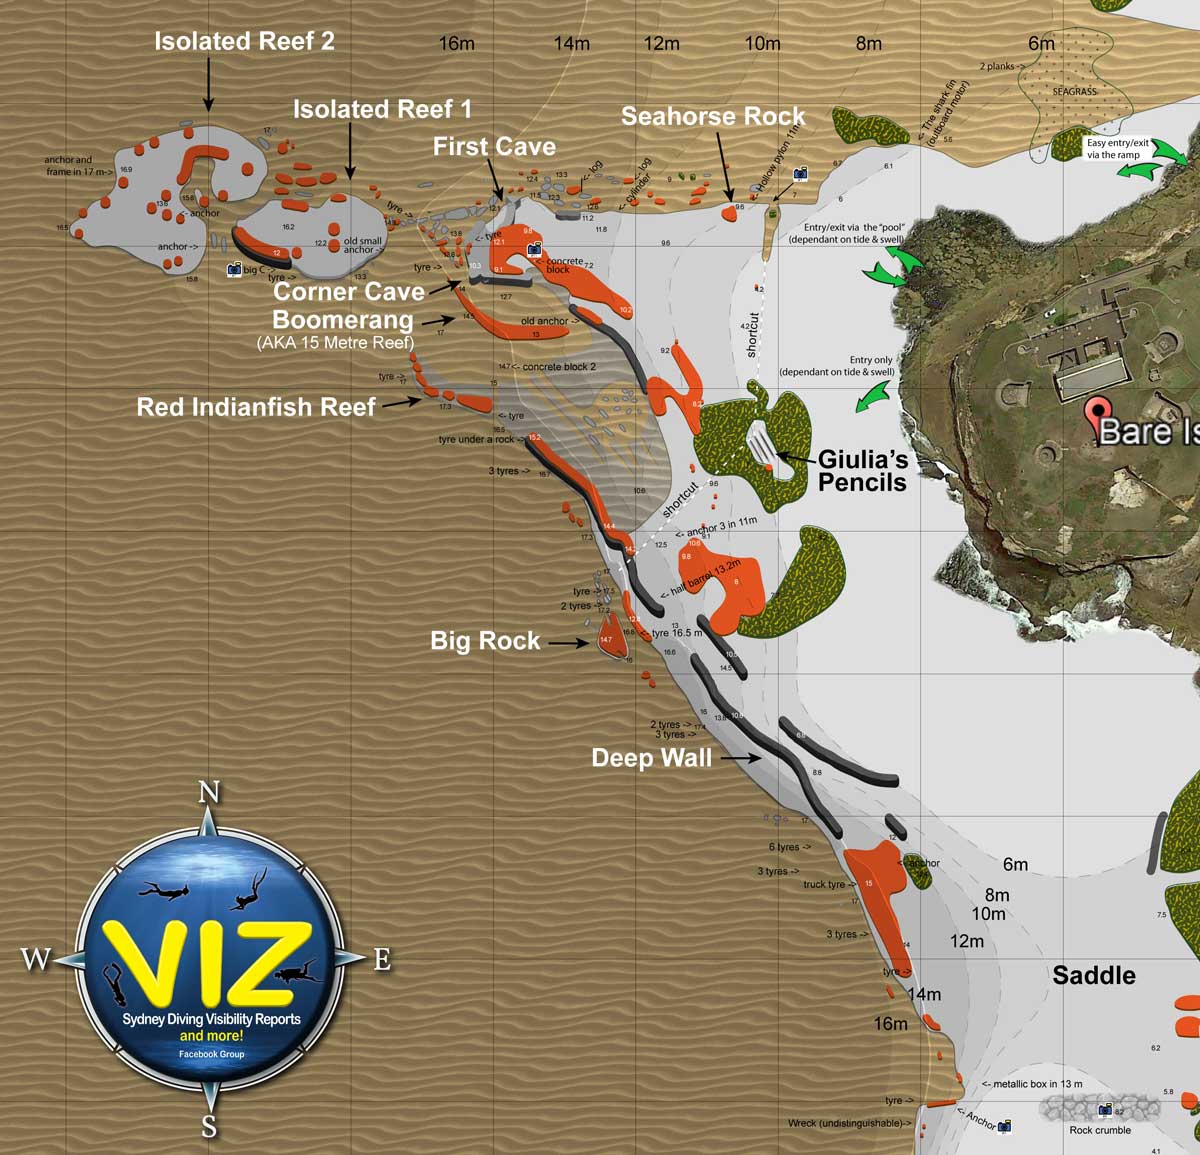
A new underwater map of Bare Island created by Marco Bordieri from www.viz.net.au.
For a much larger pdf version of this map, click here.
Used with permission of Marco Bordieri | Information about the map at left and below |
 |
A new underwater map of the western side of Bare Island created by Marco Bordieri from www.viz.net.au.
For a much larger pdf version of this map, click here.
Used with permission of Marco Bordieri |
 |
This shows the predominant tidal currents at Bare Island. Incoming are the currents to left, outgoing to right. Created by Marco Bordieri from www.viz.net.au using my information.
Used with permission of Marco Bordieri |
BARE ISLAND DEEP WALL
Originally I had a different article here describing a number of ways to dive this site, including your first dive. However, in 2026 I revised it to simplify the article as well as provide greater guidance to divers before they do their first dive here.
Basically, I recommend that you first do the following dives before even attempting this dive UNLESS you are accompanying someone who knows this site very well. If you attempt to do this dive without first doing many other dives on the shallower parts of the reef, you are likely to get lost, run out of air and surface way out in the open water.
PREFERRED STARTING POINT â WESTERN POINT OF ISLAND
 | 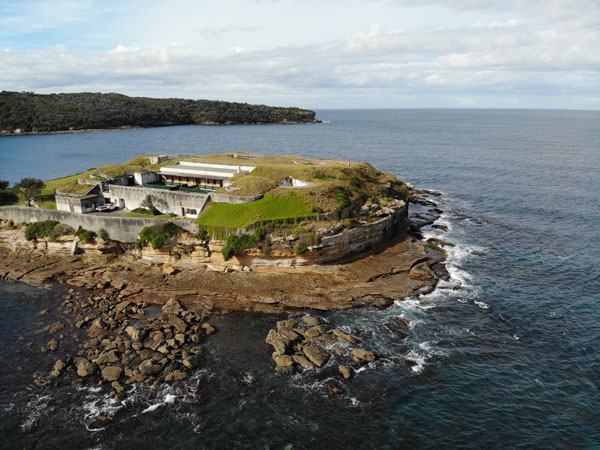 |
| A drone photograph of Bare Island from the north | A drone photo of the north-western corner of the island. The entry point for most dives
is the bottom right corner of the rock platform, the pool entry point is fairly obvious |
The best way to do this dive from the shore is to walk right to the back right (western) side of Bare Island. You will need extremely calm seas to do this dive. It is preferable to have an incoming tide but you can also do on an outgoing tide so long as there is a not a big difference in the height between low and high. However, you need to be prepared to alter your dive plan should you encounter strong outgoing currents. This can even happen when there is supposed to be an incoming tide!
 |  |
| Mandy Durand on the main part of the Deep Wall | Looking back towards the Deep Wall from Big Rock (as per map above) |
The entry point will depend on how high the tide is as the water off the rock platform is quite shallow, even at high tide. At higher tides, the water will be over the rock platform and you will need extra care. Check out the spots to the left and right of the flat rock for best spot to enter the water. Note, you can generally not exit here due to the way the platform meets the water.
Enter the water and swim out for 15 metres. Once you descend, head south-west or on later days, south-south-west. The depth at first is two metres and it increases to 8 metres over two minutes before flattening out for 30 seconds before dropping again sloping more gradually to about 15 metres. The bottom is rock with kelp and then sand with bits of sponge on rocks. After five minutes you should hit a deeper drop off to 18 metres. Just before this there is a sort of crack in the rock bottom that is very obvious.
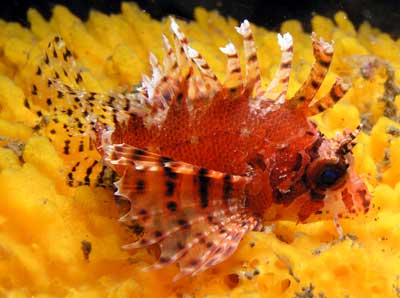
The wall here is very prominent and drops over three metres. There are some overhangs, cracks and even a small cave. On the sand there are also some isolated rocks. One is a much larger rock we call Big Rock (see map above). I usually go out and around this before heading back to the west but on a first dive, just turn right. Keep an eye out for red Indianfish in this area. Along this section of reef there used to be sea dragons and in some spots, very prolific fishlife. You can even reach 20 metres here on a high tide.
 | 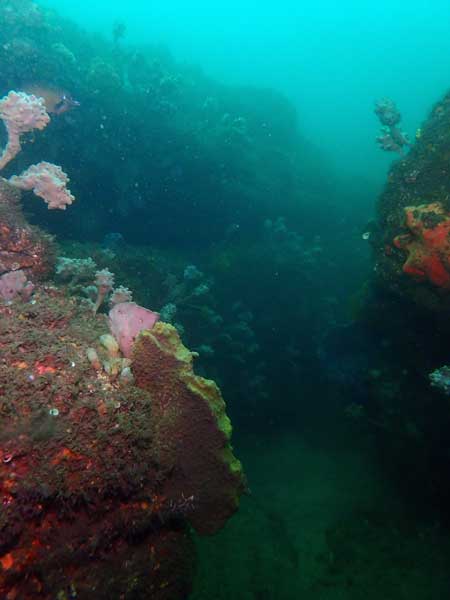 |
| Another photo from Big Rock towards the Deep Wall | The small gully a bit further on from Big Rock |
As mentioned, on your first dive here you should turn right and follow the reef to the north-west. On later dives you can explore the rocks off here and once more experienced with the site, head south for a bit and then come back around the rocks off the wall. The isolated rocks here have lots of nice growth and are home to heaps of things. We regularly see pygmy pipehorses here, as well as red Indianfish. We have also seen big belly sea horses and used to see sea dragons. These rocks also have had pipefish on them at times.
On later dives you can head south for a bit if you are very experienced and good on your air consumption.
 |  |
| A baby sea dragon on the Deep Wall | A dwarf firefish on the Deep Wall |
Once you are heading along the wall in a north or north-west direction check the wall out for big belly sea horses on the sea tulips. About 15 metres on the wall turns right and then becomes less prominent right on the sand. You will be again heading north-west and will pass the site where the old Admiralty anchor used to be. There are a couple of small rocks off the main reef edge. Once you see these, within five metres you may see pygmy pipehorses. There are some small overhangs here which sometimes have blue devilfish in them. The depth is about 17 metres.
From here follow the sand edge to the north-west. You will come to a sort of sand gully that runs more to the north than the reef you have been following. On 6 March 2008, we found the wreck of a fibreglass half-cabin boat here. It appeared to have been in the water only a couple of days. It was jammed between the two sections of reef.
The motor, auxiliary motor, radio and everything else was missing. The bung was also missing. There was no apparent damage to cause it to sink. However, I later heard that NSW Maritime had a report that a boat had engine problems and rolled onto a reef somewhere near here. What happened to the engines is hard to fathom. Very suspicious! Anyway, on 27 April 2008, it was gone. There was some damage to the reef on the western side of where the wreck was located as if the wreck had been bumping it. We searched for about 40 metres to the west, north-west and north but found no side at all of it or damage to the reef if it had been dragged over it. What happened to it? I later heard that it was salvaged.
Go up the sand gully. On your left the reef is low and flat and covered in sea whips. We call this Red Indianfish Reef as it used to be home to red Indianfish on most of the dives we went past it. About 20 or so metres along you will see a large concrete block off to your right. This was put here for an unknown reason when in 2011 Energy Australia put in an electricity cable from La Perouse to Kurnell.
Look on the block as there are sometimes some very nice nudibranchs here, including fine-lined tambjas and Parramatta nudibranchs (aka Vercos tambja). From here head north across the sand. In very good visibility you can see the reef ahead, it is about 15 metres across. There are very often spiny gurnards on the sand.
The new reef is 15 Metre Reef (as it is about 15 metres deep). On the above map it is called Boomerang Reef. This is a very low rocky reef covered in sponges, sea whips, sea fans and sea tulips. Turn left and follow it to its end, about 25 metres away. It has a dog-leg in the middle. There are a couple of small overhangs along the way. The reef used to have pygmy pipehorses on it and normally has some interesting nudibranchs.
At the end, again turn right and head north across the sand. It is about 10 metres to the main part of the Bare Island reef and you will be at Sea Horse Corner. This is the logical end of the reef if coming from the bridge as per Bare Island Right dive.
As you should have dived to here before from the shore, you will know the way back to the exit from here. Basically, follow the main reef edge to the north-east and east all the way back to the rock platform near the bridge.
Note that this dive will take about 55 to 60 minutes at a minimum, although you could rush and do it in 50 minutes. Again, I would recommend a large tank. Personally I take about 80 minutes to do this dive as I know the reef and how much air I need to have at each part of the dive.
 |  |
| Baby pygmy pipehorse on Deep Reef - May 2006 | The anchor on the Deep Wall |
From here follow the ledge to the left (westerly) and after 20 metres it takes a small turn to the right before turning left again. After another 15 metres it again turns to the left and sort of stops. Along this section you can sometimes see sea horses. From here, in good visibility (20 metres or better) you will see the main Bare Island Reef off to the north-north-east. Swim over and the depth will be back to about 14 metres. You should come across the overhangs near the corner (we call it Sea Horse Corner or Cave)
In poor visibility you will have to be a bit careful to ensure you do not keep following the 15 metre ledge across to the smaller rocks which takes you away from the main reef to the Bare Island Isolated Reefs mentioned above. Head north once at the corner and have a look in this area for sea horses (as I mentioned we call it we call it Sea Horse Corner or Cave). There are normally one or two here (November 2005 to May 2006) and I have seen up to six or seven but since 2010 we have only seen one every now and then. See the Bare Island Right dive for more information. You will then pass the two caves. Head out away from the first cave and there are some rocks and sections of reef that are home to some very nice fixed marine life and heaps of different nudibranches can be seen on the growth.
 | 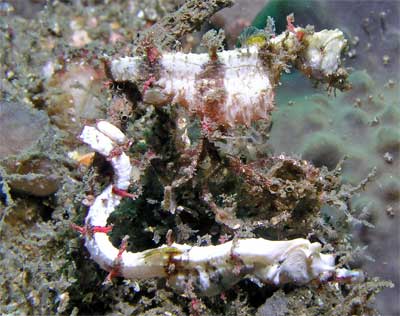 |
| Pygmy pipehorse on Deep Reef | Two pygmy pipehorses on Deep Reef
The bottom one is the one in the photo at left |
From here it is a matter of following the reef all the way back to the boat ramp on Bare Island (that is the opposite of the way you came out if you did dive 1).
Note that there can sometimes be strong currents in the 16 to 19 metre depth. If you encounter this, be very careful and alter the dive to not include the Deep Wall. High tide offers less or nil current and best visibility, but other tides can also be very good. This dive will take at least 50 minutes and more like 60 minutes, even if you do not spend too much time at the deep wall and loitering on the way back. You will need good air consumption and should take a large tank rather than a small one.
ALTERNATIVE STARTING POINT â THE POOL
If the seas are a bit too rough for going in off the western point, an option is to walk almost out to the far western point of the island and enter the water in the sort of pool that is formed by the two piles of rocks just inside the actual point. Once in the water, swim out on the surface through the "heads". At low tide, the bottom is very shallow and you may need to haul yourself over the rocks.
Once in deeper water, head south a little and then descend and head to the south. Follow the directions earlier.
ALTERNATE OUTGOING TIDE OPTION â WESTERN POINT
If the tide is outgoing you can start the dive as above but if you get to the 14 to 15 metre depth and the current is too much, turn right and head in a north-westerly direction. Eventually you will come to the Not So Deep Wall (see that dive). Follow the reef here to the north-west to Sea Horse Corner or onto 15 Metre Reef. Then follow the reef back.
If you get to the Deep Wall and then find the current is too strong, go back up to the top of the wall and then head north-west. You can do this at any time along the wall. If in doubt, head north till you hit shallower reef walls.
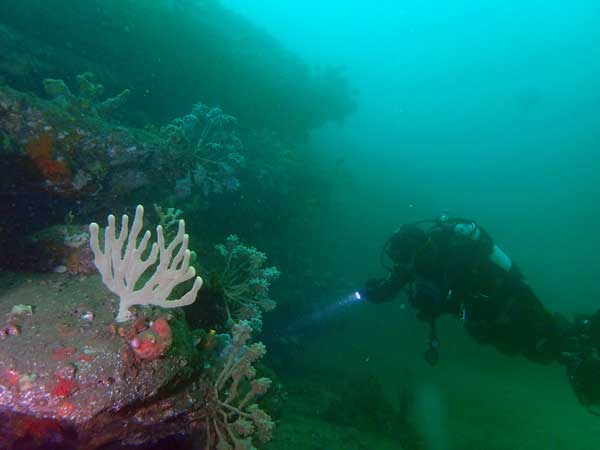
 |  |
| A cuttlefish on the Deep Wall hiding in a sponge on the Deep Wall | Pygmy pipehorse on 15 metre ledge |
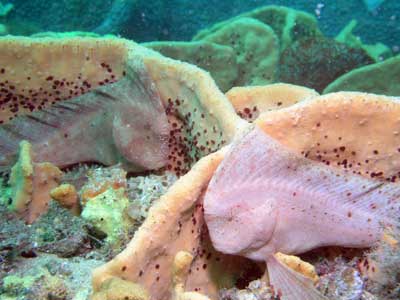 |  |
| Two red Indianfish on the 15 metres reef | A close up of a common sea dragon at Bare Island |
BOAT OPTION
Use a boat to get to the site. If you have a boat, you can anchor near 33° 59' 35.369" S 151° 13' 47.646" E (note that all my GPS Readings are using WGS84 - if you use any other datum, you will need to convert the reading - see my GPS Page for more details). This anchor spot is near the southern most wall, caves and overhangs. From the anchor spot head north or north-west till you come to the next lot of caves and then the pygmy pipehorses. Return back and perhaps explore to the south of the anchor spot.
LATEST PYGMY PIPEHORSE SIGHTINGS
We find pygmy pipehorses on every dive here. Once you find them, they normally stay in the one spot for one or two months or even longer. You should be able to find them again if you dive soon after. There is no point in recording them here as unless you dive the site soon after I have spotted them, they probably will have moved on.
To find, get down low and look across the reef. Look for movement that is not in sync with the surge pushing the weed and kelp. The pygmies normally lag a little in the movement.
It is far easier to find them at night as they stand out more when your torch shines on them. It appears that they are more common in the late Spring to early Autumn.
DEEPER REEFS (ISOLATED REEFS)
These are located to the north-west or west (right) from the Cave and Corner area. See Bare Island Isolated Reefs page for more information.
MARINE AND FISHLIFE
As well as the fish mentioned above, you will see bearded cod, beardie, bream, cuttlefish, old wife, mado, stripey, red and blue morwong, maori wrasse, crimson-banded wrasse, mosaic leatherjacket, six-spined leatherjacket, silver sweep, smooth flutemouth, blackspot goatfish, white ear, mullet, sergeant baker, yellow-eyed leatherjacket, pineapplefish (knightfish), snapper, crayfish, abalone, octopus, prawns, shrimp, herring cale, crab, senator wrasse, Port Jackson shark, yellowtail, silver drummer and moray eel. This reef also has some of the most colourful sponge life you will see anywhere in Sydney. Fantastic colours.!
I have also seen grey nurse sharks and a seal on this dive.
WARNINGS
Things to be aware of on this dive are:
SUMMARY
A fantastic dive site, one of the best in Sydney. Now home to pygmy pipehorses, although they can be very hard to find at times.
|  v6.00.307 © 2003-2005


