|
MY OLD FOUR WHEEL DRIVE
Basic Specifications
My original four wheel drive was a 1999 Toyota Land Cruiser Prado Snowy V6 3.4 litre petrol with 5 speed manual gearbox. I purchased it new in July 1999. It was a "Snowy", a special limited edition model produced in mid-1999 to celebrate the 40th anniversary of the first Toyota Land Cruisers brought into Australia. These very first Land Cruisers were imported to be used on the Snowy Mountains Scheme.
The Snowy is a GXL with added extras of mag wheels and other minor bits, mostly from the top of the range Grande. The model was coming up to a minor model update and they used parts from the Grande that obviously were not selling well to upgrade the GXL.
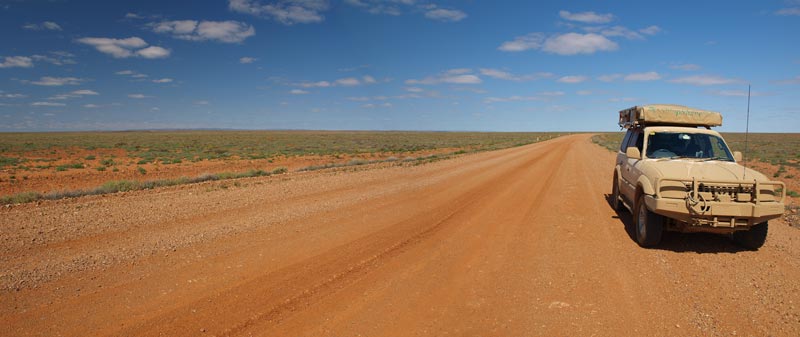 |
| Coming up the Strzelecki Track in South Australia |
Wheels and Tyres
The vehicle came with the Grande mag wheels donned with the standard Dunlop Grand Trek radial tyres. These are a road tyre and while they give good performance on the road and in sand, they are not very good on rough roads and are quite poor off road.
When the Grand Treks were almost out of tread (65,000 km), I purchased BF Goodrich All Terrain (A/T) tyres. The Grand Treks still had a bit of tread, but as I was going on a long trip, I needed new ones.
The A/Ts were first used on my 2003 trip to Central Australia and Simpson Desert. The rear ones wore a bit on the Simpson Desert trip and a few chunks came out of the tread on the rough bits of the Sturts Stony Desert (part of the Simpson). The first set gave a good 75,000 km and probably had a bit more in them (5,000 km) but as we were going on another long trip, I needed to replace before we left. I replaced them in January 2008 with the same tyres. After the 2010 Central Australia trip the second set had done 31,000 km and apart from a little wear and tear on the rear tyres, they still looked almost new. I swapped them front to back.
Since then we have done two trips to the Victorian High Country and some other trips and they have done another 20,000 very hard kilometres. They are now really showing a lot of wear, with many chunks out of the tred. However, I figure I will get at least another 10,000 kielomtres out of them.
These tyres have great grip on rocky and dirt tracks, and are fairly good in mud. All in all, a good tyre for the sort of terrain that we visit.
The one thing that I do not do is let air out of the tyres when on rough roads. I do not understand this recent phenomenon that seems to have infected all four wheel drive clubs and magazines. I should point out that I have been driving four wheel drives professionally for work since 1977 in some of the most dramatic terrain in NSW, on roads normally closed to the public and through bush where there are not even roads.
During that time I have never let my tyres down (except of course on beaches). the primary reason for this was for most of the time I have never had the means to reinflate them again (eg work did not provide compressors for our vehicles and still does not). The only flat tyres I have ever suffered on dirt roads or off road were when driving old LandCruiser Utes with inner tube tyres through the bush (not on roads) and we were getting spiked by the burnt out remains of a certain bush. I have done a lot of trips with people since I purchased the Prado and we have never let our tyres down. The number of flat tyres could be counted on one hand.
Compare this to reports I read in magazines and club reports where up to 25% of the vehicles had flat tyres. The common thing was that they had deflated their tyres from normal pressures to 25 or so psi. I see no benefit at all in this except if you are stuck on a very rocky bit of track and you temporarily drop pressures to give yourself more grip to climb the hill.
I run 36 psi on the front and 40 psi on the back, all year round. There are no problems with this.
Fuel Consumption
The Prado has a 90 litre main fuel tank and a standard 69 litre auxiliary tank. This gives a total of 159 litres which gives a range of the following:
Average fuel economy on long desert trips has been about 13 to 14 litres/100 km. Even when actually crossing the Simpson Desert it averaged 14.1 litres/100 km. On an 8,100 km trip to Central Australia in 2010 we averaged 13.9 litres/100 km. This was very heavily loaded.
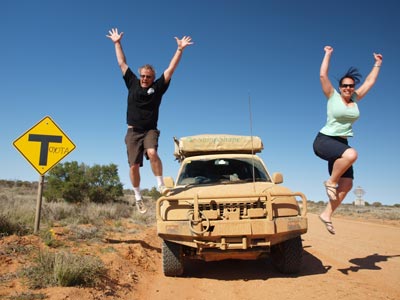 |
| Kelly and I celebrate Toyota TV ad style - photo taken between Cameron Corner and Tibooburra when we saw the modified sign |
On trips like Stockton Beach with lots of soft sand driving, the fuel consumption jumps to about 16 to 17 litres averaged out over the whole trip from Sydney. It is probably about 25 litres when on the sand.
In the Victorian High Country in December 2007, we averaged 19.6 litres per 100 kilometres for the section from Albury to Omeo. Therefore, it averaged well over 20 l/100 km for the off-road section. This was mostly first or second gear high and a lot of second gear low range.
We carry a jerry can of about 23 litres on trips where petrol is not available and the conditions are such that consumption could go through the roof if the road is very rough or may be affected by rain (eg from Birdsville to Mount Dare - 760 km - across the Simpson Desert).
Suspension
In 2002 I replaced the suspension with an ARB suspension which used Old Man Emu springs and shock absorbers. This gave an additional clearance of a bit under 50 mm. this gave a dramatic improvement to the ride as well as the off road capabilities. The height had dropped a fair bit by 2012 and the ride was a lot harsher. I was going redo in 2011 or 2012 but did not.
On 1 January 2013 I had a lower mounting brush on the back left shock absorber fall apart and the shock fell off. I then had a new suspension installed later in the month by Ultimate Suspension (2" lift). As of November 2013 we have not used off road (only on a short dirt road trip), but it certainly is more comfortable on-road. I will report on what it is like off-road in June. We also had all the suspension and steering bushes examined by our mechanic and any that were not in good condition replaced. In particular, the bushes for the panhandle rod (which connects the axle to the body) were replaced. Before this the body would rock very uncomfortably when a rough surface was encountered by the rear left wheel. It is amazing the difference this made to its ride and handling. I suspect that these had been bad for about 15 months.
Underbody Protection
The standard 90 series comes with bash protectors under the engine sump, the front of the gearbox and the two fuel tanks. Over the years some of these have copped a bashing. In fact, the ones under the sump and gearbox were almost destroyed in the first couple of years after I purchased the car. I repaired them (by bashing them back into shape) and reattached them. The problem is that they are too thin and the connection hole on the rear one is too close to the edge of the plate and the bolts just ripped the corner of the plate right off.
The protectors for the fuel tanks are also thin but a bit less exposed. However, the rear one certainly copped a lot of damage.
In December 2013 while on a trip to the Victorian High Country, the front two bash plates decided to play up, falling off a number of times as the bolts fell out and even the repairs I did over 10 years before failed. Fencing wire worked for a few days but after a couple of repairs, I removed them both. When I got home, my father-in-law Tomas constructed me a brand new stainless steel bash plate to cover both the sump and gearbox. This is much thicker and uses the same attachment points. In the end he spraypainted it black, I think I would have preferred it left as it was!
Also on that trip, I finally worked out the origin of a creaking noise from under the car. It turned out it was the rear fuel tank bash plate. The left side bracket where it attaches to the chasis was broken at the righ-angle. I took it off and Tomas welded the backet back and also reinforced both it and the right-hand side one. I also took the opportunity to bash it back into a more original shape. This made it hard to refit as the bolt holes no longer lined up, but after a few removals and more bashing, I finally got it back on.
Bull Bar
I fitted an ARB steel bull bar back in about 2000. In 2010 I purchased an Aldi winch ($400) and installed this into the bull bar. This took about 4 or 5 hours and needed some help to remove and reinstall the bull bar as well as some angle grinding of the holes to fit the winch. I have used twice, once to pull a LandCruiser Troop Carrier back onto its wheels and another time to pull a Nissan Pathfinder back onto the road from where it was bogged off the road.
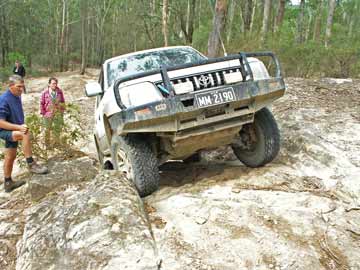 |  |
| The Prado going up the Bullock Track at the Watagans | The Prado overlooking Lake Burrinjuck |
The bull bar also supports two "no name" driving lights and the UHF, mobile phone and GPS aerials.
Extra Storage Pockets
The Prado comes standard with good storage in the front doors. In these we carry large torches and spare batteries as well as a bird book. It also has as standard a good under seat storage slide on the passenger side. This is used to hold binoculars, screw drivers, fuses, voltmeter, cable ties, spanners and other small bits. Behind the driver and passenger seats are pockets. We carry a full manual for the Prado in one as well as larger 4WD touring books.
I purchased an aircraft style console which sits on the ceiling above the centre console. This holds the radio (see later). It also has extra interior lights and two storage compartments which hold CDs and other small items. I also added some Velcro strips which hold sunglasses and our Spot device (see later).
I also added two vinyl pockets to the area above the driver and passenger doors. These hold light items like maps and national park brochures.
Rear Storage System
I designed a storage rack system for the rear and my dive buddy Andreas built it with my help at his kitchen factory. This houses plastic containers that hold all our food and utensils. It also has a fold down table section that we use to make lunch or morning tea and for assisting when preparing dinner.
In the storage system we have three small containers that fit one behind each other. These contain all our non-refrigerated food, containers of oil and sauce etc as well as cups and cutting boards. We have another larger container that fits up the top and has bigger items as well as things like toilet paper, power cables and more.
There is a 20 litre container that sits in front of the rack system and behind the rear seat. This actually holds about 22 litres and feeds back to the rear along a plastic tube so that water is accessible at the rear. This is used for drinking, cooking and sometimes washing. I also carry other water containers as necessary. For example, a 10 litre container is always carried for showers. When on longer trips to remote areas, I have taken more containers (one 20 litre and two 10 litre) giving a total maximum capacity of about 65 litres.
I purchased a second-hand Engel fridge in late 1999. While this has always worked well, it was consuming too much power so in September 2010 we purchased a new 40 litre Engel fridge on special. Tests have shown that it uses at least 1/5 the power of the old fridge. The fridge sits on a part of the rack system. It has a temperature gauge (the old one had a simple indoors/outdoors device available from places like Jaycar or Tandy) that shows the temperature in the fridge.
Finally, the rear section has space to store a thermos flasks for morning tea and a battery powered light for eating dinner by.
Electrical Upgrade
The second battery for the car sits in a part of the rack system. This is because there is no space under the bonnet for a second battery of any size without major changes. It had an isolator system that I purchased out at the Sydney Caravan and Camping show in 2000 but this died in early 2010. I purchased a new one from Ebay and this works well. In December 2007 I totally rewired the battery system as the wire I used back in 1999 was not capable of transmitting sufficient power to the rear batteries to recharge it. I used 8g wire which has about 8 mm2 of copper compared to about 3.5 mm2 in the old wire.
The battery system also has a voltage meter that shows the current state of the battery and if it is charging correctly. This sits on the dash and is visible at all times.
In October 2007 I purchased a 30 watt solar panel. This was pretty expensive as at that time solar panels were not sued by as many people. The price has come down and the watts gone up for the same size. This is used for trips where we are not doing too much driving and need extra boost to the battery. There is a solar panel regulator to ensure only the right amount of charge is put into the battery. I have also put in a small 240 volt inverter so that we can recharge camera batteries, laptop and other things when on extended trips. This works well.
The second battery has an outlet for the fridge as well as additional cigarette lighter outlets that we use for a fluorescent light at the rear and phone charger on the back seat. There are three other cigarette lighter outlets as standard in the Prado, one at the rear and two in the front. The rear one is used for any outdoor light, recharging of our table light, the inverter and the front ones for the two GPS units.
GPS
The first GPS I purchased for the car was a Garmin GPD II+. This sat on a bracket attached to the ashtray. It had an external aerial that was mounted on the bull bar. I used Garman Mapsource to upload routes and waypoints to it. I used to take my old laptop on trips to plan trips and upload the routes and waypoints to the GPS. I also used the laptop to download tracks and waypoints on a regular basis. The laptop also had OziExplorer software with maps for all of Australia that can be accessed if needed.
However, in early 2009 I purchased a Navman GPS. I cracked into it and transformed it into a mini-computer. This runs OziExplorer CE and I have all of Australia covered on topographical maps loaded on SD cards. I used this instead of the laptop for tracking our journey and checking on our location till March 2013. At that time, I purchased a Bauhn Android tablet from Aldi. This has a GPS built into it. I then purchased OziExplorer for Android and loaded all the maps onto a Micro SD card. This gives a 10 inch screen compared to 4.5 inches. Much nicer.
Planning of trips and creation of routes is down on the laptop and uploaded to the two GPSs. At the end of the trip the track is downloaded and used to review the trip.
I will still take the laptop and maps on longer trips.
Communications
Our radio is a Uniden UHF 40 channel. This is mounted in an aircraft style console on the ceiling between the driver and passenger. The aerial is mounted on the bull bar. There is a separate small speaker mounted on the driver side of the console. The radio has proved to be reliable and has a good range. The scanning facility is good when on narrow tracks like Cape York or the Simpson Desert so that you can hear if another group is approaching you.
We also have a hands free phone kit which is linked into a high gain aerial. This gives coverage long distances from mobile towers. We use the Telstra Next G network as it has far superior coverage to the other networks. In late 2010 we acquired a USB wireless modem (data card). I purchased a Telstra Next G SIM for $2 from Australia Post and then put it on a Pre Paid plan for $150. This gives 10 Gb of data that can be used over one whole year. This will be more than sufficient for our trips when away camping (and also diving).
We also have a Spot Satellite Messenger. This small device uses GPS to establish its location and then sends a signal via the satellite phone system to the Spot system. The system then sends emails and/or SMSs based on your settings. You can send a normal OK signal, a Help signal (which only goes to people you nominate) or a 911 emergency signal which is (in Australia) routed to AMSA (the Australian Maritime Safety Authority) who co-ordinate such rescues.
The email contains a link to a Google Map page which shows your location. You can also set up a Facebook link, but this does not appear to work as far as I can see. This is very handy in keeping our family and friends aware of our location and that we are okay. Our first action when we decide on a camp site is to activate the Spot and send the Okay signal. If you are within mobile phone range, you will receive an SMS within a few minutes confirming that it has worked. See the link on the main 4WD page for what the information sent looks like.
Added Extras
I fitted the Prado with a Twine hot shower. This uses the heat from the car heater (radiator water) to heat fresh water through heat transfer. It was easy to install and has been used every week since purchased (for after diving as well as camping). I have it set up so we can heat a 10 litre container to the right temperature and then turn off the engine and use the water to shower. Therefore we can have a hot shower wherever we go (of course we have a shelter for showering anywhere). This is the best extra we have installed, as we use it all the time.
I have also added a reversing camera to make it easier to park the Prado in the bush. Back on 1 January 2008 I smashed the rear window when I reversed into a tree branch which was hanging down and way out from the tree (which I did see).
Camping Gear - Tent
We used to use a touring tent (the pyramid type C.O.I. Leisure Lightning) but we purchased a ShippShape roof top tent in December 2006. This was after many trips since 1997 with friends who had one and after a trip to Western NSW where we used a borrowed one. The one we purchased was second hand from ShippShape. It is an old tent but with brand new base, mattress and frame and almost new cover. It is the top of the range model with all side curtains.
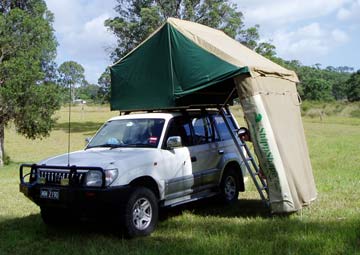 |  |
| Our car and ShippShape at Krambach | A rear shot showing the storage system and the shelter |
The tent consists of a sleeping section which is over the car. This is a full sized double bed and has heaps of room. I have slept in many smaller beds in hotels and resorts! We use normal double bed sheets (cotton in summer and flannelette when cooler) with a wool blanket. In colder climates we also put a sleeping bag (open out) over the blanket.
You get up and down via a very easy to climb ladder. Our one has windows on the driver's side as well as windows on the passenger's side that open into the covered awning area. Newer versions have windows at the front and back as well.
Kelly made up a small trampoline out of a stretchy material and cord. This hangs from one side to the other under the roof near our feet. We put our day clothes in here after we change into our sleeping clothes. There is also a small space between the mattress and base section near our head where we put things like water, battery, torch, radio etc. The battery powers a small fluorescent light which we hang from the roof so we can see and read.
 |  |
Coming up from the Lower Portland Ferry
after crossing the Hawkesbury River | A photo taken at the Strzelecki Crossing from inside the ShippShape |
Upon arriving at a camp site you park as flat as you can. We have two plastic wedges that we can use to balance the car correctly. Once flat, you unclip a bungy cord on each side from a number of knobs, put the ladder on the passenger side, climb the ladder and pull on the roof. It opens up very easily. You then take two cords from the outer edge of the awning section and attached them to suitable points on your car and tighten. These hold the awning rigid and stops the tent closing up.
The next thing to do is to secure the awning. If it is unlikely to rain, we normally just hammer some tent pegs into the ground and attach an ocky strap to each. If it is likely to rain, we put the awning out horizontal to the ground and use two poles on the far corners to make a larger protected area. We then attach the sides to provide more protection from driving rain. We also have a medium sized tarp which attaches to the back of the tent and using four poles, provides cover over the rear door of the car (which is of course where all our food, beer and gear is located). The four tent poles are carried in a section of PVC pipe under the right side of the ShippShape.
The basic tent can be erected in about two minutes and it takes about four minutes to put away. We can be sitting having a beer before others have even pulled their tent out of the bag.
In mid-2007 I waterproofed the canvas as when we used it over Easter, water seeped through a small section. It did not wet us, but it made the inside damp. We used Thomsons Water Seal which is primarily for waterproofing concrete. It is also suitable for canvas and cotton. It is available from Bunnings Warehouse and costs about A$25 for one litre. I was originally only going to do the small section that was affected, but I used all the container and purchased another litre. I ended up doing all the front and rear as well as the driver side and the top part immediately over the bed.
Over the Xmas/New Year period of 2009 we struck a lot of rain. The awning leaked a lot after it had rained for a few days. I then waterproofed all this with Thomsons.
We now have a second Shippshape which is of the same vintage as our first one. It has better canvas but the cover is in poorer condition. As of December 2013 I am repairing the cover (and waterproofing it). This one will be used by Kelly's Dad, Tomas, as he has purchased a Toyota LandCruiser 80 series.
Camping Gear - Cooking
The majority of our cooking is done on a collapsible barbecue plate. This is shaped like a plough disc and has legs and a handle that folds away. In 2009 we purchased a fold up wok that is made by the same company. This replaced our frying pan. For heating water and cooking things like pasta, toast etc, we have a cheap gas stove that uses disposable canisters. These are relatively economical and much better than a LPG gas system. I used to use petrol-powered Coleman burners but they end up being unreliable.
We have a camp oven for roasts, damper and desserts. As well as a pot and a whistling kettle we have a bowl for mixing and salads etc. We normally only have enough plates for two people with plastic wine glasses, beer coolers, barbecue and cooking utensils as well as knives and forks etc but we can carry more.
Camping Gear - Other
We carry two collapsible chairs and a collapsible table which fit on one side of the storage system. On the other we have a barbecue plate, a shower tent, and other bits. I also carry a small chainsaw (needed many times in remote locations to clear tracks as well as to cut firewood). We also have a wedge, small axe and a spare chain as well as extra chainsaw fuel and tools to repair and sharpen the saw. We also sometimes carry a small 12 volt generator to supply emergency power.
Spares carried include new hoses and belts as well as tyre repair kit and if needed, a small compressor. If we are diving we do not take the compressor as we can fill tyres from our dive cylinders. On more remote trips a second spare tyre is carried behind the driver's seat.
Carrying Clothes etc
Kelly and I each have a plastic bin with a lid in which we put our clothes. These are very handy as the clothes are easily visible through the sides and the construction means we can put lighter things on top if needed. We put these bins on the back seat.
I also created a trampoline out of a dog bed (using bungy cords and rope) which hangs under the roof over the rear station wagon section. On this we put things like hats, raincoats and jumpers. It makes them easily accessible as well as using up space that is normally not doing anything.
We also carry two bags Kelly sewed up in which we put our dirty clothes so that they are separate from our clean clothes.
Recovery and Emergency Gear
Under the seats we carry two ramps for levelling the car when we camp, first aid kit, jumper leads and an extensive socket set. There are also spanners and screw-drivers under the passenger seat and a full car manual for repairs. We carry a tyre repair kit as well as a full recovery pack of winch extensions, tree protector, snatch straps, snatch block and more.
On the ladder for the ShippShape tent, we carry a large shovel for recovery and fire purposes.
How does the Prado Perform?
Well, it is pretty good, although I wished that the 3.0 litre turbo diesel was available when I purchased it as that is a much better engine.
On road it performs well, except steep hills require fourth gear instead of fifth (which you can use in the turbo diesel). Towing my large boat (see menu on left) it goes well but on steep hills like Mount Ousley (between Wollongong and Sydney) it requires a lot of second gear. Fuel economy when empty is about 11.5 to 12 litres on long trips and when full of camping and/or diving gear, about 12 to 13 litres. Off road it generally stays about 14 to 15 litres (in hard stuff) although it has got to over 20 litres in prolonged hard stuff at altitude. Towing the boat it is about 17.5 litres in the city or country (maximum of 80 kph).
The car has never been stopped by a hill except when it has been very muddy (and no-one made it up those ones). I have never got stuck in sand for more than a few minutes. Some people have thought that it had locking diffs but it does not.
All in all, I reckon we have a camping and vehicle setup the equal of anyone.
If you have any questions about any of the above, you can email me by clicking on the Contact Me link on the main menu above or at left.
NEW 4WD
We now have a new Toyota Land Cruiser Sahara 200 series that we purchased in November 2017. Click here to read about it.
|  v6.00.307 © 2003-2005

