|
The Tasman Peninsula area of Tasmania is the south-western most bit of the State and located to the south-west of the capital, Hobart. Eaglehawk Neck is the narrow section between the bulk of Tasmania and the Tasman Peninsula. This narrow isthmus is only a few hundred metres long and about 150 metres wide or so. Over the years, Eaglehawk Neck and the Tasman Peninsula area has gained a reputation as a great dive location.
This is undoubtedly true, there are some brilliant dive sites here. Unfortunately, on our trip there in February 2008 we had some very poor weather when in the Tasman Peninsula area which severely limited our diving and meant that only a few places were suitable to dive.
One of these was Boulder Point. This is located about seven kilometres to the north of the boat ramp at Doo Town (a place where 99% of the homes are named things like Do It, Do Nothing etc). The point is about due east of the northern part of Eaglehawk Neck.
From the boat ramp, go to GPS Reading S42° 58' 45.2" E147° 59' 01.5' and you will see a prominent point. Anchor anywhere near the reading and off the wall that drops from about five metres to 12 to 22 metres.
 | 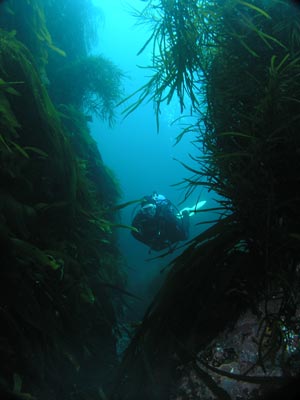 |
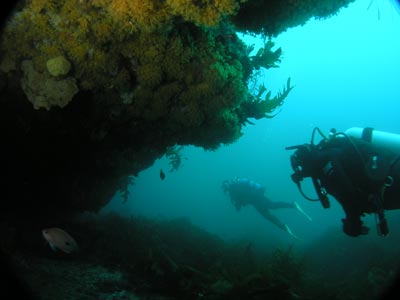
| Kelly at the mouth of one of the Boulder Point Caves | Kelly entering a crack at Boulder Point |
Once on the bottom, head to the north-west till you hit the wall and then follow it to the north-east or south-east. This wall zigzags in this direction, with each zig (or zag) about 20 to 30 metres long. At first the depth will be about 11 metres and there are a lot of boulders. In between the boulders the bottom is covered in kelp.
After about 15 metres you should come to a turn to the right which means you are now heading south-east. After about 30 metres there is a bit of a crack between the wall and a rock off it. The wall turns left here and goes to the north-east. The bottom of the reef has deepened a little to about 15 metres and there is a small overhang or cave on the left. In the lower parts of this you might be able to see some crayfish. I saw over 12 in one overhang alone!
After another 30 to 35 metres, the wall again turns right and heads south-east. This section is shorter, perhaps 20 metres long. Ahead is yet another corner and the depth will now be about 18 metres. Once you round this and head north-east again there is a larger cave on the left. This can provide some nice photographic opportunities.
 | 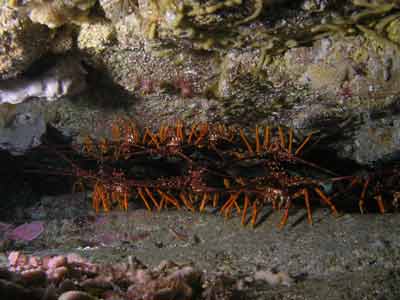 |
| Another of the Boulder Point Caves | Some of the dozens of crayfish seen |
This section of the wall is probably the longest, perhaps 40 metres long. Unlike the previous sections, the wall does not go to the right but gradually curves to the left and heads north and then, eventually, north-west. However, you will probably not get much past this spot as you will be starting to get low on bottom time and air.
Return back to the anchor and spend any remaining time in this area.
On the dive we saw some long-snouted boarfish (smallish), wrasse, Shaws cowfish, seapike and leatherjackets.
There appeared to be a few different species of kelp, some of which grew to over two metres high.
On our dive here in February 2008 had water temperature of 16.2°C and visibility of about 15 metres. This was down due to the very strong north-easterly winds that were stirring everything up.
A nice dive site.
|  v6.00.307 © 2003-2005

