|
There are a few dive sites that words cannot adequately describe. One of these is Golden Bommies located at Bicheno in Tasmania. This site is located within the Governor Island Marine Reserve and is off the north-eastern corner of the island. Like all the dive sites at Bicheno, it is only a few minutes run out from the boat ramp to the dive site.
The site consists of a main section of the reef that drops from about 26 metres in a slope to almost 39 metres on the sand. To the north of this there are two bommies (bomboras or rock islands) that are just attached to the main reef. These come up to about 26 metres as well.
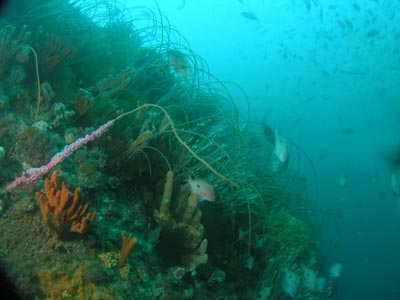 |  |
| The main reef at Bolden Bommies | The first of the bommies |
A GPS Reading of 41° 52' 10.1"S 148° 19' 3.4"E (using WGS84 as a datum) will put you right near the bommies. This is off the eastern side of a small rock which is off the northern-eastern end of Governor Island. Run around till you see the reef and either anchor on the reef or the sand (anchoring is permitted but it is preferred if you anchor on the sand or in the shallower kelp areas).
Diving this site with Bicheno Dive Centre we put down a drop line and descended down that rather than do the normal free descent. Once on the bottom we were a few metres off the main reef so we swam over. This reef is totally covered in sea whips and sponges, the visibility was excellent, well over 20 metres.
 | 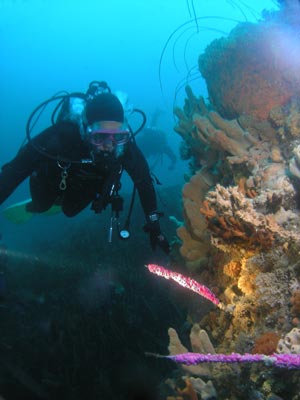 |
Kelly on the wall at the south side of the second bommie
Note the long-snouted boarfish | Kelly lights up a sea whip covered in jewel anemones |
We were to the south of the bommies. Here the sand was about 39 metres and the reef sloped up at about 45° to 26 metres. Heading north we could just see the first of the bommies. The fishlife before and over the bommie was amazing. Huge schools of seapike, bastard trumpeters, morwongs and butterfly perch covered the reef, almost obscuring the bommie itself.
Between the main reef and the first bommie there is a crack. We continue north on the eastern side of the reef. The second bommie soon comes into view. We have already ascended a bit as you do not get much bottom time at the level of the sand. We are now at 35 metres and gradually ascending as we go.
The second bommie is also separated from its neighbour by a crack. There are lots of fish and crays in this. We start to circle to the left around the northern side of the bommie. The sea whips and sponges are as good here as on the main reef. Here and there are lots of other fish, including a large yellow and black striped species I have not seen before (I am yet to identify it).
 |  |
The huge school of fish that came around
near the end of the dive - mostly butterfly perch | Kelly is surrounded by the fish |
A lot of the sea whips have jewel anemones on them and there are yellow xanthoids all over the steeper wall sections of the bommies. The western side and the cracks are virtually shear walls.
We head south back past the second bommie, still ascending. We go over to the main reef and head to the top. We are already into decompression, as we only had about 12 minutes no-deco time on the profile we did. We decided to run a few minutes into decompression and start ascending when we have two minutes of deco to do at three minutes. This gave us a bottom time of about 17 minutes. As we ascend, we encounter a huge school of fish that blots out our view of the reef and even each other. This is great!!
After the two minutes deco and a five minute safety stop, we surfaced after 27 minutes of one of the most enjoyable reef dives we have ever done.
As mentioned, one of the best dive sites and best dives I have done. Well worth doing for experienced divers.
As usual, the service of Bicheno Dive Centre was not to be faulted.
|  v6.00.307 © 2003-2005

