|
THIS IS ABOUT A NOW VERY OLD CAMERA SO NOT CURRENT
Back in the late 1980s I purchased a Nikonos IV with an old Aqua Sea strobe (a Sydney made strobe). I used this for about four years taking a lot of very average photographs and a few good ones. Along the way, I won the South Pacific Divers' Club George Roberts trophy and had a few articles published in Sportdiving. However, it was hard to get decent photos and at the time, my very limited funds did not permit me to upgrade to anything better. Eventually I stopped taking the camera on dives as it was distracting me from my enjoyment of the actual dive.
Then, in 1994 my house was broken into and amongst other things, the camera was stolen (funnily, they left behind the strobe unit). With the insurance money I purchased a Hi-8 video camera and housing and for the next almost 10 years used this when I went diving overseas and along the coast of NSW (as well as places like Dunsborough to dive the HMAS Swan). This was a lot easier and more enjoyable. My success rate ended up almost 100% in terms of useable footage. However, my use of the camera dropped off around Sydney as it was quite a beast to carry around all the time.
When digital cameras started to gain ascendency over film cameras, I decided that I wanted to get back into underwater photography. However, as I did not have a decent computer, I had to get a new computer that would enable downloading. Finally, this happened in early 2003 as I came into a bit of unexpected money (with enough for a camera) so I then decided to look for a camera that I could also use for underwater photos (I needed it by mid-year as I was doing a four week trip to Central Australia across the Simpson Desert). The following describes the steps I went through in choosing my set up as well as some hints. The following is based on starting the hunt for an outfit in April 2003.
HOUSING
I suppose in some way it is really the Chicken or the Egg. What came first, the camera choice or the housing choice? In some ways they were totally connected and considered in conjunction with each other. However, the main consideration was the specifications of the housing. As I do a lot of dives over 40 metres (eg most of the wrecks in Sydney are 45 to 52 metres), the housing had to be rated to at least 50 metres and preferably 60 metres since I dive a lot in places like Chuuk Lagoon, the Solomon Islands and on the wreck of the SS President Coolidge in Vanuatu. This severely limited the choice of housings and ruled out ones like the Olympus, Canon and Sony housings which are rated to 40 metres (but can, I know, be used to greater depths as friends have done so).
My choice eventually came down to the Ikelite housings (rated to 60 metres) and the Tetris housings (also rated to 60 metres). They make housings that suit a number of cameras, the main ones being the Olympus and Nikon top of the range models. At this stage, I did not make a choice of which housing but since both these housings suited the same cameras, I had narrowed the field. More about this later.
CAMERA
I then turned my choice to camera. My first requirement was that I wanted a 5 megapixel camera. This would enable photographs to be blown up to A3 size and certainly be as sharp as film for postcard and even A4.
Of course, it had to fit into one of the housings I had already narrowed the field to (that is, the Tetris or Ikelite housings) so this again narrowed the field. The Ikelite housings included (at that time) ones for various Olympus, Nikon and Sony models. The Tetris housings were, I think, a bit more limited. The Olympus model that was most attractive to me as I knew a couple of people with earlier models (such as the C4040).
After looking at prices and features, I finally decided on the Olympus C-5050Z (for Zoom). This was relatively new at the time, and had a 3x zoom, panoramic feature (take multiple photos and use software to auto stitch together), Macro and Super-macro capability (right down to the front of the lens), multiple modes (eg total auto, aperture priority, shutter priority etc) and user modes (where you set certain features for a short cut). The zoom is 7.1 mm to 21.3 mm which is equivalent to 35 mm to 105 mm in a 35 mm film camera. The camera also had the benefit of using multiple memory cards (two cards at any one time, of which one is XD or Smart Media and the other Flash Card or Microdrive. This greatly increases the amount of memory you can carry in the camera as well as when overseas (without needing to store outside the camera). It also enables direct downloading to laptops via Flash Card and PCMCIA adapter. The camera also came with Nickel Metal Hydride batteries and a charger, extras for many cameras.
I looked at the price of the camera at a number of camera shops and on the Internet. I finally decided to purchase it at a web site called www.centre.net.au which is run by a company called Export Mission info Systems Pty Ltd. This is located in Tullamarine in Melbourne. The camera cost me $1,349 plus $15 delivery. I received it about three days after ordering it. It was now mid-May 2003.
EXTRA MEMORY
At the same time I ordered the camera, I purchased an extra Olympus XD card. The camera came with a 32 Mb XD card. This was 128 Mb and cost me $131. This gave me the ability to take about 105 shots at the second from top resolution. A few weeks later I purchased another card, a Flash Card of 256 Mb. This cost me about $130 and was purchased over the Internet from the USA. It arrived about a week after I ordered it and was at least $20 cheaper than anything I could find in Australia.
I also have access to a 512 Mb card that my sister owns and a 128 Mb card that my brother owns. These are both XD cards as they also have Olympus cameras. I also have a 96 Mb Flash Card from a previous device that I owned.
Just using my own cards I can take about 432 photos without downloading. With my sister's card (and giving her my 32 Mb card to use) means I can take about 820 shots. So for a 10 day holiday, I can take 80 shots a day.
HOUSING REVISITED
I was originally not going to purchase the housing till about September 2003 as I was going on a four week trek across the Simpson Desert to Central Australia and it was a bit pointless to purchase it before hand and not use it for almost six weeks (due to the weekends missed).
Despite this, once I got the camera I decided to do some more work on choosing a housing, even though I was not going to purchase it for (I thought) four months or so. Another look at the Tetris and Ikelite housings meant that there was now only a choice of which housing and where to buy. After a few looks on the Internet, I decided that the Tetris was far too expensive, almost twice as much as the Ikelite. In addition, the Ikelite enabled the internal flash unit of the camera to be used for at least close up photographs and you could attach a wide angle lens to increase the coverage. Therefore, the Ikelite was going to be it.
The Ikelite importer for Australia is Cape Byron Imports. I e-mailed them about this time asking for a price, who I could purchase from and availability. No response. I then e-mailed again. Still no response. One last e-mail and finally, about four weeks after my first e-mail, an answer. The price would be US$600 plus GST plus freight giving about US$740, equal at the time to about A$1060. No way, this is out of my league. Also, the housing would have to be imported once I place my order so I cannot even look at one and try it out. Not good enough I am sorry Mr Cape Byron. Bringing into Australia once I order is not my idea of good service.
In mid-June 2003 an American diving friend advised that he was going to be coming to Australia within a few weeks. He agreed to bring the housing to me if I ordered one from the US. A quick look on the Internet showed two locations in America selling the housing. These were both camera shops in New York, Adorama (www.adorama.com) and B&H Photo (www.bhphotovideo.com). Adorama was a bit cheaper than B&H but they did not have the housing in stock and I needed to make sure I could get delivery within two weeks. Adorama could not guarantee delivery to Los Angeles in this time frame. Therefore, I went with B&H. The cost was US$520 and delivery of US$16 to LA (it was about A$80 to Oz I think). Total cost was US$536 giving a cost of A$776. Therefore, I saved almost A$300 buying over the Internet and got it delivered quicker than ordering through the Australian importer.
I received the housing in late June and used it twice before I went to Central Australia.
FIRST USES
As soon as I came back from Central Australia I started using the camera in earnest. Straight away I got great shots. Sample photographs using internal flash are on my Photo Page.
As you will see, you can get great photographs using the internal flash so long as the subject is quite close. You can also get very good macro shots using a good torch as the camera will focus down right to the front lens giving one to one (the flash does not work on macro).
However, the relatively poor wide angle coverage (equivalent to 35 mm in a 35 mm film camera which is about 50 mm above water, that is, a normal lens) meant that its ability to take good wide angle shots on wrecks and reefs limited it a good deal. Despite this, you could still get not bad shots if the water was clear and you could move back a bit.
WIDE ANGLE LENS
A few weeks after I came back from Central Australia I decided to travel to Port Moresby in Papua New Guinea for a week's diving holiday. For this, I wanted a wide angle lens. There are a number of such lenses, although to me they all appear to be very similar and perhaps may even be made by the same manufacturer. The brands were Inon, Sea and Sea and another which I forget at the moment. In the end, I chose one on the price as all reviews I found did not show one was better or worse than the other.
Before I go further, I should mention that I checked out Australian suppliers and found that the price was much, much higher than through the Internet to US shops. Once again, I came down to Adorama (www.adorama.com) and B&H Photo (www.bhphotovideo.com). This time I used Adorama as they were a few dollars cheaper. I ended up purchasing the Sea and Sea lens which gives a coverage of about 100°. The cost was US$288 plus US$42 delivery giving a total of US$330, that is A$472. This was at least A$130 cheaper than buying in Australia.
Sample photographs using the wide angle lens are on my Photo Page.
As you can see from the photos, the wide angle lens greatly increases the coverage and ability of the camera and housing. It can be removed and replaced underwater so you can switch from normal to wide angle underwater. The internal flash does not work with the wide angle lens as the lens blocks out the flash. Fairly good shots could be taken if the models in the shots lit up parts of the wreck or reef or if I used my 50 watt torch to light up closer bits.
PRINTER
My main aim for buying the camera was to take shots for this web site. However, of course I wanted to print out some photographs for friends and relatives. While I have a black and white laser printer, I did not have a colour printer. After a lot of research (speaking to friends about their printers), I came to the conclusion that the Epson colour printers were probably the best around. This is even though I work in the IT unit of a large NSW Government Department which purchases HP colour printers and I am responsible for all the IT purchases, including the printers.
Once I decided on Epson, I look at the myriad of printers available. I also looked at the cost of ink cartridges, a very important aspect to consider. I also only wanted to pay about $200 to $250. I finally decided on a new printer the Epson Stylus Photo 830U. This has a black ink cartridge as well as a five colour cartridge (cyan, photo cyan, magenta, photo magenta and yellow). It prints on all sorts of paper, including glossy photo paper and panoramic paper (600 mm wide).
I purchased this printer for $226 plus $12 delivery from City Software (www.citysoftware.com.au) which was the cheapest place I could find. However, this was probably the worst of my purchases as it took ages to deliver (almost two weeks) and the other items (paper) took weeks longer. Then, to make matters worse, only a few days after I got it I saw it advertised for $199 in the computer section of a large retailer.
However, it is a great printer. The photos are fantastic and come out as good as prints from a camera shop. The cost per print (postcard size) for the first 40 prints was about $1.20 (28 cents for paper and 82 cents for ink) but the first ink cartridge is said to not last as long as later ones as the heads have to be charged with ink. I have now used the first colour cartridge and I have now purchased an ink kit (100 mls of each colour as well as 300 mls of black). I also had to purchase a "chip resetter" as the ink cartridge has a chip in it which senses the ink levels. This resets the chip so that the cartridge thinks it is full. Without this, the printer will not operate as it thinks the cartridge is empty, even if it is refilled. The colours took between 3 and 5 mls to refill. This would appear to show that the cost of colour ink per cartridge (excluding the resetter) is about $5 to $6 compared to the cheapest price of $32 I could find (remember that the cartridge has to be replaced as soon as one of the five inks is empty but not all are empty). The black is about $52 per cartridge but I do not know how quick this will be used. This would reduce cost per postcard to about $0.43 to $0.50 (paper 28 cents and ink 15 to 32 cents depending on black). The colours can be purchased individually if they are used at different rates. This cost is comparable to camera shop prints.
STROBE
Strobe One
In early 2004 I decided that I wanted to go a bit further and get an external strobe. Once again I used the Internet to see what was available. The choice came down to some Ikelite strobes, some Sea and Sea strobes and four Inon strobes. I counted out the Ikelite strobes and decided at first on the Inon D-180S or D-220S for price. I sought prices from the Australian importer, Sea Optics (www.seaoptics.com.au) for the D-180S and found that the price was considerably more than I could get on the Internet. In addition, when I sought advice on cables to connect to the Ikelite housing and compatible with the Olympus C-5050Z. The answer was "We have no idea". I found this incredible, especially considering something I found out later (see below).
While I was on the Internet I found that there was little real information available about the compatibility of flashes to cameras and housings, especially if you wanted to mix different cameras with different housings with different strobes. However, I did discover that there was a bloke in Japan called Yuzo Kanda who sold cameras, housings and strobes and who was getting a reputation for providing good advice and service. His web site, Naturephoto Kanda Co Ltd had an contact link so I e-mailed him asking for pricing on the Inon D-180S and associated cables. He replied but said that he would not recommend it for the Olympus C-5050Z as you had to operate in in manual mode.
I e-mailed back asking what would he suggest and he replied with pricing on a Sea and Sea and the Inon D-180 and relevant cables. This is a better version of the D-180S and has some extra features. The price of the strobe was 43,500 yen, the cable 5,800 yen, a connecting bolt 1,260 yen and postage about 3,000 yen. All up, the price was 53,400 yen which equals about A$657 plus $10 conversion fee, a saving of about A$300 on prices from Australia (note that the Aussie dollar has gone from $0.70 against US to about $0.77 since then back to $0.68 and is in July 2004 about $0.73 since I purchased the lens and housing with a similar rise against the yen).
The strobe will operate in automatic mode (basically TTL) using aperture priority and so far in tests has taken well lit shots, although some settings were a bit over-exposed (see later for details). The strobe fires via slave sensor built into the strobe (that is, the strobe senses the camera's internal strobe firing and fires itself). On my tests above water, no cable was needed to activate the strobe. However the optic fibre cable I purchased fits over the sensor and runs to just in front of the camera's flash and behind a blocking device that came with the house for this purpose.
Above I mentioned that Sea Optics could not advise me about the flash operating with the camera and the right cable. Imagine my surprise when I read the manual and see that this information is included in there. The C-5050Z is even given as an example of how to use the strobe! Slack, can't they even bother to read the manual?
Strobe Two
In April 2006 my partner Kelly decided that she finally wanted a strobe to go with her Olympus C-5060Z which is in an Ikelite housing. We decided that the best strobe would be an Inon D-2000, basically the updated version of my Inon D-180. I looked around and again Naturephoto Kanda Co Ltd was the cheapest place on the Internet to buy. A couple of emails back and forward about accessories and I placed the order with Yuzo at Naturephoto Kanda Co Ltd on Saturday. The strobe arrived in Sydney on Wednesday, great service considering Tuesday was a public holiday in Australia.
The strobe is a better version of mine and has more controls. It appears to have more automatic settings. Above air tests have shown it to be very accurate with macro and wide angle. Underwater it has also been very accurate in exposure, both on S-TTL (Wide Angle) and Auto (Super Macro).
STROBE ARMS
The Ikelite housing has a handle on the left side that permits attachment of an arm. The handle top is specifically constructed to fit an Ikelite arm as far as I can see. Once again, the costs of these and all other custom built arms is horrendous, in the order of A$300 plus.
On the Internet I found a cheaper alternative. There is a flexible hosing system called Loc-Line. This consists of heavy duty plastic sections that link together and twist in any direction. These sections are shaped a bit like ) ( but one end is smaller than the other so that it can fit inside the other end. Other divers have used this to create arms. I purchased a 12" section of 3/4" hose (as it is US all sizes are Imperial - each section gives a usable length of 1" or 25 mm) which cost just under A$25 from Moyles Engineers Supplies. Their address was 1299 Botany Road, Mascot, 2020 but I was told in November 2006 that they appear to have gone out of business. Instead, try Graham McDonald Service on 02 9636 2284. They sold a friend 24" worth for $55 delivered overnight. The internal dimension of this Loc-Line is 19.7 mm but this is the minimum internal measurement. The actual internal dimension of the larger end is 26 mm. The external dimension of the Ikelite arm top is 19 mm so it meant that there was about 7 mm gap. I cut a piece of plastic hose I had to the right length and it fitted perfectly. This acted like a washer and the Loc-Line then fitted snugly over top. I drilled a hole through the bottom section and the top of the Ikelite arm and put a stainless steel bolt through to hold the section in place. This has worked perfectly.
 |
Four sections of the Loc-Line with the aluminium
base that connects to the strobe |
The other end of the arm was a little more difficult. I at first considered using a bit of perspex I had to create a small base. However, I have a friend who has an aluminium works and he cut me a small piece of flat aluminium to size. It is 6 mm thick and 32 mm wide. A length of 55 mm was cut and the corners rounded. I could have used a thicker piece of perspex and this is easier to obtain and can be cut yourself with a hacksaw. A hole was drilled towards one end and the connecting bolt that I purchased with the strobe (it is a stainless steel bolt but also has a plastic grip shaped like --O-- to enable tightening/loosening by hand) fits here. This is the hole you can see in the photo at left. I had to shorten the bolt to fit the thickness of the plate as otherwise it would have damaged the strobe bottom if fully tightened.
For the other end of the base, a number of possibilities offered solutions. The one I have seen others use is to put a stainless steel washer slightly larger than the minimum internal dimension (in this case, 19.7 mm) in the larger end (that is, the end open in the photograph at left). You then put a stainless steel bolt through from the bottom and attach from the top with a stainless nut. However, you need to make sure that the bolt has a spring washer or a lock-tight nut so that the chance of the nut coming loose and the whole section falling off is minimised. There is another way, but this requires access to a specialised tool. I filled one of the sections of the Loc-Line with resin (say Araldite glue) from the smaller end to a depth just past the narrowest bit and let this set (place it on a piece of plastic and pour in from wider end to the depth required). This created a solid plug. Once it was dry, my friend tapped a screw hole into the resin. We then drilled a suitable hole in the aluminium base and put a stainless bolt from the top through the base into the resin filled section. This was tightened (note that I put a plastic washer above to stop the bolt unscrewing). This means that the bolt cannot come free without it being very obvious.
The arm was now complete. I have been given four extra sections of Loc-Line from a friend who purchased two 12" sections and I use these as well. Kelly also has a similar arm although I modified it to fit the new strobe.
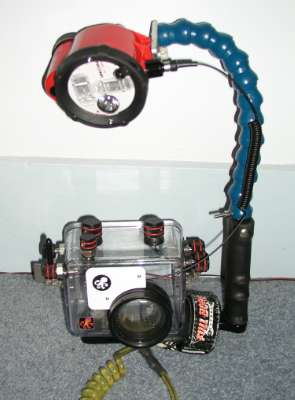 |
| The final setup |
LATEST MODIFICATIONS
When I purchased Kelly's strobe I took the opportunity to get two diffusers. These fit on the front of the strobe and makes the shadows softer and increases the coverage from 100° to 110°. I intend to only use this on macro photography. So far it seems to reduce the harshness of the lighting and shadows.
HOW IT ALL WORKS
Tests
My first tests were at home in my lounge. The most obvious observation was that the weight of the strobe was a little too much for the arm to hold the strobe in a fixed position 100% of the time. However, I suspected that this would not be a problem underwater and I was proved correct.
After reading the instruction books (for the camera and strobe), I decided to operate the stobe on Auto and the camera on the A (Aperture) setting. The camera was set to fire the internal strobe in slave function at the lowest setting and the film speed set at 100 ASA. For normal photos I decided on an aperture of F5.6 and for Macro and Super-macro I decided on F8. This was for both the setting on the camera and the strobe.
I also set up three "My Mode" settings. With the C-5050 you can set up to eight personalised modes. For each of these, you can pre-set many of the variables and thus save yourself much time when swapping between different types of photos. You can then allocate the selection of the various My Mode to a "hot button". Thus, you can switch between each of the settings by pushing one button and using the Jog Dial to move between the various My Modes. The My Modes I set were for Normal (eg wide angle), Macro and Super-macro. For Normal I set the lens at widest angle and for Macro I set it at about mid-range (so I could take shots a bit further away).
I then tried taking a few photos using the settings suggested in the strobe manual which included -2 exposure compensation for Macro and Super-macro. For Normal shots, this appeared to take properly exposed photographs. For Macro and Super-macro, they appeared to be over exposed. I checked the manual again and found that setting the camera to fire the flash as Slave meant that the Strobe needs to have the Advanced Cancel Circuit to Off. This is done by putting a small magnet in a hole in the camera back and pluggin with a screw. I have no idea what this actually means/does as it is not explained in the manual. When I did this the photos were properly exposed. However, I can say that without doing this the exposure for all photos was too bright.
First Underwater Photos
I first tried out the whole setup on 28 March 2004 at Bare Island. The few days before this had been wet with huge seas so I knew that it was not going to be a very good dive. The visibility was less than two metres and there was still a lot of surge, meaning that there was heaps of sand floating around. As I suspected, the stobe arm was able to hold the strobe stable and was easily moved into position. The arm can be moved to all positions for normal and macro photography.
My Normal shots were fairly well exposed but because of the amount of sand and dirt in the water, it was not clear if this was correct. The other shots appeared to be a little overexposed but properly exposed when the Stobe setting was changed to F5.6. I decided then to change the film speed to 64 ASA for future tests.
Second Underwater Photos
I dived again on 3 March 2004 at Maccas Reef. I had changed the My Mode settings for Macro and Super-macro to 64 ASA but otherwise left all the other settings the same. All these photos came out properly exposed. However, my Normal photos were sometimes a little overexposed, especially when the subject was white or yellow. I have now decided to also change the film speed to 64 ASA for my next tests. I have also decided to set up a new My Mode for shipwrecks. I already had such a setting for the camera without the strobe. Since most of the wrecks in Sydney are at depths over 40 metres, the light present is much lower and so I had upped the film speed to 200 ASA (the maximum possible). I will probably drop this to 100 ASA for first tests as the strobe gives me a lot more light than before. This may have to be altered later on. Sample external strobe photographs are on my Photo Page.
Third Underwater Photos
I used the camera on 4 March 2004 at Shiprock. This was a night dive so the photos were a little harder to take. The focusing light was very handy to aim and assist focusing. However, again it was very dirty and a lot of the photos were affected by sand and silt.
Fourth and Fifth Underwater Photos
On 6 March 2004 I used the camera again at Bare Island. It was a lot cleaner (15 metres) so I had much more success. The next day I used it at Shiprock again (viz of about 10 metres). I got a lot of good photos from both dives. However, one thing I noticed was that I was not getting any backgound light in any photos. While this is not particularly relevant to Macro and Super-macro photos, it is for normal photos. I then realised that I needed to modify the camera's flash setting for Normal photos to change it so that the camera let in all the ambiant light needed to balance the photo. This is called Slow Synchronisation. Basically the camera lets in all the light needed to take a good photo and the flash still fires. I have selected Slow 1 which means the strobe will fire as soon as the shutter opens (there is a setting that fires just before the shutter closes). I have modified the MyMode setting.
I also decided to try out the Strobe's Advanced Cancel Circuit which I had previously set to Off. The back of the strobe indicates that the setting should be On for the C-5050 but in the manual it says it should be off. I tested this in my lounge room and the On setting appears to provide better exposures. This is modified by removing a magnet from the back of the strobe.
Sixth Underwater Photos
On 13 and 14 March on two of the deeper wrecks of Sydney. A total failure. I had set up the Slow 1 settings as above but the camera shutter speed was far too slow. A disaster.
Seventh Underwater Photos
For deep dive mode I changed the exposure to -2 which should give a bit faster shutter speed but still let in enough light to light up the background. Tested on the Dee Why and Meggol wrecks in Sydney (see these pages for photos - the boiler of the Dee Why and the only shot on the other wreck). Worked a lot better, with reasonable exposure but still some blurriness due to movement (slow shutter speed) and the strobe does not appear to be firing at full power on Auto. I want to try again with Advanced Cancel Circuit set back to Off but I have lost the magnet (idiot). I will try to find another to fit. I will also change aperture to f4.
Eighth Underwater Photos
Found the magnet, stuck to some of my NiMh batteries. Turned the Advanced Cancel Circuit off again. This time I dived Parsley Bay and Camp Cove and took some 180 photos, mostly of sea horses and cuttlefish. Pretty good exposure but some were a little over exposed. Not sure why as they appeared to be similar in set up to other correctly exposed shots.
Ninth Underwater Photos
Dived Cape Banks Caverns on the northern side of Botany Bay. Most of the photos were normal wide angle shots and I used the settings of Aperture Priority, f5.6, Strobe Advanced Cancel Circuit = Off, 7.2 mm focal length, Slow 1, strobe Auto and f5.6. All photos were correctly exposed. However, some shots were blurred due to slow shutter speed (as low as 1/2 second). The exposure compensation was -1.0 but when I changed to -2.0 the shots were still correctly exposed although a little darker in background and there was less blurriness. For next try I will use f4 to increase shutter speed a bit further. All the Macro and Super Macro shots were correctly exposed and had no problems. I do not intend to change the setting used (see below).
Tenth Underwater Photos
Used on a boat dive at Bare Island Deep. Exposure was correct and far less movement. It was pretty surgy so I only lost a few photos due to movement of the camera and virtually none due to fish movement. I think I have got it right.
Eleventh Underwater Photos
Fantastic!! Finally, proof that I have got it right. While doing a drift dive from south of Barrens Hut, I took a series of photographs of a sunfish. All came out great and a couple almost perfect. See the photos page for some sample shots. For wide angle shots, I have the right settings. See below.
Twelth Underwater Photos
After stuffing up my attempts to take photos on a deep dive (I put batteries in camera the wrong way), I dived at Six Fathom Reef the next day and got perfectly exposed Wide Angle, Marco and Super Macro photos. The only thing now is to check out the wide angle deep settings.
Thirteenth Underwater Photos
I did a dive on the Myola page for some of the results.
Basically, how this works is that the internal strobe fires a small flash, setting off the Inon strobe which fires a small flash. The light bounces off the subject, goes through the lens and is read by the camera's metering system. The internal strobe fires again, this time a much larger flash and the Inon strobe fires at the required intensity. Thus the internal light meter of the camera has worked out how strong the strobe needs to fire. Seems to work great. A big downfall with this on the D-180 and my Olympus C-5050Z is that to do super-macro, you need to turn the Advanced Cancel Circuit to Off and you can only do this by putting the magnet back in, something you cannot do underwater. Hence, it is impossible to swap from wide-angle S-TTL to Super-Macro while underwater.
NOTE:
I no longer use Macro setting, I only use Super Macro for close ups.
Final Settings
Since the 13th Test I have not really had a failure at all. Probably 90 to 95% of photos are correctly exposed. My only failure is still some movement on deeper dives when the light is poorer. Common to all settings:
| Type of Photo | Shooting Mode | Aperture
Camera and Strobe | Exposure | Zoom | Flash Mode | Metering | Mode | ISO | Flash | Flash | AF Mode |
| Wide Angle
| A | f4 | -1.0 | 35 mm | Slow | ESP | AF | 64 | Internal/External | Slow1 | iESP |
| Deep | A | f3.6 | -1.3 | 35 mm | Slow | ESP | AF | 200 | Internal/External | Slow1 | iESP |
| Macro | A | f8 | -1.0 | N/A | Forced | ESP | Super Macro | 64 | Slave 1 | Slow1 | iESP |
| | | | | | | | | | | |
COST SUMMARY (excluding printer)
| Item | US$/Yen | A$ |
| Olympus C-5050Z | | $1,364 |
| Olympus 128 Mb XD | | $131 |
| 256 Mb Flash Card | | $130 |
| Ikelite Housing | $536 | $776 |
| Sea and Sea Wide Angle Lens | $330 | $472 |
Inon D-180 Strobe
includes cable and freight | 53,400 y | $667 |
| Arm | | $25 |
| Diffuser | 2,900 y | $34 |
| TOTAL | | $3,482 |
Note: Inon D-2000 cost 49,800 yen, cable 8,480 yen with freight of 2,800 yen giving a total of 61,880 = A$719 (85 yen to $)
WARNINGS
There are a number possible downfalls of purchasing items from overseas (and via the Internet).
- A remote possibility that you purchase from a bogus site. This can be negated by only purchasing from known and recommended sites.
- A remote possibility of your credit card being fraudulently used after you have purchased an item. I purchase items on the Internet from overseas and Australia all the time, both for myself and for my employer and I have never encountered a problem.
- The possibility that the item will get lost on the way to Australia. Again, fairly remote and almost totally remote if a courier or registered post is used (this is normal).
- The possibility that the Australian Customs will hit you for duty (GST) forcing the price up by 10%. Take this into account when deciding to purchase from overseas. It is unlikely to occur if the cost in A$ is less than $1,000 or so.
- The possibility that the item is damage while in transit, again remote from my experience as all my items have been very well packed.
- The possibility of incorrect item. This is high if you do not take care. Research properly.
- The possibility of faulty item when received or faulty later, requiring a return to the country of origin for repair (as warranties are generally not honoured outside country of purchase). This is variable, depending on the item. Some will have very low fault rates, such as housings or lenses, and higher for cameras and strobes. Again, take the saving into account and build in a margin to cover return freight if needed.
Finally, research well before purchasing. Speak to others who may have done this before. Check out underwater photography web sites and chat rooms.
|  v6.00.307 © 2003-2005

