|
Michael McFadyen's Scuba Diving - Bauer Junior-II Scuba Compressor
IMPORTANT NOTE
Do not run your compressor on mineral oil. Read carefully to see why. Also note all prices are in Australian dollars which are (as of 10 January 2026) US$0.67 to AU$1.00.
INTRODUCTION
As regular readers of my web site would know, I do a lot of diving. For all but two of the last 36 plus years I have done more than 100 dives each year, and even in those years I did almost 100. Of these, the vast majority have been in New South Wales with most being in Sydney. This is over 3,170 dives (in Sydney). For all the dives in Sydney, as well as the vast majority of the NSW dives, I have used my own tanks and as such, I have had to pay for the airfills.
In recent times, the cost of an airfill has reached $12 or even $15 in Sydney and even more a fill in some parts of NSW. Even where dive shops sell dive cards offering 10 or 20 fills at a reduced rate, the cost has reached up to about $10 or $12 a fill, or at the best, $8. This is far more expensive than places like Perth and a bit more expensive than Melbourne.
For someone like me who in 2005 and 2006 did a total of 368 dives, all but 44 of which were using my own tanks, the cost would have been between $1,944(@ $6) and $3,240 (@ $10). As you can imagine, my total air cost over the years must have been huge.
In mid-2001, a few friends and I started discussing the high cost of airfills and the fact that we were sick and tired of this impediment to our diving. We were also angry that some dive shops were now only filling tanks to about 200 to 210 bar. This was because a new Australian Standard (which, by the way, has no basis in law!) stated that tanks could not be filled past a certain pressure so that regulator yokes would not break under pressure. What a poor excuse to stop pumping tanks to a higher pressure!
After this we decided to investigate acquiring a compressor. In the end, we had four people interested in coming into the partnership (including me).
COMPRESSOR CHOICES
 |
| The compressor in its container - note the old blue filter at bottom |
At first we looked at getting a second hand compressor but over the next few months we found none available at the right price (nearly all the available ones were large commercial compressors). In the end, we decided to look at purchasing a new compressor. We looked at the available compressors and decided that the Bauer Junior-II compressor was what we wanted. This compressor advertises air delivery of 3.5 cubic feet per minute (100 litres a minute) and comes with either an electric motor (single or three phase) or petrol engine. We decided that single phase electric was the one we wanted as we did not see that we would need the petrol engine and that the noise of the petrol engine would be too great for where we intended to use it. In addition, we wanted to be able to take the compressor away for use at remote locations. The delivery figure of 100 litres appears to be correct (see later comments).
THE PURCHASE
In about October 2001, DIVE Log had an advertisement for a Queensland based company (I forget the name) offering a compressor at a not bad price. I rang this company and the person who answered had no idea about the ad and appeared to have no idea about the compressor. He eventually said he would find out more about the special in DIVE Log and ring me back. I also rang MW Hydrostatics in Sydney, a company that I used to have a great deal of time for and who had in the past given me a lot of good service in providing me with 100% oxygen fills and tank testing. Again, I was told that the relevant person was out and he would ring me back (the service of this company had dropped off at the same rate that its prices had increased when it was taken over by a much larger company - RFD - in the late 1990s).
I also rang another Sydney based company but again the person was not available.
In desperation to speak to someone who actually knew what he was talking about, I rang Australian Safety Engineers (08 9456 2066 or ase@ase.net.au or look at ASE's Web Site) and spoke to a couple of people. What a difference! Finally, a number of people who knew what they were talking about and even the lady on the switchboard seemed to have good knowledge of the compressors.
I was quoted a price for the compressor that was attractive to me and I asked for a price for an hour meter as well as three extra filters and delivery to Sydney. The compressor comes with the final pressure normally set at 225 bar but I asked for it to be adjusted from 225 bar to 270 bar. The compressor comes with a pressure gauge on the filling hose. The next day I received back a price of $5,390 including GST which worked out at $5,182 for the compressor (with meter) and $51.98 for each of the filters. I had still not received any calls back from the other three companies. I placed the order for the compressor using my credit card and waited for the compressor to be delivered. The final pressure was to be adjusted as requested (note that it is easy to adjust yourself).
The compressor arrived a couple of days later, having taken only three days to cross Australia. On 20 November 2001 we did our first airfills.
THINGS TO KNOW ABOUT COMPRESSORS
Moisture and Air Temperature
Before going on, a couple of things that need to be known before deciding on purchasing a compressor and understanding what the running costs may be.
The carrying capacity of air for water moisture is directly related to the air temperature. The higher the air temperature, the larger amount of water moisture that the air can potentially hold. I say potentially, as it does not always hold this quantity (think of a hot dry desert compared to a cooler but humid tropical location) but you need to treat it as if it is fully saturated (unless you can record relative humidity). This means that on cold days, air generally has far less moisture suspended in it than it does on a very hot day. You can notice this on cold days when the mirror in your bathroom easily fogs up as the steam coming from the water from your hot shower cannot be carried by the air whereas on a hot day the mirror stays clear, even though you have the shower temperature the same.
This relevance is that on hot days, the air can potentially hold more moisture. For example, at an ambient temperature of 10°C air being processed by the compressor can hold between 17.3 to 21.8 grams per cubic metre whereas at 20°C air can hold between 30.4 to 37.6 grams per cubic metre (almost double) and at 30°C air can hold between 51.2 to 62.4 grams per cubic metre (triple). This means that the higher the air temperature, the more water moisture in the air.
Air that we breathe when scuba diving must have the water moisture removed for a number of reasons. The main one is to ensure that the water does not corrode the inside of a cylinder and in doing so, consume the oxygen in the cylinder thus endangering a diver's life.
Accordingly, the moisture must be removed from the compressed air before it enters the scuba tank. The higher the ambient air temperature, the more moisture that needs to be removed from the air that the compressor processes. As you can seem from the above figures, this increases dramatically as the temperature increases.
In addition, most compressors use oil to lubricate the pistons inside the cylinders. Some of the oil ends up in the compressed air. Not only is this unpleasant, it can cause problems for divers and your regulators. This also needs to be removed from the compressed air before it enters the tank.
Filtration
All compressors remove moisture and oil from the processed air via a number of ways. For the Bauer Junior II and most compressors, the first is through an Intermediate Separator which removes the vast majority of the water (as well as oil from the compressor block) from the air. This is located between the second and third stages. This mixture is released via a manually operated valve (this is done every 15 minutes - as are the later valves).
The second way is via the Filter System P21 which holds the Triplex cartridge. The Filter System removes more water and oil in the separator section. This is basically done by swirling the air around (as does the Intermediate Separator). The water and oil mixture is released via two manually operated valves. The final cleaning is done by the replaceable Triplex filter (click here for more information). The life of this filter is said by Bauer to be 26 to 32 12 litre tanks at 20°C but only 15 to 19 12 litre tanks at 30°C. In reality, it is much higher than this as I will explain later. Therefore, a main, if not the main, running cost of a compressor is the Triplex filter which needs to be replaced regularly.
Electricity
The second cost of the compressor is electricity. The motor is stated to draw 2.2 kilowatts but in reality it is about 3.2 kilowatts. More importantly, you need to ensure that your power supply is sufficient to run the compressor. The compressor comes with a 15 amp plug (which will not go into a normal plug) but the motor actually draws closer to 9.25 amps, although the initial starting draw could be much higher (since a 5 Kilowatt gen-set on a cruiser would not run it). Anyway, originally I changed the plug to a normal household plug and did not suffer any problems in over seven years, although I later changed to a 15 amp circuit and in my current house now have it on a 15 amp circuit. We have used the compressor when away on a normal 10 amp circuit and have only ever encountered problems when someone turned on a clothes dryer on the same circuit.
Note that I have a solar system and a home battery setup. In fact, I have paid no money at all for electricity to fill tanks since 2017.
Oil
The last regular cost to be considered is the oil that the compressor uses to lubricate the compressor block. This is relatively expensive but as you do not need to use much in normal running, its cost is little from day to day (see end of this paragraph). The compressor used about 50 mm for about every 40 fills in summer and about every 50 to 60 fills in winter (using mineral oil) although when I first switched to synthetic oil it seemed to use about 100% more per fill (see later why). However, it is now using less than when we used mineral oil. In addition, you need to replace the oil every 1,000 hours or annually. Synthetic oil costs about $80 for two litres, although I note on the Internet that you can get it a lot cheaper in the USA (it would not be worth us in Australia doing this due to weight/freight and possible hassle of importing oil). Synthetic oil only needs to be replaced every second year. See later more comments about oil.
USING THE COMPRESSOR
Each filter comes with a graph paper chart on which you cross off a certain number of squares (representing units - 1,361 for each filter) considering the air temperature and the size of the tank. The chart also has a table that enables you to work out the number of units for each fill.
For example, an 11 litre tank being filled at 22°C takes up 25 units (at 30°C 32 units). However, this is for a totally empty tank, something that is uncommon in most divers and certainly uncommon with the owners of our compressor. As the number of stated fills for each filter was so low, I did some calculating and came up with a series of tables that enabled us to calculate the actual filter use as compared to the potential use. This takes into account the remaining air pressure in the tank, the temperature and the tank's size. You should be able to work this out yourself when you see the chart.
I was very conservative for the first filter and it lasted 82 fills when we swapped it for a new one. I opened the filter after I replaced it and found that the molecular sieve (that removes the moisture) was nowhere near used. After that I steadily refined the system and found that we could be a bit more liberal (but no need for compressor Nazis to contact me claiming this is dangerous as it is still within the filter's parameters) and still did not have any problems with oil or moisture in the air. The number of fills per filter ranged from 82 to 103. The largest number tended to come in Autumn not Winter as you would imagine. This is because in Autumn the air is cool but the water warm so you use less air when diving but the cool air lets more fills be done. In Winter the tanks are generally emptier as the cold water makes us use more air so more units of the filter get used up. Summer has the lowest number of fills per filter. The average fills per filter over the first 11 filters was 95.
Tank Fill Time
The average time to fill a tank after over 4,700 fills was 19.5 minutes (this was almost the same as it had been but in more recent years I have been doing longer shore dives with emptier tanks so it has gone up a bit). This means that the average rate of filling is almost exactly the claimed 100 litres a minute. This is a little higher in Summer but there is not much in it. As I indicated above, we purchased an hour meter with the compressor so we could easily record the running time of the compressor. I think it was well worth the small extra cost. If you do not have this, use a stopwatch to note your operating time and make sure you record this use.
Filling Time for Various Tanks
Filled to 230 bar
| Tank Size | Empty | 50 bar | 100 bar |
| 7.9 litre (65 cf) | 18.2 mins | 14.2 mins | 10.3 mins |
| 10.2 litre (85 cf) | 23.2 mins | 18.2 mins | 13.1 mins |
| 11.3 litre (90 cf) | 26.0 mins | 20.3 mins | 14.7 mins |
| 12.2 litre (100 cf) | 28.1 mins | 21.9 mins | 15.9 mins |
| 15 litre (1,000 cf!) | 34.6 mins | 27.0 mins | 19.6 mins |
Of course, the above table is based on the average, in Summer the time is longer and in Winter it is a little quicker.
Actual Use
The compressor is simple to use. The steps for filling are as follows:
- Check the oil level
- Connect the filling hose to tank and open tank and hose valves
- Start the compressor
- Open Intermediate separator valve to release water
- Open the two cartridge valves to release water
- Repeat the above two steps every 15 minutes
- When tank is filled (we fill to 250 bar), quickly swap to next tank
- Repeat till finished and turn off compressor
- At end, again release the water from the three valves
- Record fills and hour meter
Using the compressor as it comes standard, on most days steel tanks filled to 250 bar need to be topped up once they cool as they drop to only 215 to 220 bar (on my Aladin Air Z digital pressure gauge). On warm days (over 25°C), aluminium tanks also may need to be topped up as they are about 225 bar. For deep dives we top again to get around 230 to 235 bar. Note that analogue gauges generally read much higher than the digital ones but similar to the compressor gauge.
On very hot days (over 30°C) I try to avoid using the compressor as it uses the filter far quicker, the compressor heats up and the tanks get so hot. For example, during December 2005 (Summer), my house in Sydney had 21 days out of 31 days over 30°C and 4 more were 29°C. During the days when I had to use the compressor, the tanks were so warm that they did not cool down even when left for hours and the final fill pressure when used was 215 bar even after topping up.
With a second fill whip the tanks do not heat up anywhere as much.
Since early 2008 I have the compressor under my (new) house where the maximum temperature in summer is a more consistent 21 to 23°C.
PROBLEMS/OTHER THINGS
When we were down to the last filter (of the four we got at the start) I decided to order three more. I rang the Sydney and Queensland suppliers again early in the morning but the relevant persons were not available. I awaited their return call. By 3 pm I had heard nothing so I rang ASE in Perth and ordered the filters. They cost $57.48 each including freight. I received the filters the next morning at 8 am. Later that day the Sydney supplier rang me. What service! Pity ASE is not as efficient as these blokes (a bit of sarcasm here).
At around 410 fills the nipples for the separator section of the filter (these are really the valve seats) started leaking so I needed to order some. These cost $4.40 each plus freight (I ordered six and two more filters to lessen the cost of the freight). Of course, this time I only rang ASE in Perth. Again, I got them the next morning. One of the replacement nipples broke at 1,574 fills (meaning they lasted about 3.5 years). I replaced both and kept the unbroken one as a spare. I still have two nipples, so I figure I will not need to buy any more for about six years or so. The new ones are a better design and this appears why they will last much longer.
About 35 fills later the compressor started leaking air from the second stage relief valve (this is part of the Intermediate Separator). I ended up ringing ASE and spoke to a mechanic who advised me that it was likely that the discharge valve for the third stage was broken. I pulled the third stage apart and sure enough, the spring inside the valve was broken. I ordered a new discharge valve as well as the intake valve and an o-ring (I was advised to replace both - but I do not think I probably had to). The cost with freight was $239.33. I replaced the valves and the compressor worked again.
One of the partners in the compressor looked at the discharge valve and changed the broken spring. About 100 fills later the valve broke again. This time I replaced the discharge valve with the repaired one. This was still in use in late 2014 over 2,300 fills later. The broken one was also repaired. Note in 2008 I discovered that part of the broken spring was still in the compressor and it jammed the valve, causing problems that I will detail two paragraphs below.
The nipple from the Intermediate Separator deformed a bit and was sticking at about 1,650 fills (meaning that it was not releasing the water/oil mixture when opened). I cleaned it and filed it down a bit and it was no longer sticking. When I got a chance I purchased a new one and fitted it at 1,700 fills at the same time I replaced the intake air filter (which takes dust and dirt out of the air before it enters the first stage of the compressor). These were purchased from Pro-Diving Services in Sydney and were fairly cheap (see later for contact details).
In November 2008 I decided to open and clean the third stage as I was still getting very low hours from each filter (see More Problems towards the end). After I cleaned it and started the compressor, there was a catastrophic failure of the cooling pipe from the second stage to the third stage. As I mentioned above, this was caused by a piece of spring catching in the valve (meaning it could not open and let air out to the third stage) and the safety valve in the water separator failed due to it being clogged by carbon (again, see More Problems). It cost about $175 to replace.
Note that the compressor comes with a very good manual (I have as an Adobe Acrobat file, it is on my web site in the Downloads section - size is about 3.5 Mb) and anyone with a little mechanical knowledge should be able to do minor and even major repairs.
Note, I also have Acrobat files of other Bauer compressors and items. Email me to see if I have the manual you want.
The only other problem we have encountered is overheating. As this was originally being used in a small suburban house, we built a housing to protect it from the elements, to keep it safe from thieves and to provide some sound insulation. We gradually modified this to provide a better air flow through and around the compressor. The compressor itself does not get all that hot but the On/Off switch has a thermal cut out and in Summer, it was cutting out after 40 minutes if the weather was hot and if the airflow was restricted a little. In early 2004 I totally removed the back off the housing to provide a better airflow and after that it only stopped once or twice and each time it restarted immediately. This seemed to solve the problem.
In early 2008 we moved house to a much larger home. The compressor now sits under the house and it never gets hot and there is little sound heard outside the house and none in the neighbours.
In August 2011 after 2,763 fills the compressor was leaking from the third stage. I had to replace the o-ring that sits between the discharge valve and the valve head. In February 2014 I had to change it again after 3,500 fills. I guess that the one we used is a lot softer than the old one.
Also see later comments about changing from mineral to synthetic oil.
MORE INFO AND THINGS TO CONSIDER
Since we purchased the compressor in late 2001, one of the partners moved away from Sydney so we bought out his share. Early in 2006, my wife bought in so it is again now owned by four people, although Kelly and I own half.
In mid-2004 I was offered six filters by a person who had purchased a large number for a project (but he only used a couple). These cost me $43.33 each, a saving of about $13 to $16 each. However, they did not seem to be as good as the original ones as they did not last as long each (again, see my comments later about changing from mineral to synthetic oil). Despite this, they were still good value. I still have two unused ones.
There are some other advantages in owning our own compressor. The first is that we do not need to have our tanks tested every year. Unlike the situation in Australia where we are forced to have our tanks tested every year (note that this is not a law, just an Australian Standard which most dive shops treat as law), most other countries do not require tanks to be tested each year. For example, Germany only requires tanks to be tested every two years (so long as tested in the calendar year that it is due which means it can be up to three years) and similar laws apply in the US. Therefore, we test only one or two tanks each a year (I have nine tanks and my wife has five), thus saving up to $700 a year).
Another advantage is that we do not need to drive some distance to a dive shop and stand around while we wait for ours (and others in front of us) to be filled and then only have them filled to 200 bar. Until 2006 I normally took my tanks and those of the other partners home with me and I filled them as I washed my dive gear, had a cup of tea and read the paper. It was no work on my behalf. Since we normally dive together a lot of the time, I simply took the tanks to those dives or to our dive club meeting where I gave them back. The other partners had access to my house to fill their own tanks.
In early 2007 one of the partners purchased a large commercial compressor at auction (ex a dive shop that went broke) at the bargain price of $2,500. As the large compressor was installed in the other partner's factory, the smaller compressor got less use. Basically, only my wife and I generally used the small compressor while they used the large compressor.
Since then, one partner died, so there are now only three owners. The other partner used to only use the compressor on trips away from Sydney where he might take it to provide fills at a remote location (eg Seal Rocks). However, he now has another petrol powered compressor and has not used it for many years.
With our own compressor, we can ensure that our tanks are filled to a pressure that is sufficient for our diving. We can also top up tanks "free" that may have only been partly used due to an aborted dive or top up pony bottles etc without occurring a fill cost. Finally, we can take the compressor away with us to isolated places when we use our own boats so that we can fill our own tanks without travelling long distances to dive shops (eg Seal Rocks and at Jervis Bay). This has saved us very large amounts of money and time.
The only real disadvantage of the compressor is that it is relatively noisy. When I lived in the Inner West of Sydney in a small house, even though we insulated it as much as we can, it made a lot of noise. We had to consider my neighbours when running the compressor, generally using it only in the middle of the day and certainly not early or after 6 pm or when they may be entertaining in their backyards.
MODIFICATIONS
Hour Meter
As I indicated above, we had an hour meter installed when we purchased the compressor. I would recommend this to all as it certainly helps keep track of things for servicing etc.
Synthetic Oil
As also indicated above, you need to change the oil in the compressor every 1,000 hours or annually. In June 2005 I purchased some synthetic oil to enable a change of oil and also to move away from mineral oil. This cost $80 for two litres. I got this from Pro-Diving Services at Botany. About 360 ml of oil is needed for each change. I changed the oil in July 2005 and after that it appeared that it used more synthetic oil than it did mineral oil.
One thing that I did not know is that switching from mineral to synthetic oil can cause problems. Again, see what I found out after I did this (next heading) and make sure that you do not strike the same problem.
Repackable Filter Cartridge
In October 2005 I purchased a repackable filter cartridge from Pro-Diving Services. This stainless steel filter is almost identical to the normal cartridge from the outside. However, the air only passes through the filter once compared to the two times it passes through the standard filter. Despite this, the volume of material inside the cartridge is actually a little more and the air must (when you sit down and think about it) pass exactly the same amount of material when passing through the filter.
I was advised to start at half the number of fills of a normal cartridge and modify up from there. I worked out a calculator based on the normal cartridge modified to reflect this. Note also that the air enters the filter from the top whereas in the original non-repackable filter, it enters from the bottom.
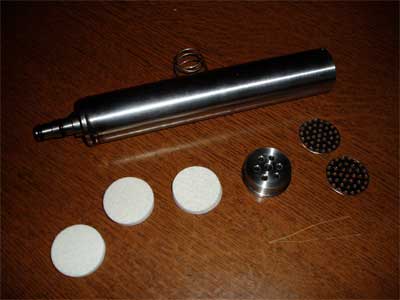 |
| The refillable filter and the parts that go inside |
The repackable cartridge cost about $286 and the molecular sieve (which removes moisture - click here for a detailed explanation) about $88 and the activated carbon (which removes oil and odours - click here for a detailed explanation) about $44 (each a bit over two litres). You also need felt pads. I was given some with the purchase and when I purchased other items later. I will report on this cost when I need to purchase more.
The cartridge is filled as follows from top:
The total internal volume of the filter is about 200 ml. However, when you take into account the three pads and the air space needed above the top pad, the total volume of material is about 160 ml. Therefore the cartridge takes approximately 80 mls of each material. As the total cost of the purchase was about $418 and cartridges cost about (say) $60 each, this only represents just under seven genuine cartridges. Therefore, as soon as the equivalent of seven cartridges have been used, we should be ahead. The material I have purchased was about 2400 ml of activated carbon (say 30 repacks) and 2400 ml of molecular sieve (say 30 repacks) which represents about 30 filters if they last as long as the standard cartridge. If a refill only lasts half as long as a normal one, then we have purchased the equivalent of 15 cartridges so the cost will be just over $28 each for this lot. Of course, after this it will only cost $132 for the materials so the price will drop to the equivalent of just under $9 each (assuming we only get half as much air from each filter refill).
 |
| A diagram of the inside of the refillable filter |
I installed the repackable cartridge on 6 November 2005. On 21 December 2005 I replaced the materials. The filter had done just over 11 hours and used half the units (676 out of 1361) that a standard Bauer filter would process. We had filled 35 tanks. Note that the weather for this period was far hotter than any period since we had purchased the compressor, with virtually every day over 30°C but low humidity. When opened, the molecular sieve was okay for the bottom 40% but the top 60% (remember the air comes in the top) was affected by moisture and it was hot. The top filter was oiled. I replaced the materials but this time made the activated carbon a little more than before (as the air had a very very slight oil taste that no-one but me had noticed) and the molecular sieve a little less. I also decided to review the filter at a shorter period (400, 500 and 650 units) for the next few filters to get a better idea of when we need to replace the materials.
Remember, this was only four months after I changed to synthetic oil.
For the second repack, I checked the air quality at 400 and 500 units and it was still excellent. I repacked the filter again on 15 January 2006 (the third filter). The filter had done 11.25 hours (just a little more than the previous one) and filled 37 tanks. I had used 660 units on a standard Bauer filter graph, just less than the previous filter. Again, nearly every day was over 30°C for this period. When I opened the filter, the molecular sieve was 80% used.
For the third filter I put 80 ml of carbon and 80 ml of molecular sieve in. This represents about 29 refills from the material I purchased. This works out at $36.00 a filter for the current batch and $10.66 for when I buy new materials. This will be about 19% of the cost of a genuine Bauer filter. I had intended to again repack at about 660 units but it was still going very well at this time. At 752 units I opened the cartridge and checked the molecular sieve. It appeared to be about 75% used. I repacked it using the same materials and changed it at 850 units. It had done 40 fills and run for 12.27 hours. The next filter did 85.5 fills and ran for 27.26 hours. It was about 95% used. Since then I have been getting between 90 and a bit over 100 fills, depending on temperature and size of tanks etc.
Looks like it is at least as efficient as the standard filter.
Summary of Repackable Cartridge
| No of Refills | Sieve - mls per refill | Carbon - mls per refill | Bauer Units | Average Hours | Average Fills | Average Cost per fill | Comments |
| 63 | 80 | 80 | 1250 | 21.4 | 64.2 | $0.47 | Total since purchased |
| 32 | 80 | 80 | 1250 | 32.1 | 93.0 | $0.38 | Since fixing |
Back Pressure
In early January 2007 I decided to modify part of the compressor. I had read a paper on the internet by Ted Green. It was called "Understanding Scuba Compressors and Filtration". See Neptuno' World Articles Web Site to read it. In this article, Ted states that increasing the back pressure on the compressor's filter outlet will do a number of things. The main one is that it increases the amount of air and the time that the air will spend in the filter. This will also make the filter work more efficiently.
The Junior II back pressure is set at 150 bar. Ted says that he has run his compressors at a back pressure of 3000 psi (close enough to 200 bar for my purposes) for 8,000+ hours without a problem. I changed the setting on our compressor to 200 bar (I actually set it a little higher at first by mistake but I have since put it back at 200 bar). This means that there will be about 1/2 the amount of moisture in the air in the final filter by percentage. I decided I would monitor how this affected the filter. If it seemed beneficial, I would keep it set at this. Note that for the first filter after I did this the molecular sieve was used far less than I would have expected.
Note that it is easy to modify, check out the Bauer Junior II Manual on my web site. Basically, start the compressor with totally empty separators (that is bleed the two filters) and let all the air out of the filler line. Attach the filler to a tank but do not open the tank valve. Watch the compressor's pressure gauge. It will go up quickly once the air starts filling the last filter and when it reaches 150 bar (or what ever it is set at), it will then go much slower. Adjust the backpressure by turning clockwise a little and test again. Once you have it at 200 bar, set it at this.
In April 2008 I changed the back pressure back to 150 bar as I was still getting an oil taste after a short period on a new filter. I may again review this later in 2009 once I am sure that I have resolved the mineral/synthetic oil problem (see next major heading).
Second Whip
In February 2008 I purchased a second fill whip from Ebay. It came from Florida and cost us $172. This is a Bauer product and was well under the going price in Australia. It cost $80 to get the necessary T joiner and plugs to adapt the two hoses to fit. The main advantages are that filling two tanks at once means they do not heat up as much and I do not have to rush when swapping tanks over.
MORE PROBLEMS
Oil Taste in Air
In July 2005 I had to replace one of the filters that I had purchased from a person well before I thought I should as I could taste oil. I should state that I am fairly sensitive to things like oil in air (just as I can pick up that milk is nearing its expiry date well before others do). No-one else had noticed it.
At the time, I thought that the filter was just not as good as the others.
The next filter gave much better results, but not as good as previous filters. After this I purchased the repackable filter as previously described. Right from the start I was a little disappointed in the number of fills/hours we were getting, being less than half what we achieved using normal filters. I thought that this was just the result of not using the Bauer filters.
In early 2007 we started getting even less fills per filter refill than before. In late 2007 when on a liveaboard dive trip to the Great Barrier Reef, I spoke to one of the members of my dive club who has exactly the same setup and I discovered that he was achieving far more hours than we were. He suggest I check the Intermediate Separator (between second and third cylinders). This has a sinter filter and he thought it might be clogged. I cleaned this, even though it was not all that dirty. I also cleaned the outlet valve area which was a bit clogged.
However, I still did not get any better results and in fact, it got worse. In late November 2007 I rang Australian Safety Engineers in Perth and spoke to one of their engineers, Mike. I told him what was happening and after he questioned me, he thought that perhaps I had not reassembled the Intermediate Separator correctly. There is a "distribution plate" (as it is called in the manual) above the sinter filter (called "filter insert") which he thought I might have put in upsidedown. This is a sort of washer that looks like a fan and has ////// vanes in it. These direct the air from the second stage cooler into the separator and starts the air swirling in a clockwise direction. This centrifugal force causes the water and oil to come out of the air and drop to the bottom of the separator.
Mike also told me that mineral oil and synthetic oil is not a good mix and that they recommend that if you have been running on mineral oil and then change, you should change the synthetic oil again after 20 hours to get rid of any contamination.
When I pulled the Intermediate Separator apart (it is easy), the plate did not come out. I used the lugs in the top of the "baffle funnel" (which sits above the filter) to aline with the holes in the plate and then twisted it and it came out.
Well, the plate was in the right way but I now know what the problem could be. The blades (the //////) bits were clogged completely with a gunk. The gunk is a mixture of a hard black substance and a gooey substance. Only about 10% of the blades were free, meaning that the centrifugal action must be greatly diminished.
I pulled the whole top part of the separator off the compressor and what I found was amazing. At least 75% of the reset where the plate fits was full of this gunk.
I cleaned it out as well as other parts that I could see.
After this I did some checking. On the Bauer web site I found a document that states in part:
A simple switchover from mineral oil to synthetic oil is only possible during the first 100 operating hours of a new compressor. Beforehand, the compressor has to be cleaned thoroughly. Older units have to be checked by a qualified service technician prior to the oil change. Synthetic oils tend to dissolve carbon deposits inside the compressor. The dissolved residue will clog filters, valves and coolers. A switchover from synthetic to mineral oils is possible anytime.
Therefore, it is obvious that the gunk is some of the built up carbon deposits from the almost 350 hours of use on mineral oil. This in itself is very interesting. The amount of carbon is amazing and one good reason to use synthetic oil from the start (why do they not provide it as a standard?). Imagine the build up on the piston and valves over years of use. USE SYNTHETIC OIL ONLY!!
I checked the Separator again about five hours later and found some more traces of carbon. I also checked again five hours later and there was a smaller amount. I decided to continue checking every five or so hours till there was none. Note that 23 hours after I first checked, the check showed some hard black carbon, the first I had seen in 10 hours, and a little gunk. After almost 40 hours there was still some black bits turning up in the first and second stage separators. When will it stop? At 55 hours I again checked and it was as bad as the first time I checked it.
After the cooling pipes between the second and third stages blew, one of the partners and I decided to totally clean the compressor. Over three hours, we pulled off the head of each stage, cleaned the valves and pistons and reassembled it. The first stage was pretty clean, but the second stage was very clogged and the third stage fairly bad as well. I am hopeful that we have finally fixed the problem. In the first filter repack after this I got more fills than all of the last 20 repacks. When I checked the final separator, there was only a tiny amount of very small carbon bits and no gluggy stuff at all. In addition, the felt pads in the filter were totally clean for the bottom two and the top one was only slightly oiled.
The next filter repack gave me a record 62 fills over 17.38 hours operation. When I checked the filter, the sieve was about 75% used and the top pad was a little oiled. The bottom two pads were clean. The next filter gave 85.5 fills over 27.26 hours operation. Much better!!
If you have changed your compressor from mineral to synthetic oil and you have done more than a few hours (I would suggest well under the 100 hours Bauer says), totally pull apart the clean all three stages (pistons and valves) the two separators and any other places you can think of.
OTHER REPAIRS/MAINTENANCE
In early 2020 the compressor started turning off after 30 minutes or so operation. In the end I had to hold the on/off switch on using a piece of dowel. In May 2020 the compressor stopped working totally. I worked out that it was the on/off switch which is a thermal switch as well (if it gets too hot it turns off).
I purchased a new switch from the same manufacturer (the only one I found the same size and with same connections) from RS Components at Smithfield in Sydney. The cost was just under $35. However, this did not work as the new switch was only 10 amps (despite the one shown on their web site been 12 amps). The old one's label was damaged and I could not read what it was supposed to be.
The compressor is supposed to be run on a 15 amp circuit, although it will run on 10 amps but the cable gets how and sometimes it will stop. The compressor would run when it was not connected to a tank, but as soon as there was some pressure on the hose, it turned off. I guessed that it was the high amps causing the problem.
A friend of mine who I dived with a few days earlier had mentioned that the switch on his Junior II had only lasted a month, at least I got almost 19 years out of it! He also told me he had not been able to find a replacement 15 amp switch to fit. I phoned him and he came over and he modified mine to remove the switch altogether. Now I turn on and off via the power point.
CYLINDER BANK
We acquired two large cylinders which I was going to put together as a bank to enable quicker filling of cylinders and to enable the compressor to be run less on very hot days. However, now that we have twin whips and the compressor is under the house (and cooler), I decided to not set it up.
NITROX
Since 2011 I have been using the compressor to create Nitrox. Click here to read about how I set this up.
COSTS
Running Costs - After 5,458 fills completed at 11 January 2026 - 1,741 hours
| Item | Cost per fill since new | Repackable filter cost | Latest filter cost |
| Filter | $0.22 | $0.08 | $0.08 |
| Electricity | $0.24 | $0.26 | $0.53 |
| Oil | $0.04 | $0.05 | $0.07 |
| Spares/repairs | $0.07 | $0.04 | $0.04 |
| TOTAL | $0.57 | $0.47 | $0.71 |
NOTES:
- Total may not be exactly sum of parts due to rounding
- The nipples and valves purchased have been amortised over a number of filters
- The oil has been amortised over a number of filters and not all the cost has yet been reflected in the fill cost but the above represents a realistic situation.
- Repackable cartridge was amortised over fills 14 to 63 and included in Filter cost.
- The cooling pipes between second and third stage will be amortised over fills 41 to 90.
- The electricity cost has gone up markedly in recent years and also I have been filling a friend's tanks which are larger and more empty than our own.
- Since 2017 I have not paid for electricity to fill my tanks as I have a solar system and home battery and do not fill unless I have the free power available.
Fixed Costs
At the same time as above the purchase cost of the compressor is $0.95 per fill. This is basically treating the compressor cost as 100% depreciated and not taking into account any money I could get for selling it.
Total Cost
The total cost as I write this is $1.53 a fill (over the life of the compressor) and since using replaceable filters it is $1.45 a fill. Therefore, based on $9 a fill (or even $5) we are already ahead and of course this will get even better over the coming years. This also does not take into account the return we would get today if we sold the compressor. Taking into account my solar/battery setup, the actual current cost per fill for me is about $1.04.
As of 11 January 2026, I alone have saved $19,383+ based on air fills costing $7 each.
CONVERSION TO PETROL
As I was heading off sailing on my yacht to the Great Barrier Reef from early May 2015, I converted the compressor to run using a petrol engine in April 2015. A dive buddy gave me a new Honda 160 4 kw petrol engine late in 2014. This was from his compressor which came with both. I purchased a new pulley to fit the shaft of the Honda motor (which is actually 20 mm diameter, not 19 mm as in the manual). I also purchased a new v-belt. The same belt is used for petrol and electric motors, but as I have never replaced the original one, I decided to get a new one and keep the old one as a spare.
 | 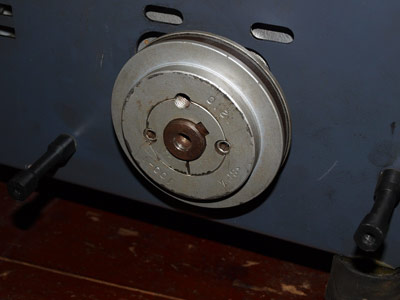 |
| Our Bauer Junior II with the Honda engine filling a tank | The taper lock pulley. You remove the two screws and
then screw one in the hole at the top. This separates the parts. |
I removed the electric motor, but this is not the easiest thing to do. The bolts holding the motor in place are hard to access. You need to take off the shroud around the fan first. The pulley is a taper lock pulley (at least mine is) and there is a trick to getting this off. It is in two parts, the inner part and the outer part. They are locked together by two grub screws. You remove these and then insert one into the other hole. Screwing this in separates the two parts. Both should now come off the shaft.
After this I put on the Honda engine, the new pulley and belt and bolted it back in place (a tip, bolt the engine in place first, then force the belt on the two pulleys). It is not the easiest thing to do, so you would not be swapping back and forth on a weekly basis, that is for sure. Once set up, I put oil and petrol in the engine and attempted to start. It took probably 40 goes but finally it was running. It seems to work okay, I filled a tank successfully. At that time I still needed to figure out how to judge the best/correct rpm for the engine. I ordered a RPM counter which works off the spark plug. I did not get this before we left (it turned up about a month later) so never got to test it till we returned home in November 2015.
I also purchased a long section of plastic hose so that the compressor can suck air from well in front of the engine, thus avoiding the deadly carbon monoxide from the engines exhaust. This set up worked well, it actually filled tanks quicker than the electric motor. On the trip it worked perfectly, very quick fills.
FINAL COMMENTS
Despite some comments on DiveOz in February 2011 disputing the validity of the above figures (as they were then) and more recently a post on Scuba Forum which stated you do not buy a compressor to save money, you can save money. I can assure you that the above figures are 100% correct. Sure, someone may end up paying more for a fill than the figures I have posted, but this will depend on how much air they consume on a dive. As pointed out, the average fill time for a tank since new is about 19.5 minutes. Sure, if you use a 15 litre tank and end up with only 30 bar left in it after a dive, it will take at least 30 minutes to fill and your electricity cost will be much more as will the filter and other costs as you will get less fills per filter. However, as long as you do at least 100 dives a year and/or have a partner or two, this is much cheaper in the long run that using a dive shop. It is also more convenient.
So far this has been a very good investment and worth every cent. We are certainly gaining great value and we got back our investment within two years and over the next years made a good "profit". I would also recommend Australian Safety Engineers in Perth for all your compressor needs, their service is exceptional. I would also recommend Pro-Diving Services in Sydney for services as well. Speak to Rick or Brendan Poole, 02 9316 4013 or have a look at their web site for more information.
In 2011 I also purchased some supplies like molecular sieve and carbon from St George Underwater Centre at Blakehurst. They are also stocking oil and Coltri/Nuvair compressors. The price of these items was very good.
|  v6.00.307 © 2003-2005

