|
Since about 1995 I have used 100% oxygen for decompression when doing deep scuba dives in Sydney. This is normally fed from a 72 cubic foot cylinder of pure oxygen on my boat via a regulator with a hose that reaches to just over six metres. This has two regulators on the end. Using oxygen at six metres is a partial pressure of 1.6, right at the limits of safety for oxygen toxicity. When diving off other boats I carry a 100% mix in a small pony bottle.
While my wife Kelly has been certified for Enriched Air (Nitrox), I had never bothered. In early 2011 I finally got around to doing my course. As I have a compressor and already have access to oxygen (via an E size cylinder), I decided to start making my own enriched air fills.
While I knew there are two ways (well really three) to end up with cylinders containing more than 21% oxygen, I did not really know which was the best way for me to head.
A number of people I know are using the most commonly used method of partial pressure blending. However, with this you need to eventually discard oxygen from your source cylinder when the pressure gets below the tanks you are filling or else you need to empty the cylinders to be filled, thus wasting oxygen that may still be in there.
The third method, membrane, is way too expensive for the backyard filler like me. This leaves the second method, oxygen stick, as one I decided to research as it enabled almost 100% utilisation of oxygen from your source cylinder.
When researching this, I knew that there were commercially available sticks. Even though I thought they were expensive, I was extremely surprised to see that the cost was over US$2,500 for a device that was simple to make. First I should explain what an oxygen stick is.
An oxygen stick is a tube into which air and oxygen are added at one end and out the other end comes a mix of the two gases. This is then fed into the compressor and compressed and put into the tank. The stick's only purpose is to mix together the oxygen and air before it enters the compressor so that the compressor does not get batches of 100% oxygen which could be dangerous. To mix the gases, there are normally some sort of baffles inside that cause the air to swirl and mix. There is normally also an inlet for the oxygen as well as another outlet (apart from the one to the compressor) where oxygen levels can be tested before the mixture is compressed. It is quite simple.
 |
| My design diagram for the Oxygen Stick |
I found on the internet a couple of sites where people detailed how they made their own oxygen stick. Very simple as I outlined above. I decided to go ahead and set up an enriched air setup using an oxygen stick.
To make the stick I went to Bunnings (a huge Australian hardware chain) and purchased:
See the photos below for the individual items.
I also purchased an oxygen regulator (for welding) off Ebay as well as some smaller plastic hose to connect the oxygen to the stick.
 |  |
The top of the oxygen stick - note pulled back
from normal location for photography purposes | The oxygen inlet |
I marked up where on the pipe I proposed to place the oxygen inlet and analyser outlet and then the four baffles. I decided to put one baffle before the oxygen inlet so that the air was already swirling when it passes the inlet. I marked these up with a pencil. The baffles are basically flat pieces of PVC or other material that go at least 50% of the way across the pipe. I decided to use the extra pipe caps as the baffles as I did not have a drill that could cut a 65 mm section out of flat material.
Using an angle grinder and a 1 mm cutting disc, I cut the rims of two of the caps off and then cut them in half. This gave me two half disks of 65 mm diameter.
Then, using a 2.5 mm cutting disk (the caps are 3 mm thick), I cut slots exactly half way through the pipe. The slots are on alternate sides. For example, the one closest to the inlet faces me and the next one is totally away from me and so on. As I cut the slot, I tested the baffles to make sure they fitted and more importantly, to make sure I did not cut too far so that the baffle disappeared inside the pipe. The baffles were then fitted and glued in place using normal silicon adhesive.
Next, I cut a hole in the centre of the remaining cap so that the screw fitting hose joiners would fit through. I then screwed them together from opposite sides of the cap. Silicon was added both sides to make a good seal.
The next thing was to place the oxygen inlet and analyser outlet pipes. To be honest, I now think that I did not need to create the outlet pipe as I have never got a good reading from it. See later. I ground down the tip of one end (the bit that helps the hose stay in place) till it was a bit narrower than the rest of the pipe. I drilled a hole a little smaller than the indicated pipe size. The now "pointy" end was then squeezed into the hole. This provided a relatively tight fit. I siliconed these as well from the outside (the inside is not really accessible).
Finally, the hood was attached. This had an external diameter a little less than 65 mm so I had to attach it with two screws as well as applying a deal of silicon to the inside of the pipe.
 |  |
| The Oxygen Stick in place above the compressor - this is the outlet end | The oxygen regulator on the E cylinder |
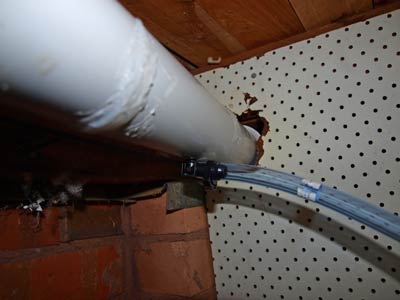
The oxygen stick itself was now complete. Using the large clips, I attached the stick to the underside of the floor joists, placing the hooded intake end through a thin wall that separates my workshop from the other part of the under house area. This is so the air is pulled from the cooler part rather than from right near the compressor.
I then attached the end of the existing 12.5 mm hose that feeds air into the compressor to the outlet of the oxygen stick. A small 100 mm section of the 8 mm hose was attached to the analyser outlet and then the plastic tap attached to this. However, as I have mentioned, I now do not use this.
I purchased a OxyCheq Expedition Oxygen Analyser off eBay (US$281.87 - A$267) delivered from Tedward Sparks in North Carolina for testing the final product out of the cylinder.
The remaining piece of 8 mm hose connects to the oxygen inlet and runs back to the E size oxygen cylinder. To start off, the connection was via a simple hose over the outlet end of my tank equaliser device. This did not work well. Therefore I purchased a welding oxygen regulator off eBay for about $60. At first, it was impossible to work out how to get the right result. Eventually, I screwed a stainless steel screw into the outlet of the regulator after grinding down one side of it. This restricted severely the outlet so much that it became easy to control the oxygen input into the compressor.
I looked around on the internet for a spreadsheet to work out the required oxygen percentage to be fed into the compressor but could not find one. I found a web page that sort of did it so I created my own. This is can be downloaded by clicking here (TO COME).
How the device works is as follows;
The cost of refilling an average cylinder with 32% oxygen will be $4.91 and 28% oxygen is $3.83. This assumes that the starting fill is already the same percentage of oxygen as the required result. It also takes into account the cylinder is not completely empty (based on my normal remaining air and includes oxygen, compressor capital and recurring costs. Oxygen costs are $3.00 and $1.91 respectively.
Tests
My first test was on 15 June 2011 when I filled a partially full (180 bar) tank. My aim was to get 25%. My calculator showed that I needed to have an input of 35.5% at the inlet to the compressor. I had roughly this when I tested the mixture. However, when I tested it at the end, I had 39.5%!!!
When I did my first tests if became apparent that the oxygen regulator was incapable of fine adjustments to make it work properly. A couple of friends built a stick after seeing mine. What they did was place a restriction in the regulator out barb to severely restrict the amount of oxygen that could pass through the barb. I used a stainless steel screw that just fitted inside and the head stopped it going all the way through. I ground out one side of the underside of the head. This then created a very small gap, perhaps less than a millimetre.
I then ran the compressor and found that at the following pressures I got the given percent of Nitrox at the whip:
It now works perfect and I can basically dial up a percentage just by using a table I created based on the tests above and setting the required kPa (it has more graduations than above).
It is important not to overfill the cylinder as this will throw out the calculations, as will underfilling.
I now find I can fill a tank to within 0.2% oxygen time and time again. Very easy and safe.
Oxygen Supply
Originally I got my medical oxygen from BOC. They had an outlet about 10 minutes drive from my place. While there were cheaper places to get oxygen (Pro Diving Services at Botany), to do this you had to purchase a large cylinder, drop it off there and collect later on a different day. From my place that meant 4 x 35 minute drives. It was worth the extra cost to get locally.
After five or so years, BOC decided to close the outlet and instead provide oxygen (and other gases) via resellers. As it turned out, one of these was just up the road from our place, a one minute drive. This was more convenient. However, the price for a swap over cylinder went up dramatically and has continued to outpace inflation. For example, in 2011 a E size cylinder was $77, by 2017 it was $97, an increase of 25% while inflation over this period was about 15% or so. Rental for the cylinder was $210 per annum,
In early 2018 a diving friend told me about another company selling medical oxygen. This was Supagas. I contacted them and was soon signed up. A G size cylinder rental was $15 a month ($180 per annum) and a swap $77. They deliver the cylinders to your house for free too. This of course was for a G, which holds 3400 litres while an E holds only 680 litres.
Therefore the cost per litre was now 2.3 cents a litre compared to 14.3 cents with BOC as well as cheaper rental. I am very happy with their service, apart from the fact that they do not have an on-line facility to pay your bill, you have to phone them to pay. Very 1980s!
There is more information about oxygen sticks at Nitrox Made Easy Web Site.
|  v6.00.307 © 2003-2005

