"SS Myola was discovered by Peter Fields and John Riley"
Fujikawa Maru
Michael McFadyen's Scuba Diving - Fujikawa Maru
On your dive trip to Chuuk Lagoon, it is almost certain that the first wreck you will dive is the Fujikawa Maru. This ship is very easy to find, located as it is between Eten and Uman Islands and sitting upright with the rear mast sticking out of the water. This is also the most popular wreck for night dives.
The Fujikawa Maru was built as a passenger-cargo ship by Mitsubishi Heavy Industry at Nagasaki. Construction began on 20 October 1937 and it was launched on 15 April 1938 for Toyo Kaiun KK. The new vessell displaced 6,938 tons and it was 132.6 metres long and 17.8 metres wide. She had a single diesel engine of 840 nhp driving a single propeller.
There is no mention of the ship using the spelling Fujikawa Maru in any edition of Lloyds Register. This is because the Japanese Government adopted Romaji spelling in 1938. Under the Romaji system the letter f became h, ji became z and so on. Hence Fujikawa became Huzikawa. Under this name it is mentioned in Lloyds.
The Fujikawa Maru
A colour photo of the Fujikawa Maru
On 1 July 1938 the Fujikawa Maru was completed and placed in service with Toyo Kaiun on the Japan/North American run. It was then chartered to Mitsui Busan for use on the South American and Indian routes. She carried passengers and cargoes of raw silk, cotton, jute and flax (presumably on the Indian runs).
On 9 December 1940 it was taken over by the Imperial Japanese Navy and on 18 December 1940 conversion to an armed auxilary aircraft transport started at Kawasaki Heavy Industries. As part of this, 4.7-inch (120-mm) guns were installed at the bow and the stern. The conversion was completed on 20 January 1941.
On 9 May 1941 the Fujikawa Maru departed Furue, near Hiroshima, for Micronesia. On 2 June 1941 the 12th Seaplane Tender Division's flag was transferred temporarily to Fujikawa Maru. On 27 June 1941 it returned to Furue. On 5 July 1941 the flag of the 12th Seaplane Tender Division was transferred from Fujikawa Maru to Kamikawa Maru.
In August 1941 the Fujikawa Maru was based in the Amoy area, off the Chinese coast. On 7 September 1941 it arrived at Sasebo. It later made a trip to Takao, Formosa (now Taiwan), departing there on 11 November 1941.
On 8 December 1941 during Operation "E" - The Invasion of Malaya and Saigon (Indochina - now Vietnam) at the start of the Pacific War, the Fujikawa Maru was assigned to Rear Admiral Matsunaga Sadaichi's 22nd Naval Air Flotilla of Vice Admiral Tsukahara Nishizo's 11th Air Fleet.
On 23 December 1941 it departed St Jacques, Indochina and on 27 December 1941 it arrived at Kota Bharu, Malaya. The Fujikawa Maru then returned to Indochina, arriving on 2 January 1942 at Camranh Bay. The Fujikawa Maru appears to have stayed in this area for a while as on 30 January 1942 it departed St Jacques again. On 1 February 1942 it arrived at Kuching, Borneo with personnel and construction materials from the 22nd Naval Air Flotilla's Genzan Air Group.
From 1 March 1942 the Fujikawa Maru made many trips to and from Saigon. On 5 March 1942 it departed Saigon for Kuching, arriving there on 7 March 1942. It departed on 10 March 1942 for Bangkok, Siam (now Thailand), arriving there on 13 March 1942.
On 11 April 1942 it departed Bangkok (presumably it was not here all the time) and on 13 April 1942 it arrived at Saigon. It departed on 17 April 1942 and on 24 April 1942 it arrived at Palau. The next day it departs Palau for Truk Lagoon (Now Chuuk Lagoon), arriving there on 1 May 1942.
It would appear that the Fujikawa Maru then did a lot of work in the New Guinea theatre of the War, heading to Rabaul. On 30 May 1942 it departed Rabaul and on 6 June 1942 it arrives back in Japan at Yokosuka.
On 17 June 1942 the Fujikawa Maru departed Yokkaichi, probably with a load of aviation gasoline from the refinery. It is not know where it went, but on 14 July 1942 it arrvied back at Yokosuka. It departed again on 18 July 1942 and on 20 July 1942 it arrived at Aomori at the northern end of Honshu Island, Japan. It departed on 24 July 1942 and arrived at Maizuru which is on the western coast of Honshu, on 25 July 1942.
It is not known where the Fujikawa Maru was for the next three weeks but on 16 August 1942 it departed Maizuru (of course it may have been in Maizuru as this was a key port in World War II). On 23 August 1942 it arrived at Yokosuka.
During September 1942 Captain Aihara Aritaka (38 years old and former skipper of IJN Kako assumed command of the Fujikawa Maru.
On 28 October 1942 the Fujikawa Maru departed Yokosuka and arrived the same day at Kisarazu, Tokyo Bay. Here it probably loaded fighter aircraft for transport.
On 18 November 1942 it arrived at Tinian, Marianas and then four days later on
22 November 1942 it arrived at Rabaul. On 26 November 1942 it departed and on 8 December 1942 it arrived back at Yokosuka.
On 17 December 1942 the Fujikawa Maru departed Yokosuka and on 24 December 1942 it was reassigned directly to the 11th Air Fleet. On 26 December 1942 it arrived at Roi, Kwajalein (now called Roi-Namur and part of the Marshall Islands). Here it probably delivered a load of Mitsubishi A6M "Zeke" (Zero) fighter aircraft to the 201st Naval Air Group. On 31 December 1942 it arrived at Taroa and then on 5 January 1943 it arrived at Kwajalein (probably Ebaye Island).
On 7 January 1943 it departed Kwajalein and on 14 January 1943 it arrived at Jaluit Atoll, Marshall Islands. It then returned back to Roi, arriving there on 17 January 1943. It is believed it then headed back to Truk as on 25 January 1943 it arrived at Nauru (now an independent country on the equator - not the greatest place to visit even now - I have been there four times on the way to and from Chuuk).
On 6 March 1943 the Fujikawa Maru departed Roi so it obviously must have made a journey to Japan and back as it appears to be about a 10 day trip each way. On 15 March 1943 it arrived at Kisarazu, Tokyo Bay where it is believed to have loaded more A6M fighter aircraft for transport. It departed the same day for Yokosuka, arriving on 16 March 1943.
On 25 March 1943 it departed Yokosuka and arrived the next day at Yokkaichi. Here it probably loaded aviation gasoline at the refinery. On 28 March 1943 it departed Yokkaichi, obviously for Kwajalein via Truk as on 5 May 1943 it departed Kwajalein.
On 9 May 1943 it arrived back at Truk and on 14 May 1943 it departed. Immediately after leaving port the Fujikawa Maru was attacked by an unknown submarine, but incurred no damage. On 20 May 1943 it anchored at Tateyama Bay, Japan. At 8 am on 22 May 1943 it arrived at Yokohama and at 11 am it moved to nearby Yokosuka.
On 7 June 1943 it departs Yokosuka in convoy No. 3607 with Chihaya Maru and other unidentified ships with an unknown escort. On 10 June 1943 when south south east of Bonin Islands (this is on the way to Truk) it was attacked again by a US submarine. In a submerged daylight attack, Commander Frank T. Watkins in the USS Flying Fish (SS-229) fired three torpedoes at the Fujikawa Maru but the attack is unsuccessful.
On 17 July 1943 it departed Truk for Roi, Emidj, Mili and Tarawa (Gilbert Islands, now Kiribati). On 22 August 1943 the Fujikawa Maru was reassigned to the Inner South Seas Area Fleet, First Base Force (11th Air Fleet).
On 11 September 1943 it departed Kwajalein in convoy No. 6113 with fellow cargo ships Chihaya Maru and Katori Maru, fleet oiler IJN Shiretoko and possibly others, escorted by subchaser CH-31, auxiliary subchaser CHa-46 and an unknown patrol boat.
On 12 September 1943 alerted by an Ultra signal (a decoded Japanese message), Lieutenant Commander Carter L. Bennett in the USS Permit (SS-178) intercepted the convoy. Bennett sets up and fires six torpedoes at three ships in submerged night attacks at N8° 23' E165° 12'. He claimed several hits, including one on the Fujikawa Maru and two on Shiretoko. That same day, light cruiser IJN Naka departs Truk to assist the torpedoed ships.
The Fujikawa Maru was extensively damaged and she arrived in Kwajalein three days later on 15 September 1943 (however, I have also read that it arrived in Truk on that date). On 8 October 1943 an unknown officer assumed command.
On 4 December 1943 when the Fujikawa Maru was still at Kwajalein, aircraft from Rear Admiral Charles A. Pownall's Task Force 50 aircraft carriers USS Yorktown (CV-10), USS Lexington (CV-16) and light carrier USS Independence (CVL-22) attacked Kwajalein and Wotje Atolls. They damaged Fujikawa Maru, light cruisers IJN Nagara and IJN Isuzu, auxiliary and transports Eiko Maru, Kinesaki Maru and Kenbu Maru and Mikage Maru No. 18 and sank collier Asakaze Maru, cargo ship Tateyama Maru, auxiliary subchaser Takunan Maru No. 7 and guardboat Mikuni Maru No. 5.
On 24 December 1943 the Fujikawa Maru departed Roi, Kwajalein in convoy 6242. It was being towed by Mikage Maru No. 18 with an unknown escort. At 11.30 am on 31 December 1943 they arrived at Truk
On 1 January 1944 it was rerated an auxiliary transport and reassigned to the Ministry of the Navy's Supply Force and attached to the Maizuru Naval Station. It appears that some repairs may have been carried out here and it then went back to Japan for more repairs. This is unclear. By the end of January 1944 the vessel had been repaired in Japan (it is not clear how it got there when damaged) and these repairs can be seen today on the port side waterline near the funnel. Some other work (possibly to balance the repairs) can be seen on the starboard side.
In early or mid February 1944, the Fujikawa Maru arrived at Truk and offloaded 30 B6N "Jill" bombers onto Eten Airfield. Reserve Captain Takayama Chuyo was now the commander of the ship.
A drone shot showing the location of the wreck of the Fujikawa Maru Photograph courtesy of Kevin Green
Another drone photo showing the Fujikawa Maru. The bow is to the right. Photograph courtesy of Kevin Green
On 17 February 1944, planes from USS Bunker Hill and Monterey attacked the Fujikawa Maru and in strike 3E-1 two torpedos were dropped and at about 1420, one hit just rear of the funnel on the starboard side. This is very visible now. The ship did not sink immediately (it is reported that it did not sink until the next morning) and there is a report that it was hit by a 1000 lb bomb on the port quarter but this is not confirmed (there is no obvious damage).
In 1944 the Fujikawa Maru was removed from the Navy List.
The size of the Fujikawa Maru and the huge amount of items to see in the ship means that at least two dives are needed to cover the whole ship. The dive boats anchor on the bridge and this enables you to easily examine the front and rear on separate dives. A GPS Reading of N7° 20' 40.7" E151° 53' 05.5" using WGS84 as the datum will put you on the bridge.
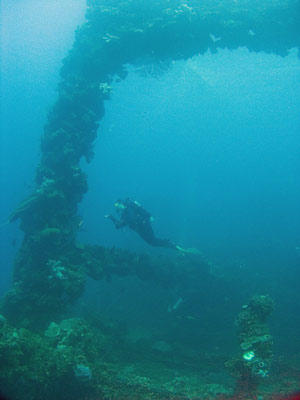
On your first dive head to the bow. After descending, drop over the bridge and head towards Hold 1 and gradually descend till you hit the deck adjacent to the hold. Continue along the deck and ascend to the forecastle. Head out off the wreck a little and look back. In clean water, this is a most impressive sight. The anchor chains hang down and make great photo opportunities as they are covered in soft and hard corals.
Kelly McFadyen and the bow telegraph of the Fujikawa Maru
A close up of the bow telegraph
Rob Timmers and the bow gun of the Fujikawa Maru
Some of the items in Hold 1
Swim back towards the ship and the first thing you will see is the bow telegraph which is on the port side of the bow. Behind here is the very prominent bow gun. This is said to be an old British gun. It is engraved (RC [?] 6 In. B. B. No12469. 1899) and sits right above the forecastle and aims out to the starboard quarter.
Hold 1 has drums on the 'tween deck level, full propeller blades, wing tanks, coils of wire, one torpedo ('tween deck port side - eroded at the prop end), tail sections of fighters, engine cowlings, machine guns, wings and shells (for the bow gun and another size - in boxes). On the bottom of the hold there are at least two large water tanks (box shaped). On top of one of these tanks there is an outboard motor lying over a plane tyre, more shells, plane propeller blades, wings (including some tail wings), drums, a radial plane engine and some small arm munitions (bullets).
Hold 2 is even more interesting, with several Zero fighter aircraft to be found inside. These are in separate parts, mostly lying on top of 200 litre drums, with fuselages, full wing sections, tails, engines, full props and other pieces stored apart from each other. There are probably five planes to be found, composed of two, possibly three, different types. I think that the planes are mostly "Zeros", with one "Val" tail section and a different cockpit section which I have not been able to identify yet. I do not believe that any are "Judys" as stated in some books on the Chuuk Lagoon wrecks as I have many aircraft books and the planes in the hold do not resemble the ones in the books.
A spinner from an aircraft in Hold 1
An engine cowling in Hold 1 Note the water container behind
At least three still have some gauges in the dashboards and the joysticks move. One plane is upside down and all that can be seen is the bottom of the wing. This has one of the wheel doors open and the tyre is visible. Most of the planes have their wingtips folded (they are carrier aircraft). There are a large number of spares in this hold, including engines, dozens of propeller blades and some wings. More engines are found lower down in the hold as well as drums.
The third hold has drums inside and a lot of wood. It is very dark and only worth a cursory glance. On the top 'tween deck there are two engine cowlings, one of which is broken in half, as well as more drums. You can enter the bridge from the 'tween deck through a door. This leads to a couple of rooms (some saki bottles here) and then into the engine room through another door.
The engine room can be entered from here, the skylights or as detailed above and it is an excellent exploration. The multi-level catwalks are extremely interesting and the engine (together with a spare piston) can give you a top value dive. You can explore around and under the engine but the best bits will probably require a guide. The engine room is quite large and open. The engine is a six cylinder diesel, with the cylinders in two lots of three.
A Zero fighter in the Fujikawa Maru
The cockpit of one of the Zeros - note the awful visibility
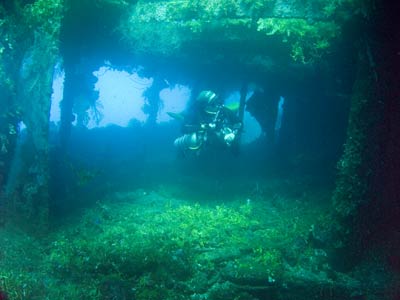
Heading from Hold 2 to Hold 1 on the 'tween deck
Jessica McInnes under the bridge
Under the main engine level at the front (access via stairs on starboard side) there is a large telegraph indicator so that the engine crew could adjust the speed of the ship as required by the bridge. Next to here there is a large electrical board and then a wooden telephone box (used so that the crew can hear over the engine noise).
From here, go back to the stairs, pass them and see the fuel tanks on the left. Go right around the engine and back up the port side. Here you will find the ship's machine room. Inside there are a plethora of machines and items. There are vices, lathes, drills, etc and forward of the room there is a spare parts room. Inside there are lights, fans and other parts. Return to the top of the engine via the same set of stairs you came down.
A bath under the bridge
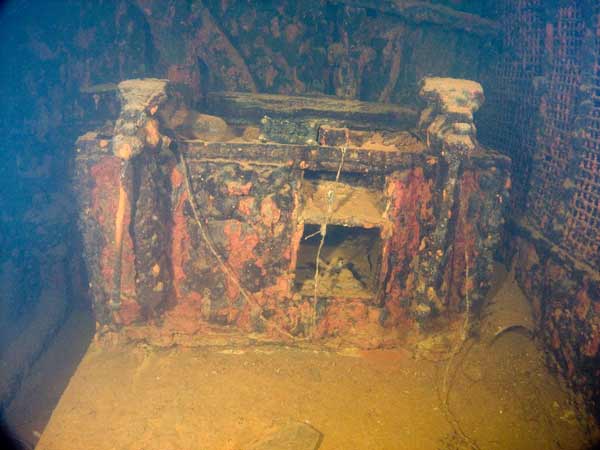
Jessica in the galley
To the rear of the bridge area is another hold (four) but it is empty. In between the fourth and fifth holds there is a huge hole on the starboard side where the the torpedo struck. The hole is about five metres across and three or four metres high. Most of the hole is below the sand level. This enabled the water to enter into both holds, causing the damage that eventually sank the Fujikawa Maru. Today you can swim through these holds and a good dive is to exit the ship out the hold and swim to the stern to examine the prop. It is about 34 metres deep here and after a quick look (remember, this is probably your second dive on the wreck due to its size). From here, ascend to the stern deck and have a look inside the deck house where there are ropes and blocks and tackles. The stern gun is also a very impressive sight, covered in beautiful soft corals.
The fifth hold contains an outboard motor and the between decks includes a compressor with ten storage cylinders. This is a giant fire extinguisher for the engine, the CO2 piped into the engine in case of fire. There is also galley equipment (kettles, rice bowls, bottles, plates etc) on the first between deck.
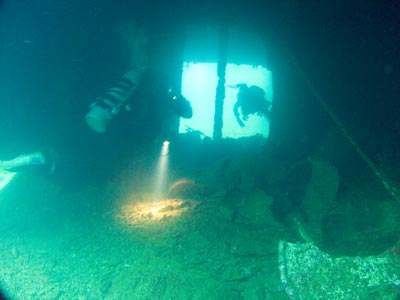
Kelly McFadyen dropping into the Engine Room
The engine of the Fujikawa Maru
A series of light covers in the machine room off the Engine Room
A lathe in the machine room
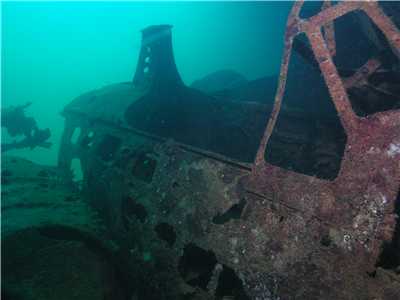
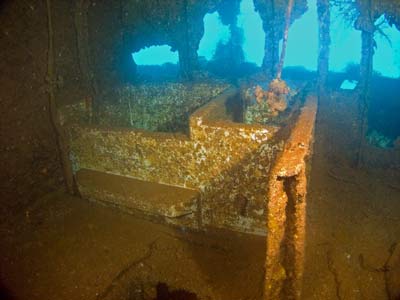
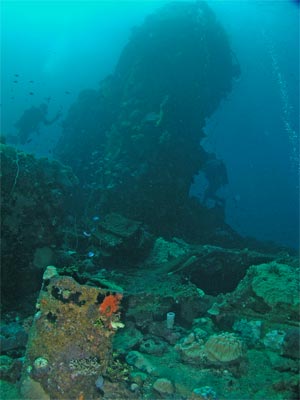
The bridge area has plenty to see. From the stern, enter on the main deck one of the doors. On the port side there are some toilets on your left, then two large baths and then the bridge. Above here is the bridge area. It is extremely open and easily explored. As well as the normal parts of a ship, there are medicine bottles, beer and liquor bottles as well as the galley which has a huge stove. There are also toilets and urinals. There are many artefacts inside this area. On the top of the bridge, the funnel is listing badly to starboard (I am sure that it was upright in 1994) and in very poor condition. It is very very colourful and you can get some good photos of the growth on it. You can also get some good photos with it in the background.
On the port side of the main deck in front of the bridge there is a plaque to the loss of the Fujikawa Maru and the wrecks of Chuuk Lagoon. It reads as follows:
Fujikawa Maru Sunk February 17, 1944 during US Navy's "Operation Hailstone". This plaque, placed February, 1994 on the 50th Anniversary of this action, is dedicated to the preservation of and respect for the remaining ships, aircraft and artifacts as a heritage for the people of Truk Lagoon.
Another shot of the lathe - cylinder heads on left
The vices in the machine room
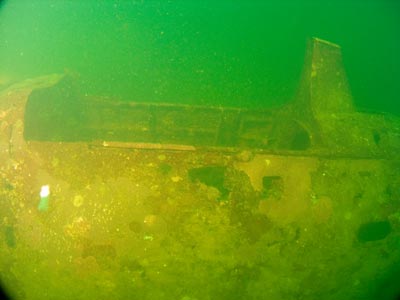
Rob Timmers and the funnel of the Fujikawa Maru - the Engine Room skylights are bottom right
Kelly and the rear kingpost
Note that this plaque was not placed there on 17 February 1994 as it was not there when I dived the wreck on 22 February 1994.
For a dive of 46 minutes, exploring the prop, deeper parts of the holds, will require about three minutes of decompression at three metres.
The Fujikawa Maru is probably the most beautiful wreck in Chuuk Lagoon. Together with the Shinkoku Maru it is the most covered with hard and soft corals. The whole wreck is totally covered in red, crimson, yellow, green, white, pink and other colour soft and hard corals. It is truely an amazing sight to see, far better than any natural coarl reef I have seen in the Pacific.
This is really an excellent dive site, worth at least two dives. If you get a chance, try a night dive on the Fujikawa Maru when the colours are even more prominent.
VIDEO
Video shot by Kelly McFadyen on our 2011 trip to Chuuk.
 v6.00.307 © 2003-2005