|
Michael McFadyen's Scuba Diving - Heian Maru
The largest wreck in Chuuk Lagoon is the Heian Maru. This was not always correct as the largest vessel sunk in Operation Hailstone was the Tonan Maru No 3 which was 535 feet long and displaced 19,209 tons. However, the Tonan Maru was salvaged after the war by a Japanese company. It was towed to Japan, rebuilt and on 8 October 1951 recommissioned as the Tonan Maru, a whaling ship.
The Heian Maru was laid done on 19 June 1929 and launched on 16 April 1930 and went into service on 24 November 1930. Built by Osaka Iron Works, Osaka Japan, for Nippon Yusen KK, the Heian Maru was 155 metres long (511.6 feet), 20 metres (66 feet) wide and had a gross tonnage of 11,616 tons. Powered by two eight cylinder Burmeister and Wain diesel motors giving a total of 13,404 hp, she was capable of a maximum of 18.4 knots.
She was completed on 24 November 1930. The new ship was a passenger and cargo vessel and on 18 December 1930 she departed Hong Kong for Seattle, Washington on her maiden voyage.
The Heian Maru's route from 1930 to at least March 1931 was Hong Kong, Shanghai, Moji, Kobe, Yokohama, Victoria (Canada) and Seattle. Sometimes she stopped at Yokkaichi, Nagoya and Shimidzu.
 |  |
| The Heian Maru | This is a photograph of the Hikawa Maru after World War II.
She was the identical sistership to the Heian Maru |
From at least January 1935 she ran on the Osaka to Seattle route. The points of call were Osaka, Kobe, Nagoya, Shimidzu, Yokohama, Seattle. The return trip was to Yokohama, Kobe and Osaka. From April to October 1935 she sailed the same as above but did not visit Osaka, with voyages starting and finishing at Kobe. After this she may have continued on a similar route.
On 16 August 1941 she returned in ballast from Seattle to Yokohama. This was the last voyage of a Japanese vessel to Seattle prior to the outbreak of the Pacific War. On 3 October 1941 the Heian Maru was formally requisitioned by the Imperial Japanese Navy, although it reality it appears she was under their control from 16 August 1941.
On 15 October 1941 the Heian Maru was registered as a prospective submarine tender in the Yokosuka Naval District. Conversion began at the Mitsubishi Heavy Industries' shipyard at Kobe on this date. Six 6-inch (152-mm) 41st Year Type single mount guns, one 3.5 m range finder, two Type 93 dual 13-mm machine guns and one 1100-mm diameter and one 900-mm diameter search lights were fitted. A degaussing cable (anti-magnetic mine device) was also fitted (this can still be seen today).
On 30 December 1941 the work was completed. The Heian Maru was then assigned to Vice Admiral Shimizu Mitsumi's Sixth Fleet (Submarines) in Rear Admiral Sato Tsutomu's SubRon 1, Combined Fleet, based at Kwajalein.
On 31 December 1941 she departed Kure for Kwajalein.
On 1 February 1942 Vice Admiral William F. Halsey Jr's Task Force 8 (USS Enterprise (CV-6) raids Kwajalein and Wotje in the Marshall Islands. The Heian Maru was not damaged.
On 17 February 1942 she arrived back in Japan at Kure. By 10 April 1942 she is in the Sixth Fleet in Rear Admiral Sato's SubRon 1 as the tender for flagship I-9 and SubDiv 2 (I-15, I-17, I-19) and SubDiv 4 (I-25, 1-26).
On 14 July 1942 the Heian Maru is still in the Sixth Fleet's SubRon 1 but now Rear Admiral Yamazaki Shigeaki's is in charge. She is still the tender for flagship 1-9 and SubDiv 2 (I-15, I-17, I-19), SubDiv 4 (I-25, I-26) and SubDiv 15 (I-31, I-32, I-33).
On 18 August 1942 she departed Yokosuka for an unknown location. She returns to Japan and on 24 September 1942 she departs Kure as part of convoy "Tei No. 2". She has on baord the Commanding Officer of the 17th Infantry Division, 1,900 of his men and 240 wheeled vehicles.
On 5 October 1942 the Heian Maru arrived at Rabaul and disembarked the troops and vehicles.
On 1 January 1943 the Heian Maru was back in the Sixth Fleet in Rear Admiral Mito Hisashi's SubRon 1 as the tender for flagship 1-9 and SubDiv 2 (I-17, I-19, I-25, I-26) and SubDiv 15 (I-31, I-32, I-36. On this date USAAF Fifth Air Force B-17 "Flying Fortress" and B-24 "Liberator" bombers attacked shipping in Rabaul's Simpson Harbour. The Heian Maru is targeted by several bombers but escaped damage. She fired a total of 8,000 13.2-mm rounds in return.
On 3 January 1943 Rabaul was again attacked by B-17s, this time they are flying from Espiritu Santo, New Hebrides (now Vanuatu). About 6.30 am, the Heian Maru is again targeted by several bombers. They scored a number of near misses off her port side. The flak crews of Heian Maru fired 7,638 13.2-mm rounds to ward off the attack.
On 29 March 1943 Rear Admiral Koda Takero assumed command of SubRon 1. In April 1943 the Heian Maru was used to move POWs (Prisoners of War) from and between the Moluccas and Flores to Surabaya.
On 4 May 1943 she arrived at Yokosuka escorted by destroyer IJN Fumizuki.
On 27 May 1943 she departed Yokosuka and sometime later in the month arrived at Paramushiro. She supported SubRon 1's operations in the Aleutians. On 21 June 1943 Vice Admiral Takagi Takeo assumed command of the Sixth Fleet (Submarines). For the period late May to 28 July 1943 she was based at Paramushiro and served as Rear Admiral Koda's HQ during the withdrawal from Kiska.
On 28 July 1943 during Operation "KE", the Japanese completed the evacuation of Kiska Island, Aleutians. On 14 August 1943 the Heian Maru returned to Yokosuka.
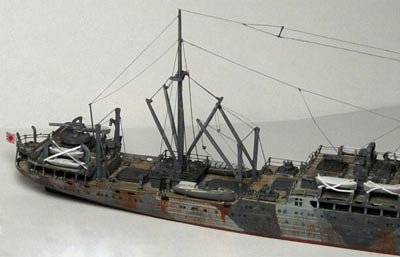 |  |
A photo of a model of the stern of the Heian Maru
Note sure who made this models, photos sent to me at some time | The bow of the Heian Maru |
On 5 September 1943 she is attached directly to the Combined Fleet and on 16 September 1943 the Heian Maru departed Yokosuka, arriving at Shanghai on 19 September 1943. On 24 September 1943 she departed Shanghai transporting elements of the IJA's 17th Army Division to Rabaul in an unnumbered convoy with the Gokoku Maru, another unidentified ship and escorts.
On 8 October 1943 they arrived at Rabaul. She returned to Yokosuka on 21 October 1943.
From 23 October to 7 November 1943 the Heian Maru is refitted at the
Yokosuka Navy Yard. Four 152-mm guns are replaced by one 120-mm AA gun (10th Year Type), two Type 96 25-mm twin mounts and two Type 93 13.2-mm twin mounts. In addition, a Type 2 sonar is installed. The crew complement is increased to 242 men. The Heian Maru's dazzle camoflague pattern is possibly applied at this time.
On 1 November 1943 Captain-Retired Tamaki Toshiharu (36) assumes command of the Heian Maru. On 14 November 1943 they departed Yokosuka at 2 pm in fleet convoy 3115 with the IJNS Irako and aircraft transport Keiyo Maru, escorted by destroyer IJNS Yukikaze and kaibokan IJNS Oki. On 16 November 1943 lookouts on the Heian Maru sighted an enemy submarine travelling in the opposite direction. This was probably the USS Dace (SS-247).
At 7.24 am on 19 November 1943 the convoy is attacked by Lieutenant Commander Joseph Enright's submarine USS Dace on her first patrol. Enright targeted the Heian Maru. A torpedo barely missed the bow of the Oki. The kaibokan counter-attacks with depth-charges and even the Heian Maru. drops a depth charge, but the Dace escaped undamaged. At 3.50 pm on 23 November 1943 the Heian Maru arrived at Truk.
On 1 December 1943 the ship is still in Truk when it was designated as the tender and accommodation ship of Rear Admiral Koda's SubRon 1 for flagship I-11 and SubDiv 2 (I-16, I-19, I-21, I-39, I-40) and SubDiv 15 (I-32, I-35, I-36, I-38, I-41). On 15 January 1944 SubRon 1 is deactivated.
During her time as a submarine tender, the submarines in SubCon 1 sank one carrier (USS Wasp), one cruiser, two destroyers, one submarine and damaging a carrier and a battleship. Of the 12 subs, only two remained by the end of 1943.
On 17 February 1944 the Heian Maru was anchored on the leeward side of Dublon Island with the hospital ship Tenno Maru (later Hikawa Maru No. 2) and cargo ship Urakami Maru. At 4.35 am an air raid alarm was given according to one source, although the time does not correspond to the actual time of the first planes over the lagoon as the first planes did nto take off till 4.44 am (the first planes were over the lagoon at 6 am). The Heian Maru, carrying Vice Admiral Takagi and his Sixth Fleet staff, weighed anchor and steered a zigzag course north of Dublon. The Japanese expected a hit-and-run attack like the one on Kwajalein two years earlier. Grumman F6F-3 "Hellcats" reportedly strafed the Heian Maru. However, US reports show that their planes attacked no ships on the first two sorties. Her crew are said to have fired a total of 400 rounds in an attempt to ward off the attacks.
At 10.10 am the Heian Maru was attacked by a single Grumman SB2C "Helldiver" that came in from astern. It dropped two bombs that damaged one of her prop shafts and flooded the No. 6 hold aft (this corresponds with a report from Strike 1C of an attack on a large 10,000 ton ship with two bombs dropped). The crew pumped some fuel to her bow tanks and managed to correct the trim. After sunset, the Heian Maru moored at the pier at Dublon Island. Here Vice Admiral Takagi and his staff disembarked. The crew started to unload the spare Type 95 oxygen-propelled torpedoes.
The next day, 18 February 1944, at 1.10 am (at least according to Japanese reports), another air raid commenced and the Heian Maru got underway again. At 3.04 am, she was hit by two bombs that exploded above her engine room on the port side (not reported in US reports). A fire started in a compartment adjoining the officers' mess and soon raged out of control. It reached the bridge and threatened the hold containing the remaining torpedoes. At 3.12 am the ship's bow was hit by two bombs and the rate of sinking increased (again, not mentioned in US reports). At about 5 am Captain Tamaki orders the flag lowered, then ordered Abandon Ship. The survivors, including Tamaki, reached the base of the 85th Submarine Base Unit. A total of 16 passengers and one crewman are killed as is a civilian from the staff of the Nippon Yusen Co. A total of 25 men are wounded.
 | 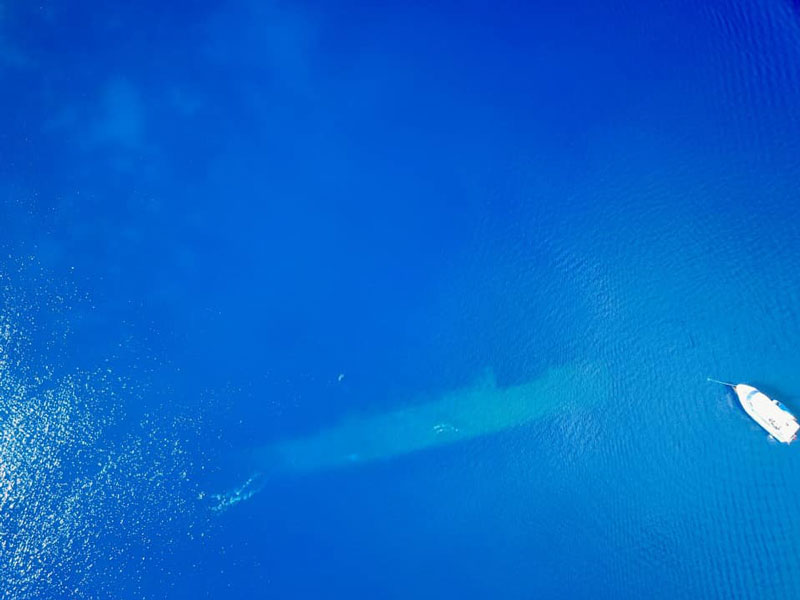 |
A drone photo of the Heian Maru
Photograph courtesy of Kevin Green | Another drone photo of the wreck, bow to the right
Photograph courtesy of Kevin Green |
At 9.30 am, Grumman TBF "Avenger" torpedo bombers from USS Bunker Hill (CV-17) attacked the still burning Heian Maru. She was hit on the port side amidships by a torpedo. The Heian Maru sank soon after ending up on her port side.
On 31 March 1944 the Heian Maru was removed from the Navy List.
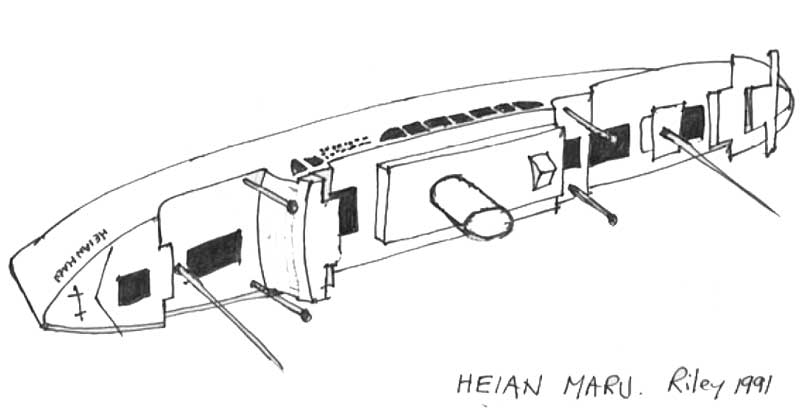 |
| A drawing of the wreck of the Heian Maru by John Riley - done in 1991 - still very accurate in 2011 |
Today the wreck is located on the north side of Dublon Island in 33 metres of water, an excellent depth for diving. A GPS Reading of N7° 22' 58.3" E151° 51' 20.7" will put you in the bridge. The wreck lies in its port side and the starboard hull is about 12 metres down and is a flat expanse that extends as far as you can see.
As one would expect, this is an enormous wreck, the second biggest shipwreck I have dived (the SS President Coolidge of course is the biggest).
The dive boats generally anchor in the bridge area. As you drop over the side of the hull you can really appreciate the size of the wreck. The masts lie angled down towards the sand and there are a number of small kingposts. You can swim under these as you explore the (former) top deck of the ship.
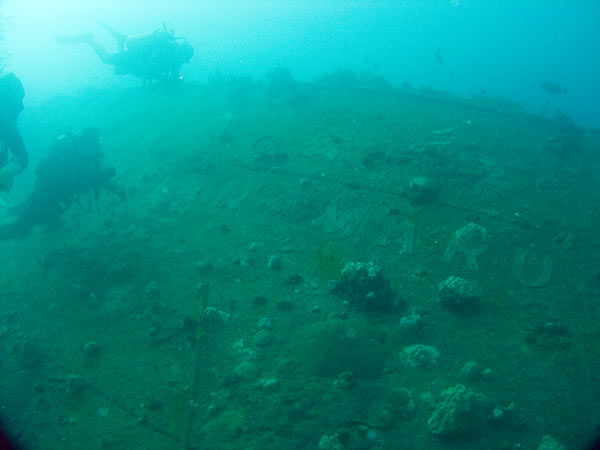 | 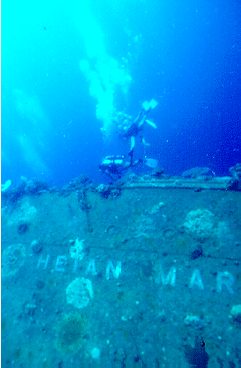 |
| The name on the bow of the Heian Maru - taken October 2011 | The bow of the Heian Maru
has the name clearly visible
Photo by the late Noel Hitchins - taken about 1994 |
I have now done 6 dives on the Heian Maru but as it is so big, I still cannot report first hand on all it has to offer. You could dive it every day for a couple of weeks and still not see everything. On you trip to Chuuk, it is worth a number of dives, two if you can.
Starting from the bridge, head along the hull towards the bow. Before you drop over the side, have a look at the the starboard side of the bow (the upper side). The ship's name can still be seen in both English and Japanese characters (see the above photographs).
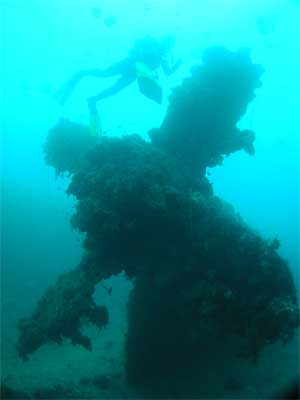
After looking at the name, drop over the hull where you encounter a large gun turret. However, the gun is nowhere in sight (perhaps it fell off as the ship sank and is now under the wreck?). On the top of the bow the anchor is still in place while the port anchor chain runs out below. Under the bow there is the ship's mooring buoy and one of its three huge anchors (the other two are located off holds two and four).
 |  |
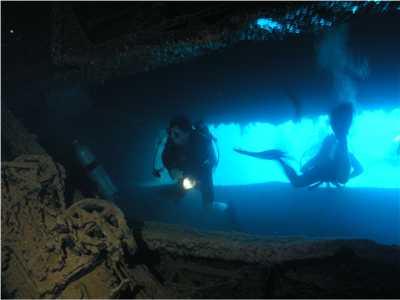
Kelly McFadyen going through a hatch that gives
access to the deeper part of Hold 1 | These artillery shells were deep in Hold 1 |
 |  |
Heinz Bendinger deep inside Hold 2
of the Heian Maru | Kelly inside Hold 2 |
Inside the forecastle there are a number of large shells, presumably for the missing bow gun.
Hold One has a number of large artillery shells as well as a couple of torpedoes. I think there were also some smaller artillery shells.
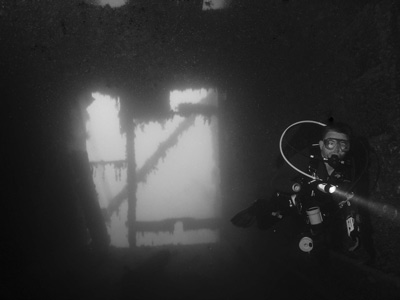
Hold Two has covers in place and the access is through narrow, long slits or you can enter it via the second level of Hold One. Looking out from deep in the hold can give you an an attractive photograph.
| 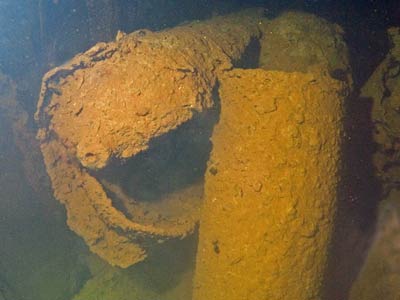 |
| These artillery shells were in Hold 1 I think | Two torpedoes in Hold 2, including the exploded one |
Inside this hold there are a large number of torpedoes, mostly bodies and engines but a couple of warheads. They are mostly in the back left as you enter. The rudders and props make an interesting sight as they stand up out of the bottom (port side) of the hold. This hold may have been a workshop for the torpedoes. There is also one torpedo that has blown open near the warhead.
Once you come out of Hold 2 turn left and head towards the bridge. Just before the bridge, top left as you look at it, there are two minesweeping paravanes. These are similar to the ones on the Nippo Maru. These are much bigger though.
At the bridge you can enter into the main promenade deck compaignway from the port side and here you can see four periscopes which are lying on the wall (the bottom as you look at it). They are about 10 metres long and are thicker at one end than the other.
 | 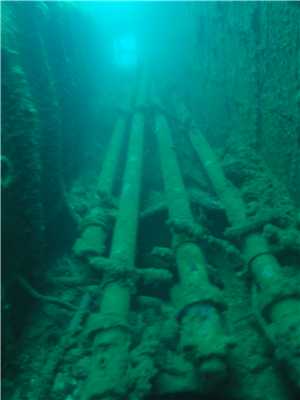 |
| The top of some of the periscopes | At least four of the periscopes in one
compaignway of the Heian Maru |
There are two types of periscopes here. The ones with a very small top which were attack periscopes and the larger topped ones were for normal or night work. Most have handles exactly like you see in movies, both at the bottom and towards the middle. As mentioned, there are four closer to the bridge, then as you go along further there are another three, then two more and then finally one more. That makes a total of nine periscopes on this passageway.
After swimming along this passageway you can drop down a level (actually the same deck but further towards the centre of the ship) and there are five more periscopes here. You can exit out the back of the superstructure from this passageway.
After swimming along this deck you can exit out and look at the funnel, engine room skylights and anti-aircraft mounts (the gun is apparently below on the sand). A small Hold 3 is located immediately behind the bridge. This can be entered. Inside there is a lot of china (plates etc) at the bottom right.
 | 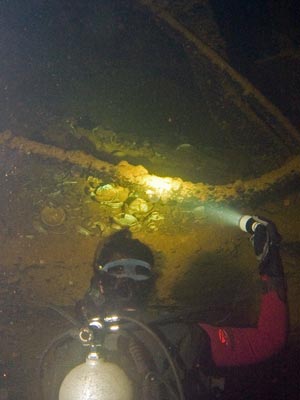 |
| Martin in one of the holds of the Heian Maru | Kelly examining a pile of china |
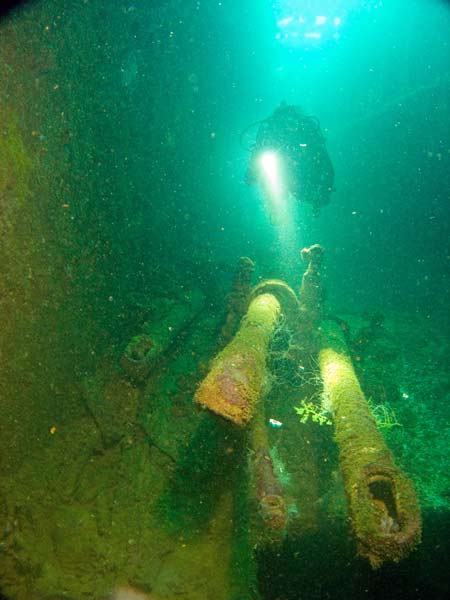
You can enter the engine room from inside the superstructure. I cannot recall if you can get inside via the skylights. It is very dark but quite interesting. After returning outside, you will see to the rear a small kingpost and then a small Hold 4 which is covered. There are two gun barrels under this hold, perhaps one is the bow gun but what is the other? There is another hold, Hold 5 just behind and in front of the mast. This is over a mast house. This can be explored. There is also another mooring buoy here on the sand.
Behind the mast and in front of the stern is Hold 6. I do not recall what is in this hold or even if you can enter it.
 |  |
| The upper prop of the Heian Maru | A jellyfish, a lot of small fish
and divers outside the Heian Maru |
At the stern there is another gun platform but no gun (is it the one under the hold?). The twin propellers are excellent photographic sites, with the upper starboard one missing its hub (opposite to what Klaus Lindemann says in his excellent book Hailstorm Over Truk Lagoon).
Once again, an excellent dive, waiting to be explored even further.
Dives:
16 February 1994
5 November 1997
13 November 1997
3 September 2004
5 September 2005
17 October 2011
References:
Hailstorm Over Truk Lagoon by Klaus Lindemann
WWII Wrecks of the Kwajalein and Truk Lagoons by Dan E. Bailey
Warships of the Imperial Japanese Navy, 1869 - 1945 by Hansgeorg Jentschura et al
Lloyds Register 1931-32, 1945-46
Suez Maru Web Page
IJN Submarine Tender HEIAN MARU: Tabular Record of Movement
|  v6.00.307 © 2003-2005

