|
Michael McFadyen's Scuba Diving - Yamagiri Maru
One of the more interesting wrecks in Chuuk Lagoon (not that any are uninteresting) is the Yamagiri Maru. According to the 1938-39 Lloyds Register, this ship was built by Mitsubishi Jukogyo KK (Mitsubishi Heavy Industries) of Yokahama, Japan, as a passenger/cargo vessel for Toyo Kisen KK and launched in 1938 (however other references say she was launched on 3 May 1939 and put into service on 30 June the same year). The Yamagiri Maru was 133 (436.4 feet) metres long, 17.5 metres (58.3 feet) wide and grossed 6,442 tons and powered by a single six cylinder Mitsubishi diesel engine of 1166 NHP. This gave her a maximum speed of 17.0 knots and a maximum speed of 15.0 knots. In about 1939 or 1940 the ship was sold to Yamashita Kisen KK.
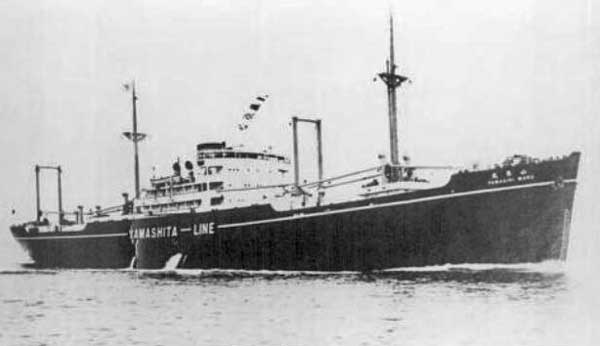 |
| Yamagiri Maru |
The Yamagiri Maru was requisitioned by the Navy on 15 September 1941 as a special cargo transport. On 28 August 1943 she was torpedoed by USS Drum when travelling as part of a convoy west of Mussau Island in the Admiralties. The two torpedoes that hit caused a great deal of damage, so much so that when she arrived at Rabaul in Papau New Guinea for repairs she was shown by Allied aerial photographs to be lying down by the bow.
The ship was in Rabaul from at least 1 September till 1 October 1943. When Rabaul was under almost daily attack at the end of 1943, she was taken (either under tow or her own power) to Chuuk for additional repairs. Photos taken early during Operation Hailstone show her still heavy in the bow, indicating that the damage may not have been completely repaired even by then.
 | 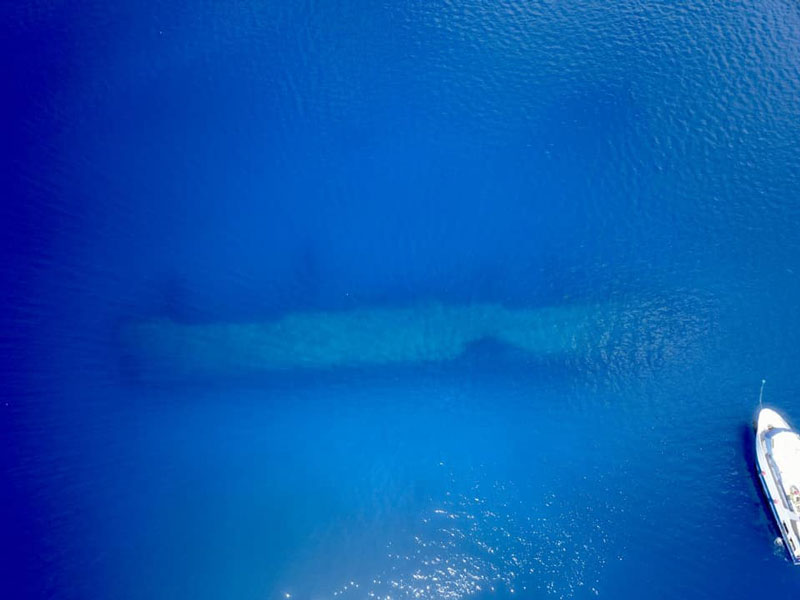 |
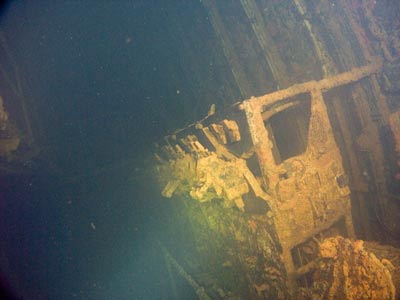
A drone photograph of the wreck of Yamagiri Maru
Photograph courtesy of Kevin Green | A closer shot from the drone, bow to left
Photograph courtesy of Kevin Green |
The Yamagiri Maru was anchored to the north-west of Fefan Island and was attacked on 17 February 1944 and was possibly hit once by a dive-bomber and had two near misses by bomb and torpedo. The next day she was attacked by Curtis Helldivers from USS Bunker Hill and one scored a direct hit (maybe two). There was apparently a large explosion and fire and the ship must have sunk fairly soon after as photographs taken later that day show an oil slick in the vicinity of where the Yamagiri Maru was previously seen.
A GPS Reading of N7° 23' 00.2" E151° 49' 17.4 using WGS84 as the datum will put you on the bridge.
Today the wreck lies in 34 metres of water on its port side (why are most of the Chuuk wrecks that are on their side on the port side?? On second thoughts, so are most of the Sydney shipwrecks as is the SS President Coolidge!). The starboard hull is about 15 metres and it is a bit deeper towards the bow.
 | 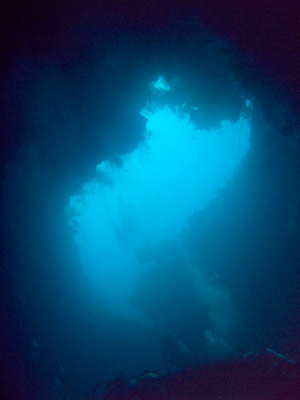 |
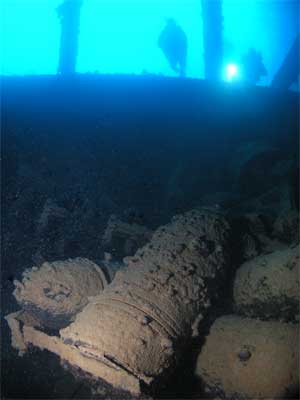
| The torpedo hole in Hold 3 of Yamagiri Maru | Another photograph of the hole |
The dive boats normally anchor somewhere near the bridge or Hold 3. Once you have descended, head along the hull towards the bow and over to the right so that you are near the hull bottom. Soon you will see a huge amount of damage. From appearances, this is where the two torpedoes from the USS Drum appear to have hit. Hold 2 has a strange mixture of steel work, bent back and all over the place. You can also see where steel plates have been used to repair the damage from the Drum. Hold 3 has a huge hole in the bottom and sides of the hull. There is also considerable amount of repair work in this area as well, or at least that is what it looks like. It would take more than one dive to be able to fully appreciate the situation in these two holds.
However the damage here was caused, it obviously caused the sinking of the vessel although it is hard to fathom what exactly occurred. My guess is that the damage from the USS Drum torpedeos was repaired with plating and reinforcement and then the Helldivers hit the same area (or near misses) and caused the weakened hull to implode with devastating results.
 |  |
| A road roller in Hold 5 of Yamagiri Maru | A torpedo in a hold (5 I think) |
Most people enter the damaged hold by going through the hole. This is very large and could easily accommodate 15 people entering at the one time (see the photograph above). Inside this hold appears to have been a refrigerated hold as there are numerous coils of pipes and some pumps. The hold looks like it used to be broken up into smaller compartments and a couple of these are still intact. The walls of the "fridges" are constructed of insulation blocks (about 0.5 x 0.5 x 0.1 metres). This is a material of tar-like substance covered with another material. In the second 'tween deck I found one that I entered through a small doorway. If you do this, be very careful as I accidently touched one of the blocks that make up the walls and was covered in tar over my legs and arms. Other than this, the hold appears to be empty.
It is a short swim to the bow past Hold 2 (see comments above) and then Hold 1 which is mostly empty except for some steel girders. There is a nice small gun on the bow.
 |  |
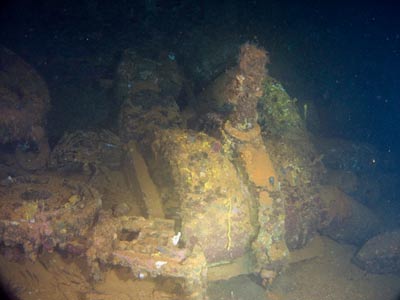
| The engine room of Yamagiri Maru, a switch I think | Some engine control handles |
Behind Hold 3 is the bridge. This can be entered from the first 'tween deck of Hold 3 or from outside through the window on the bottom. The entire area here is very interesting and there is a lot to be seen.
The engine room can be entered a number of ways. The easiest is to go through the skylights or by going into the bridge near the sand (as mentioned above) and then swimming towards the stern and dropping a couple of decks towards the centre of the wreck. You can then ascend through a door into the engine room. This is a very large engine room, open, light and able to hold many divers.
You can examine the engine (2 x 3 cylinders, in line), go behind the engine and drop under the main catwalks surrounding the engine. There is much to see, including a skull which is embedded in a wall. You can exit out any of the aforementioned entrances or there is another door on the starboard side towards the stern.
 |  |
| The engine of the Yamagiri Maru | A human skull imbeded in the wall of the engine room |
Hold 4 can be seen as you exit the superstructure. This is elevated over the level of Hold 5 (the same as Hold 3). The hold is open at the top level but is covered on the bottom of the second 'tween deck. There is a door into the lower parts of the hold on the port stern corner of the hold. You can go through to hold five via a hole in the second 'tween deck or a door in the first 'tween deck. The hold is empty except for some 200 litre (44 gallon) drums.
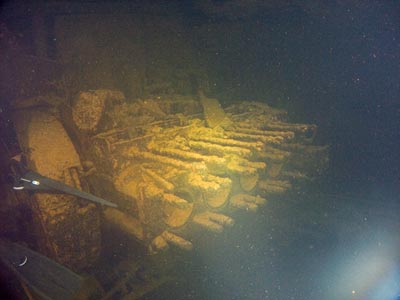
The most spectacular feature of this wreck is to be found in Hold 5 which is the second last hold. Inside the hold there are at least 30 huge shells for the Japanese battleships Yamato and Musashi. These giant shells are more than one metre long and almost half a metre across and weigh 1,460 kilograms each. Capable of sending a projectile 42 kilometres, the shells are mostly scattered around on the wall (floor as you look at the wreck) of the hold or on the side of the shaft tunnel. However, some are contained in their original packing which appear to be metal containers in mining box cars.
 |  |
One of the huge shells in Hold 5
This one is on the shaft tunnel | A number of huge shells in Hold 5
- note two on left in railway box cars |
This hold also contains a small steam-roller (perhaps two, it is a bit hard to identify everything). The front roller of the machine is quite obvious lying on the side of the shaft tunnel right in the middle of the hold (see photo above) and there is a large object near it which may be the engine section of the roller. I also was of the opinion that there was an artillery gun here as well.
There is other machinery, perhaps heavy road building equipment. There is certainly a largish cement mixer (it may be part of a cement truck) but only the barrel can be seen right at the front of the hold as well as other small gauge railway cars. There are also some spare propeller blades as well as two (I think) complete small props. The blades are mounted on the rear wall of the hold (to your right as you enter). Even more amazing things are in this hold, including boilers. What an interesting hold!
 |  |
The stern telegraph
of Yamagiri Maru | The colourful prop of Yamagiri Maru |
Hold 6 is behind this hold and contains some drums. There are some more drums on the sand outside the hold. There are also two large ventilators on the sand in this area. As you exit this hold and swim to the stern you will see a telegraph on the starboard side of the ship. The handle still moves a little. From here you can go over the stern and go to the prop. There is a single propeller which has two of the four blades exactly aligned with the rudder.
The final parts of the dive can be spent on the outisde of the superstructure, especially the starboard (shallower) side. The funnel is still in place and has a very distinctive and prominent huge Y symbol of the former owner welded on it. There is also a compass resting on the funnel.
 |  |
| A spare anchor at the stern in front of the poop deck | Another shot of the prop of Yamagiri Maru |
Like most of the wrecks in Chuuk Lagoon, this is a dive that can be done by any diver. The maximum depth is only 34 metres or so but the vast majority of a dive can be done in the 20 to 24 metre range. A dive time of about 38 minutes requires 7 minutes decompression at 3 metres. I have now dived this wreck four times and at least a couple of dives are really required to explore it. This is a must do dive on your trip.
Dives:
19 February 1994
5 November 1997
13 November 1997
8 September 2005
25 October 2011
References:
WWII Wrecks of the Kwajalein and Truk Lagoons by Dan E. Bailey
Hailstorm over Truk Lagoon by Klaus Lindeman
Lloyds Register 1938-39, 1939-40, 1945-46
|  v6.00.307 © 2003-2005

