|
Shell Reef is located xx kilometres east of Townsville. I visited this site when on a week long liveaboard with MV Kalinda in 2014 after diving the SS Yongala.
Staghorn Corner (the name I and my friends gave to the site) is the southern end of Shell Reef. The reef is about 2.5 kilometres long and about 1.25 kilometres wide. A GPS reading of S19º 03' 56.0" E148º 10' 27.6" (using WGS84 as a datum) will put you to the immediate north of the actual dive site.
 | 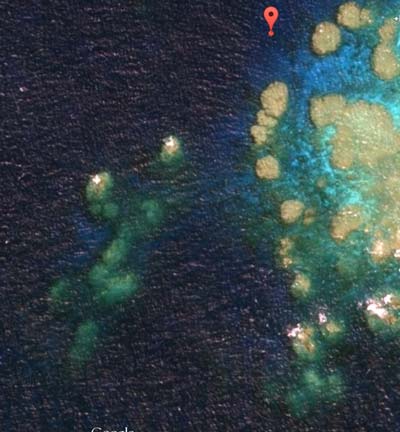 |
| A satellite photo of Shell Reef. Anchoring spot is red marker | A close up of Staghorn Corner. Dive site is around
the bommies at left and back between
them and the main reef. |
The southern end of the reef consists of a series of bommies that break the surface at low tide. There are a couple of other bommies off to the south-west of the main ones that also break the surface at low tide. The dive site consists of the area to the west of the outer bommies and also between these and the main series of bommies (see the photos above).
When we dived here there was a slight current from the south that we swam into. The outside of the bommies has a relatively shear wall that goes down to 15 metres at first and then to over 25 metres where there is a sandy bottom. The bottom has some small bommies that come a few metres off the sand. There are a few small gorgonias on the walls and bommies.
 |  |
| A satellite photo of Shell Reef. Anchoring spot is red marker | A close up of Staghorn Corner. Dive site is around
the bommies at left and back between
them and the main reef. |
Along the wall there are white and black-tipped reef sharks. It is just over 200 metres to the southern end of the wall. Here the depth comes up to 15 metres. There is a slot between the larger bommie (bottom left one in the photo top right) where you can come up shallower to eight metres. This shallow slot leads to a wide gully that takes you back to where you started.
About two thirds of the way back, once you have passed the shallowest section of the gully (six metres) it deepens back to eight again. Around here on your left there is a small cave that is actually larger than it appears. This becomes a sort of tunnel (it is really open above) and goes all the way through the reef back to the outside.
From here you can follow the outside of the wall back to the boat (red marker) and spend the rest of the dive under the boat on a larger bommie before going back to the main reef and doing a safety stop at five metres.
As you can imagine from the name of this site, there is a lot of Staghorn Coral. It is really everywhere. There are plenty of anemones on the reef with lots of clownfish of many species.
| |
| A satellite photo of Shell Reef. Anchoring spot is red marker | A close up of Staghorn Corner. Dive site is around
the bommies at left and back between
them and the main reef. |
For a second dive here you can head north from the boat at about 22 metres. There are some deeper and larger bommies (not visible in the photos above). Once around them you can follow the wall to the west of the two bommies that are to the right of the red marker. In fact, you can swim between these two bommies (eight metres) and end up the the very small lagoon. This is 12 metres deep and has a sandy bottom.
Come back around the southern of the two bommies and spend your time here at five metres. This dive has more staghorn coral as well as plenty of clams, although there are no large ones at all (probably because they were all taken 50 years ago). There are more sharks on this dive as well as anemones. Of course, on both these dives there are plenty of surgeonfish, parrotfish and all the normal tropical fish you would expect to see.
In November the water temperature was just over 26ºC and visibility was 25 to 30 metres. A very nice dive site.
|  v6.00.307 © 2003-2005

