|
From June 1999 till early November 2017 I had a Toyota LandCruiser Prado Snowy (90 series). In November 2017 I purchased a 2016 LandCruiser 200 Sahara which had only 14,000 kilometres on the clock. The following details how I have set it up for towing my dive boat and for off-road expeditions.
Basic Specifications
The Sahara has a twin turbo V8 diesel engine of 4.5 litres. This has 200 kw and an enormous 650 Nm of torque. The fuel economy is stated to be 9.5 litres/100 kilometres, but everyone says it is nowhere near that. After 35,000 kilometres (10 January 2020), a mixture of country driving, a couple of hard 4WD tracks, city driving and towing my large boat around town (the last two the majority of use), the average is 14.3 litres per hundred kilometres. On a trip to Victorian High Country with a good deal of hard off road driving, it was 14.6 for the whole trip, with a best of 11.7 for the run along the Hume Highway from Sydney to Myrtleford. For 5,400 km to Birdsville, 13.4 and 750 km to Bendethera in NSW it was 13.2.
The only gearbox available (apart from the "poverty pack" GX) is a 6 speed automatic with permanent four wheel drive. This is far from perfect as I will detail later. It also has some amazing features, traction control, stability control, crawl control, Kinetic Dynamic Suspension System, active (radar) cruise control and much more. There are even four cameras giving views forward, to the rear and on both sides. This is amazing for parking and off-road work in tight sections of tracks.
The car inside is also brilliant, with leather seats (heated and cooled), climate control air conditioning, a fantastic sound system, electric seats and so much more I cannot list it all. Lots of its features are not even mentioned on the Toyota website or brochure.
Wheels and Tyres
The standard Sahara comes with 18 inch alloy wheels (285 60/18) but only road tyres (Dunlops). I decided to leave these on for a while and later replace with either BF Goodrich All Terrains or Toyo Open Country AT2s.
In late May 2019, I purchased four Sahara wheels and tyres from Gumtree. These were brand new, the tyres only having travelled 100 km. The seller was asking for $1250. There were a number of other similar sets for sale in Sydney. I offered $1000 to them both but they wanted $1100. Later, one came back to me offering to sell for $950 if I purchased within two days. I did.
I then took them to Blair's Tyres at Peakhurst and had four Toyo Open Country AT2s put on. The cost was $1100 (best quote other than that was $1260. I of course kept the tyres from them. So, for $2050 I got two brand new sets of tyres and one set of genuine Sahara rims. I will keep the Dunlops on the car for around town and highway use and put the Toyo set on for proper off road work. I put them on the car on 23 June 2019 in preparation for my trip to Birdsville for the Big Red Bash.
In early September 2019 I took the Toyos off and put the Grandtreks back on. The Toyos had nearly 8,000 km on them. At this stage they had a bit over 9 mm tread depth. Specifications state that they start with 10.8 mm but I am not certain this is correct. The front and back have the same depth but the back tyres have a bit more damage as would be expected considering the load in the rear. Overall, they seem in better condition than my All Terrains from my previous two trips to Central Australia in the Prado.
Fuel Consumption
See the first paragraph above. I will update that figure more as I do more trips. I have driven from Sydney to the Gold Coast and return with the rooftop tent on without refuelling. I averaged 12.4 l/100km heading north and 13.5 l/100 km heading south, both sitting on the maximum of 110 or 100 km/h.
On a trip to the Victorian High Country (this time with all camping gear) I averaged 14.6 for the whole trip, with a best of 11.7 along the Hume Highway. This trip included a fair bit of hard and steep country.
In February 2018 I took the boat (2 tonnes) down to Jervis Bay for a week's diving. I also had three sets of dive gear (six tanks), clothes, food etc. For the trip down and driving about 40 kilometres each day (with four on board and eight tanks etc), I averaged 17.9 l/100 km.
For the trip back I used 20.1 l/100 km, but this included the very steep climb back up from Wollongong. I sat on the speed limit when it was 80 km/h or 90 km/h if it was higher. Going up Mount Ousley I sat on the speed limit of 80 km/h and just past the Picton Road turnoff on the steepest section of the road, I could do 84 km/h (limit 100 here). Apart from this one small section, you hardly knew the boat was behind us. In the Prado I could only do 30 to 40 km/h.
Suspension
As mentioned above, the Sahara has Kinetic Dynamic Suspension System. This apparently gives more movement to the suspension in off-road situations as well as limits roll on the road. More about this once I have used it a bit more (so far have not noticed anything).
Bull Bar
I installed an MMC Falcon Premium bull bar with an Ironman 9500lb winch with synthetic rope. This seems to be a very well made and rugged bull bar. I later installed two towing points ($97 including D-shackles).
 |
| The bull bar, winch and snorkel |
Underbody Protection
As part of the bull bar install, I purchased the underbody protection option.
Snorkel
I had an Ironman snorkel put on at the same time as the bull bar and winch. This was also done by Fastfit Bullbars at Leichhardt. A very nice job and at a very good price compared to other brands and places.
Driving Lights
In late 2018 I purchased a pair of 7" Blaze Series LED Driving Lights from BAP Offroad ($364). These have 28,000 Lumen. I installed them on the bullbar and used a genuine Toyota driving light harness ($105). The harness was a problem, as the installation guide is not only rubbish, it is wrong. The harness connects okay to power, earth and the on/off switch. You need to cut the light end and solder in the plugs from the lights, easy to do.
The problem comes when you try to connect into the high beam trigger wire. This is because the Toyota high beam is negative triggered (I think that is what they call it). You need to find the right wire that comes out of a module under the back of the glove box. The guide says it is the black wire in the top right part of the module. Wrong, there is no such wire on my 2016 Sahara, although my friend's 2018 VX does have it. I finally worked out that it was the black wire in the top left part of the module.
Even then, I somehow stuffed something up and all four cameras stopped working. It took me about three hours of checking everything (plugs, fuses etc) and I still could not find anything "broken". Guess what, when I next drove it, the cameras worked. I must have fixed the problem without knowing it.
I have not yet used the lights in the country, but on dark streets they worked fantastically.
Rear Storage System
I had a Drifta rear drawer system built. This has a slide for the fridge on the left side at floor level and two large drawers on the right side. The fridge is totally enclosed so I can put things on the top and sides. It was made to order as I had it customised to fit the water tank (see below). As I ordered at the end of the year, it took about two months to get it (freighted to us).
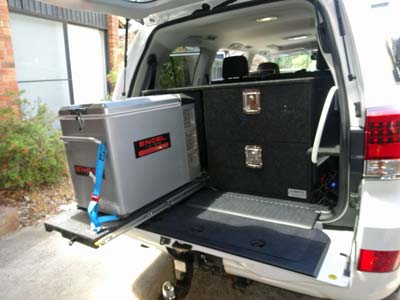 | 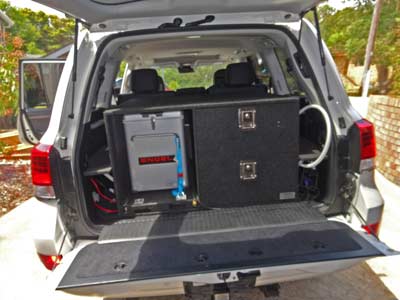 |
| The Drifta drawers with the fridge slide out | All closed up |
I installed it in a few hours one morning. The hardest part was working out where to drill the holes in the sides and pulling it in and out to drill the holes. The method proposed by Drifta did not seem to work. Anyway, it looks really great. I have also done a few minor modifications to fit out electrical panels and added some tie-down points to the top of the system.
On my first two trips the drawers proved to have much more space inside and on top than my system in the Prado. If I was to do it again, I think I would only get one drawer and then put plastic containers on top if I needed more space. At the moment there is only one large spot (where the fridge goes) unless I remove the whole system.
Water Tank
I purchased a 50 litre water tank sits behind the rear seat and in front of the Drifta drawers. I also have a small electric pressure water pump which I put under the right side wing section of the drawers. The water is plumbed to the rear under the right hand side wing section. I had to modify the pump to work at a lower pressure as it was too strong. This involved cutting the spring in the head to about half its length. It now works perfectly.
Electrical Upgrade
I also installed a second battery (98 Ah deep cycle) together with a new solar panel (110 watt folding blanket by Kings). This was all connected through a battery isolator (Kings), a solar regulator and an electric panel which has outlets for two cigarette lighters and a Hella (also called Merit) connector and a voltage meter and also a separate solar regulator. These are mounted on the right rear side of the drawers. I also have a separate Anderson outlet to the rear (from the main battery) for running My boat trailer's winch. It works great.
The second battery is in the space provided for the second battery but a modification had to be made. The only battery tray you can get that fits properly is for a smaller battery than 95 ah. I cut the weld join on the inside lip of the tray and straightened out. This permits the larger battery to fit (there is room).
I also put the isolator on the top of the lid of a plastic box which is to the rear of the fuses box. Some other people have put theirs on top of the fuse box. However, I did not know that the LandCruiser's alternator is a smart one, so later I had to buy a different isolator as the second battery was not being fully charged (I later reused the Kings one on the Prado when I sold it as its one failed). I got a Thunder DC/DC charger. I mounted this on top of the main fuse box. This is now charging the battery to 13.7 volts.
 | 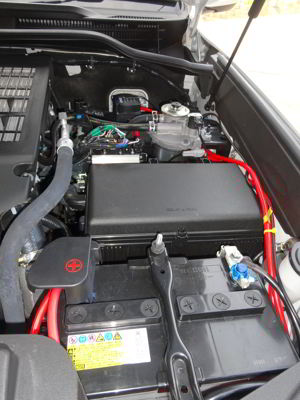 |
The second battery, also showing hot
water shower hoses and pump | The battery isolator at rear |
I also have LED strip lights in the tent, the rear compartment and side awning. These connect through the new panels at the rear. I also have some extra LED strip lights on a roll. I have also installed an LED module in the lower part of the top section of the rear door. This has an on/off switch and shines onto the drawers and fridge. Works fantastically! I also bought a Kings LED strip that I can hang up outside the car for more light.
GPS
I have VMS Touring 700HDX GPS which has on-road and off-road applications. I moved my maps from my tablet to a new micro SD card and activated OziExplorer (which comes on the VMS). I will use this for trips. It did not work properly on my first trip, this appears to have been because the map files were not properly indexed. It now seems to work but not as good as I hoped. Since then I have used the VMS one and am relatively happy with that, so may stick to it.
Communications - Mobile Phone
In January 2022 I purchased a CEL-FI GO Mobile Signal Repeater from Repco for $899. It was on special at $100 off and at least $200 cheaper than anywhere else I found it. This items are specific to each phone carrier and I purchased a Telstra compatible one as if you are really keen or travelling Australia, you need to have Telstra as they have by far the biggest coverage.
Anyway, this kit consisted of an external antenna, the booster and an internal aerial. It was a simple matter to mount the external antenna on the bull-bar, run this cable into the car. Then mount the booster somewhere. I put it in the rear cargo section on the left hand side under the window. I then (temporarily) mounted the internal aerial (where the signal is retransmitted) on the back left corner of the car. I also used a temporary power connection from the back seat 12 volt cigarette power plug. I will eventually mount it to the second battery power source in the rear so I can use it 24 x 7 (I need to use in rooftop tent).
I have very poor mobile coverage at home, so it was a good place to test. My phone went from 1 bar to 3 to 4 bars. So far it looks like a good investment.
NOTE: The instructions are not the best. You can set this up for use in a car or in a house. This is not made clear and despite what it seems, if installed in a car or boat or caravan, it is a mobile installation no matter what.
Communications - VHF
I originally purchased an Oricom UHF 380 two way radio. This has the controls all on the hand piece. The head unit is located on the left side of the passenger footwell and the aerial is mounted on the bullbar. On my first trip it appeared to work well. Since then I had to replace the top part of the aerial when it fell off and I lost it and later replace the whole aerial when the top part broke totally and I had to buy a new one in the outback. Poor design. On my 2020 trip I had problems transmitting and realised that the problem was the PTT (push to talk) button not working properly. I purchased a replacement handset. It worked well on my 2021 trip but on my 2022 trip I again had problems. It seems there is a design fault here.
When I returned from the 2022 trip I purchased a GME XRS 370C radio. This is made in Australia and also about double the price of the Oricom. I installed it under the glove compartment and put the handset near the starer button.
I also have a GME portable UHF radio for use near the campsite.
Standard Vehicle Electronic Settings
I purchased a OBDII to USB cable so that I could modify some of the settings of the car's electronic settings. This requires a piece of software called Techstream which is the software used by Toyota service centres to modify the cars. You can buy the cables on Ebay and find the software on-line (or it may come with the cable, mine did). See this link to a forum where the exact process to install on Windows 10 is given. Follow exactly and it will work.
Using the setup, I modified some of the warning beeps (eg car seat belt for passenger so it does not go off if something is on the seat), how doors and windows open and close. Total cost under $17.
Hot Water Shower
I had a Twine hot water shower on the Prado and this was the most used feature of the car. I used it whenever I went diving and almost every day on 4WD trips. These are no longer made, so I purchased a Glind hot water system.
Like the Twine, it has a heat exchanger and uses the water from the heater/radiator to warm water. I installed it, taking about five hours all up. I had to put the heat exchanger unit on a bracket for the bull bar (right side near headlights) as there is no room in the engine bay. He put the pump on the back side of the air filter lid and the switch inside the front driver wheel arch.
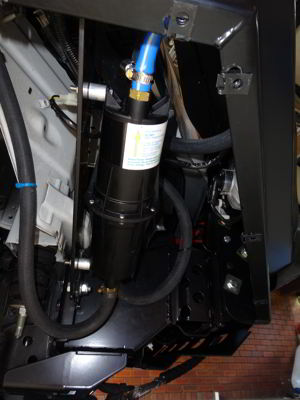 |  |
| The Glind heat exchanger in place on the bull bar bracket | The hose set up at the front |
Like my Prado install, I made up a system of hoses so I can heat the water in a container to the right temperature and then turn off the engine. This means that the water does not keep getting hot. I have an invalid shower temperature module that shows the water temperature as it passes through. From experience I know that once this is showing 45° it is hot enough. Unlike the Prado, you cannot use the heater to control the water temperature, so this is really the only way it can work.
Automatic Transmission
As mentioned above, the auto transmission fitted to the car has a few "quirks" that make it less than perfect. The main one is that when in D, it will not change into 6th gear until it the car is doing well over 110 km/h. Of course, as the maximum speed limit in most of Australia is 110, this means it will not use that gear. Even though 5th gear is selected as low as 60 km/h, it will not go into the next one at a speed it is really capable of doing. In addition, the gearbox drops down far too early when you get to a little hill. It could easily pull up such hills in 5th or 6th without any stress at all but goes to 4th or even 3rd.
There are a number of ways to overcome some or all of these problems. The first is to move the gear selector over into the S (Select) gate and select 6th. When you do this, the gearbox will use 6th gear at speeds under 100 km/h (95 on GPS). However, it will still drop gears once you encounter the tiniest of hills and the torque converter will unlock meaning the engine revs much higher than needed.
The more expensive ways are to do one or both of the following. The first is to get a transmission "remap". Basically this involves getting a new computer chip added to the existing engine/transmission computer (CPU - one for both operations unlike most cars which have separate ones) which changes the characteristics of the gearbox. Of course, this costs heaps to do, as it is not as simple as some sellers seem to imply (putting new software on the CPU), they need to solder a new chip into the motherboard.
The second is to buy a torque converter lockup kit. These cause the torque converter to lockup so that there is no slip in higher gears. It does not really help in changing the speed at which the transmission selects 5th and 6th gears (so you still need to drive in S6), but it makes the gearbox stay in the selected gear for much longer and means less hunting and changing of gears. It also lowers the transmission fluid temperature when towing large boats/caravans.
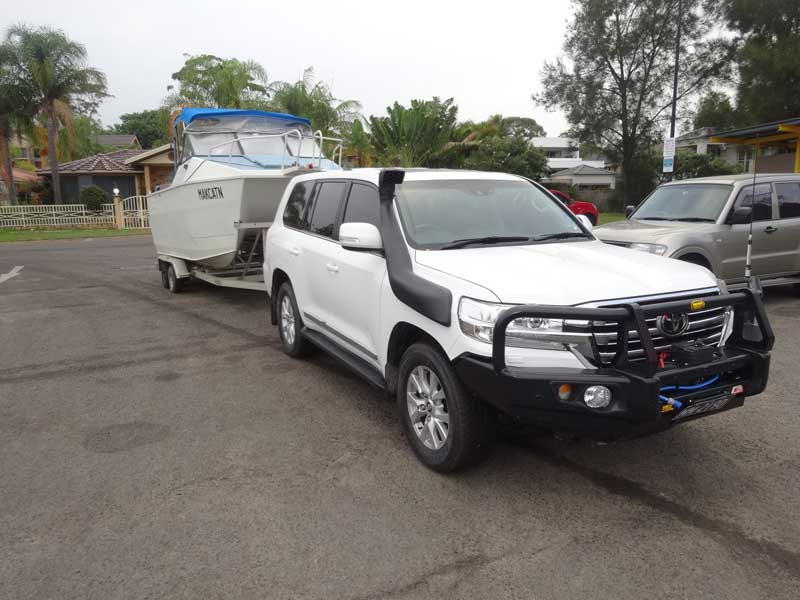 |
| Towing my dive boat, MakCat |
As far as I can see, there are three available for the 200 series in Australia. The first is called Stocklock, it has a good reputation but it is made by one person who does not have a web site and he only has a Facebook page. This has no information at all about it. The second is the GENII Torque Converter Lockup Kit from Wholesale Automatic Transmissions. I did not find as many people endorsing this one, although it seems to be the cheapest. I also saw nothing that said you could install yourself or how hard this was.
The third one is the Transmission Lock Up Controller from Richards Auto Electrics (Google the last two and you will find their web sites). This cost $715 delivered to Sydney. There is also an excellent Youtube video which shows how to install it (not exactly correct as the kit is a tiny bit different from the one used in the video) and also the benefits of using it.
I purchased the Richards one and on 10 January 2018 I installed it. It was pretty easy, taking me three hours from start to finish. There are very good instructions that come with it, although I had a couple of minor problems (not been able to work out how to remove the lower CPU connector fully - I had to temporarily move the electrical box in front while I did) and it not been clear that the extra item in the kit that was not mentioned in the list was to piggyback into a 12 volt ignition connection via the fuse box. I probably could have installed in about 2.5 hours if these had been clearer.
The day after I installed the kit I towed my 2 tonne boat to the ramp and back. For this I used the low speed mode. This kicks in at 40 km/h, so it really only becomes obvious once you are doing 60 or so. It gave good engine breaking coming towards red lights and down the hill towards the ramp and my place. I used it again the next day and it was also quite good.
That afternoon after I put the boat away, I drove from home to Helensburgh. This involves a section of 70, 80, 100 and 110 km/h roadway. For the 70 section, nothing happened as the high speed mode kicks in at 78 and out at 72. Even at 80 it does not work all that well (I may change the settings to 75 and 72 - easily done it seems).
On the 100 and 110 sections it worked brilliantly. Small and even larger hills which were previously only climbed with the transmission kicking down from 6 to 5 or 4 (or 5 to 4) were climbed without any gear change. There was no appreciable change in how the transmission changed gears. As far as I could see on this short one hour test, the fuel economy was less than the last time I did this section of road.
A few days later I drove on the M5 out past Liverpool. This is 100 km/h mostly but some 110 km/h and I was able to sit on the maximum the whole way. As this road is quite flat, the transmission stayed in 6th for virtually the whole way. Fantastic. Again, the fuel economy appeared for this part to be much better than other similar bits I have driven before.
On the trip to the Victorian High Country over Australia Day 2018, it was used for both low speeds when off road and for high speeds on the highways. It worked perfectly. On a trip towing my boat from Sydney Jervis Bay in early February 2018 it also seemed to make everything work much better. The transmission temperatures also stayed fairly constant. I now use the high speed setting on any drive where speed is over 80 km/h and the low one when towing my boat or in very rough conditions.
Scangauge
I purchased a second hand Scanguage II off eBay for $175. Primarily, I got this so I could monitor the transmission temperature. Easy to install, although the X-code for the transmission was a bit hard to figure out. I finally found that on the Australian web site for the gauge the code for the later models which is in Celsius rather than Fahrenheit as on the US web site.
This certainly shows that when using the Richards lockup and driving at speeds up hills and when towing, the temperature stays much lower. I also found via some forums the codes for the torque converter temperature and gear status.
Added Extras
Camping Gear - Tent
In December 2006 I purchased a ShippShape roof top tent after many trips since 1997 with friends who had one and after a trip to Western NSW where I used a borrowed one. The one I purchased was second hand from ShippShape. It is an old tent but with brand new base, mattress and frame and almost new cover. It is the top of the range model with all side curtains.
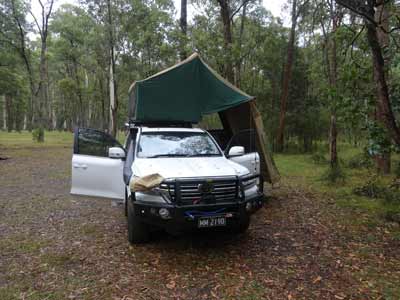 |  |
| My Sahara and ShippShape at Beveridge Station in Buckland Valley | A rear shot showing the Sahara's drawer system |
The tent consists of a sleeping section which is over the car. This is a full sized double bed and has heaps of room. I have slept in many smaller beds in hotels and resorts! I use normal double bed sheets (cotton in summer and flannelette when cooler) with a wool blanket. In colder climates I also put a sleeping bag (open out) over the blanket.
You get up and down via a very easy to climb ladder. My one has windows on the driver's side as well as windows on the passenger's side that open into the covered awning area. Newer versions have windows at the front and back as well.
I have a small trampoline out of a stretchy material and cord. This hangs from one side to the other under the roof near my feet. I put my day clothes in here after I change into my sleeping clothes. There is also a small space between the mattress and base section near my head where I put things like water, torch, AM/FM radio etc.
 | 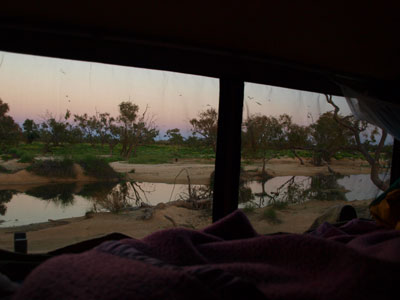 |
Stopped coming out from Talbotville
in the Crooked River Valley | A photo taken at the Strzelecki Crossing
from inside the ShippShape |
Upon arriving at a camp site you park as flat as you can. I have two plastic levelling ramps that I can use to balance the car correctly (I have two small spirit levels to show the actual balance). Once flat, you unclip a bungy cord on each side from a number of knobs, put the ladder on the passenger side, climb the ladder and pull on the roof. It opens up very easily. You then take two cords from the outer edge of the awning section and attached them to suitable points on your car and tighten. These hold the awning rigid and stops the tent closing up.
The next thing to do is to secure the awning. If it is unlikely to rain, I normally just hammer some tent pegs into the ground and attach an ocky strap to each. If it is likely to rain, I put the awning out horizontal to the ground and use two poles (carried inside the tent) on the far corners to make a larger protected area. I then attach the sides to provide more protection from driving rain. I also have a medium sized tarp which attaches to the back of the tent and using four poles, provides cover over the rear door of the car (which is of course where all my/New Year period of 2009 I struck a lot of rain. The awning leaked a lot after it had rained for a few days. I then waterproofed all this with Thomsons.
To move to the Sahara, I had to buy new mounts and feet for the roof racks. Whatever you do, be careful when removing the standard rails from a 200 series, you need to undo each bolt one turn at a time as you go. If you do not do this, you will lose the retaining bolt section inside the roof.
Camping Gear - Cooking
The majority of my cooking is done on a collapsible barbecue plate. This is shaped like a plough disc and has legs and a handle that folds away. This is called a Biji and I bought it in about 2001. I have a small frying pan if needed. For heating water and cooking things like pasta, toast etc, I have a cheap gas stove that uses disposable canisters. These are relatively economical and much better than a LPG gas system. The only problem is when it is cold and you have a canister that is less than half empty, it does not work well. I used to use petrol-powered Coleman burners but they end up being unreliable.
I have a camp oven for roasts, damper and desserts. As well as a pot and a whistling kettle I have a bowl for mixing and salads etc. I normally only have enough plates for two people with plastic wine glasses, beer coolers, barbecue and cooking utensils as well as knives and forks etc but I can carry more.
IN May 2019 I purchased a small firepit off eBay for about $75. It is 400 mm long, consisting of two ends and two sides. I purchased a canvas bag to store it in, works great when you want a small fire in a place where fires cannot be on the ground.
Camping Gear - Other
I carry a collapsible chair and a collapsible table which fit on top of the storage system. I also carry a shower tent, and other bits. I also carry a small chainsaw (needed many times in remote locations to clear tracks as well as to cut firewood). I also have a wedge, small axe and a spare chain as well as extra chainsaw fuel and tools to repair and sharpen the saw. I also sometimes carry a small 12 volt generator to supply emergency power.
If needed I carry a small compressor. If I am diving I do not take the compressor as I can fill tyres from my dive cylinders.
Carrying Clothes etc
I have a plastic bin with a lid in which I put my clothes. These are very handy as the clothes are easily visible through the sides and the construction means I can put lighter things on top if needed. I put these bins on the back seat.
For the Prado I also created a trampoline out of a dog bed (using bungy cords and rope) which hung under the roof over the rear station wagon section. On this I put things like hats, raincoats and jumpers. It made them easily accessible as well as using up space that is normally not doing anything. I implemented something similar in the new car.
I also carry a bags in which I put my dirty clothes so that they are separate from my clean clothes.
Recovery and Emergency Gear
I carry a first aid kit, jumper leads and an extensive socket set. There are also spanners and screw-drivers in the rear door. I carry a tyre repair kit as well as a full recovery pack of winch extensions, tree protector, snatch straps, snatch block and more.
On the ladder for the ShippShape tent, I carry a large shovel for recovery and fire purposes.
Suspension Upgrade
In April 2025 I gave the Cruiser a suspension lift. Over the past 9 years it had sagged, especially the rear. In addition, when I did the desert tracks going out to Poeppels Corner in 2021 and in the western deserts in Victoria in late 2024, I constantly bottomed out when going over sand dunes. On the Victorian trip this caused some problems as I got bogged a few times as I was towing the camper. Biggest problem was the bash plate at the front and the towing hooks.
I used TJM in Wollongong and got a lift of 50 mm minimum on the front and over 80 mm on the rear. My main reason for the lift was I am going to cross the Simpson Desert in July 2025. TJM was very responsive in replying to my requests and far cheaper than others when they finally replied. All the other ones near my house either never replied (even to multiple requests) or asked stupid questions when I had already provided that information or was irrelevant. Hopeless!
How does the Cruiser Perform?
Well, I have not yet really used it in really hard 4WD conditions. On the bits where I used in the Victorian High Country where there were some hard bits, it perform as well as I expected. On the sand at Fraser Island it also performed brilliantly. I have used it to tow my boat and can say that its towing ability is awesome. Without a doubt, it is the best 4WD I have ever driven.
Summary
Without a doubt, this is the best car I have owned, with awesome abilities. If you need a 4WD to tow very heavy loads or go into very hard country with a degree of luxury, then this is the one for you.
| 
 v6.00.307 © 2003-2005